How to Install a Doona Car Seat? Step-by-Step Guide for Parents
Quick Answer
To install a Doona car seat, fit the base first with LATCH or a seat belt, set the recline angle, then click the carrier into the base until it locks. The base should move less than one inch side to side at the belt path. Always use the Doona rear-facing, and check the level indicator before every ride. Follow this rear-facing car seat installation guide if you want the wider rear-facing steps alongside the Doona-specific ones.
Install in 5 quick steps
- Place the base: Set it flat on the vehicle seat, with the load leg down if your model has one.
- Attach LATCH or belt: Connect the lower anchors or thread the seat belt through the blue belt path.
- Tighten and lock: Press the base down, pull the strap tight, and lock the seat belt if you use it.
- Set the angle: Adjust the recline foot until the level indicator sits in the green zone.
- Click the carrier in: Lower the Doona onto the base, listen for the click, and tug it to confirm the lock.
Before you drive off
- Do the one-inch test at the belt path, check the harness, and confirm the handle is in the correct carry or drive position for your model.
- If anything feels loose or unclear, stop and re-read the Doona manual for your exact model year.
Installing a Doona feels different the first time, because it is a car seat and a stroller in one unit. I have fitted infant seats in tight back seats, in family SUVs, and in small hatchbacks, and the Doona rewards a slow, methodical first install.
This guide walks through both ways to install it: with the base, and without the base using a seat belt. You will also learn the recline angle, the tightness check, and the mistakes I see most often.
In This Guide
- What Is a Doona Car Seat?
- Before You Start: What to Check and What You Need
- How to Install the Doona Base With LATCH
- How to Install the Doona Without the Base
- How to Click the Doona Into the Base and Check the Fit
- Doona Base vs. Seat Belt Install: Which Should You Use?
- Common Doona Installation Mistakes to Avoid
- Frequently Asked Questions
What Is a Doona Car Seat?
A Doona car seat is an infant car seat with built-in stroller wheels that fold out from underneath the carrier. You carry it as a seat, click it into a car base, or open the wheels and push it like a stroller.
That dual design changes the install in one key way. The carrier itself is a rear-facing-only infant seat, so every car install is rear-facing, with no forward-facing option.
Doona sells the carrier with a base in most sets, and the base stays in the car. You lift the carrier out, fold the wheels in, and click it onto the base when you drive.
The base has a recline foot, a level indicator, and LATCH connectors. Some versions also include a load leg, also called a support leg, which braces against the vehicle floor.
Doona at a glance
- Seat type: Rear-facing-only infant carrier with integrated stroller wheels.
- Install options: With the base using LATCH or a seat belt, or without the base using a seat belt only.
- Key parts: Carrier, base, recline foot, level indicator, LATCH straps, and load leg on some models.
- Best for: Parents who move between car, taxi, and walking often and want one unit for all three.
Pro tip: check the Doona manual for your exact model year, and use the NHTSA recall lookup if you bought the seat used or second-hand.
Section takeaway: The Doona is always rear-facing in the car, and the base is your anchor point — learn the base first, and the carrier click-in becomes simple.
Before You Start: What to Check and What You Need
How long does a first Doona install take? Plan for 20 to 30 minutes the first time, with the manual open beside you.
Later installs take far less time, because the base stays put. You only click the carrier in and out after that first setup.
Pick your seating position before you touch the base. The centre rear seat is often the furthest from a side impact, but only use it if you can get a tight install there.
Many cars have LATCH anchors only in the two outboard rear seats. If the centre has no dedicated anchors, do not borrow anchors from the sides unless your vehicle manual allows it.
What you need
- Doona carrier and base: Check both for damage, missing parts, and the manufacture date label.
- Vehicle manual: Find the LATCH anchor locations, seat belt locking method, and any centre-seat rules.
- Doona manual: Confirm the belt path, handle position, and load leg rules for your model.
- A towel or pool noodle: Use one only if the Doona manual allows it to fix the recline angle.
- Your baby’s weight and height: Confirm they are still inside the Doona limits before you install.
Set the recline foot to the starting position shown in the manual. Do not guess the angle by eye, because a newborn needs a more reclined angle than an older infant.
Read the correct recline angle guidance before you tighten the base, so you know what the level indicator should show for your baby’s age.
Section takeaway: Choose the seat, read both manuals, and set the recline first — a rushed start is the main reason a Doona install ends up loose.
How to Install the Doona Base With LATCH
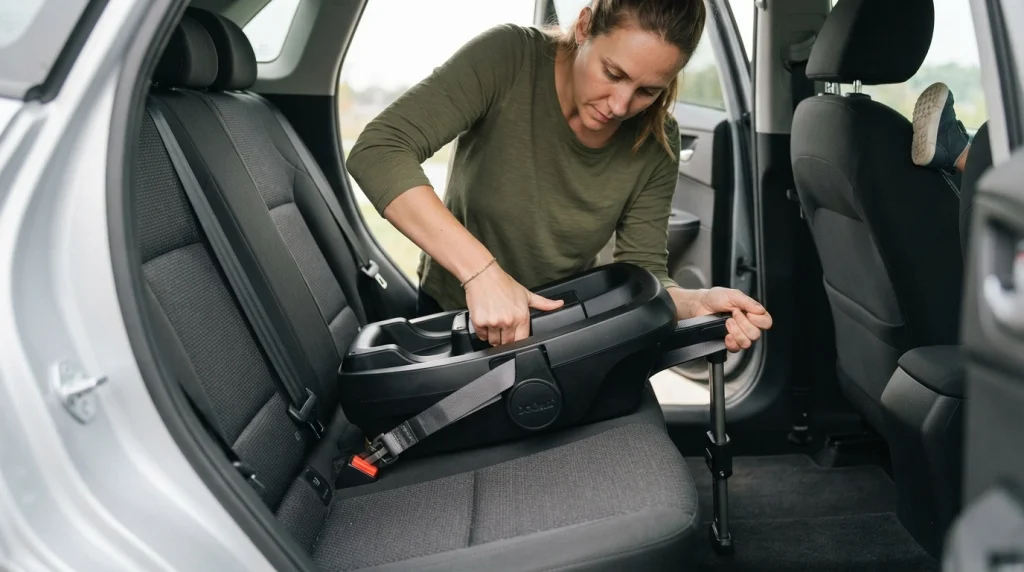
LATCH stands for Lower Anchors and Tethers for Children, and it is the quickest base install for most parents. Use LATCH when your vehicle seat has lower anchors and your baby is still inside the LATCH weight limits in your manuals.
Start by placing the base on the chosen vehicle seat. Keep it centred on the cushion, with the front edge facing the front of the car.
Extend the load leg if your base has one, and set it so it touches the vehicle floor firmly. Do not let it dangle, and do not force it past the floor.
Pull the LATCH connectors out from their storage slots on the base. Clip each connector onto its matching lower anchor in the vehicle seat bight, where the seat back meets the cushion.
Listen for a click on each side, then tug each connector to confirm it is locked. A connector that looks clipped but pulls free is not installed.
Tighten the base step by step
- Press down: Put one knee or a firm hand on the base, pressing it into the vehicle seat cushion.
- Pull the strap: Pull the LATCH adjustment strap slowly, keeping the base level as you tighten.
- Check the angle: Look at the level indicator and adjust the recline foot until it sits in the correct zone.
- Test for movement: Grip the base at the belt path and push side to side and front to back.
- Lock the load leg: Confirm the leg is still touching the floor and locked in place after tightening.
The base should move less than one inch in any direction at the belt path. If it moves more, loosen the strap, re-centre the base, and tighten again with more downward pressure.
For the full anchor method in detail, see the LATCH installation steps for a standard car seat, then apply the Doona base positions from your manual.
Pro tip: check your vehicle manual for the LATCH weight limit, because you must switch to a seat belt install once your child plus the carrier pass that limit.
Section takeaway: Press the base down, pull the strap tight, and pass the one-inch test — a LATCH install that still slides is not finished yet.
How to Install the Doona Without the Base
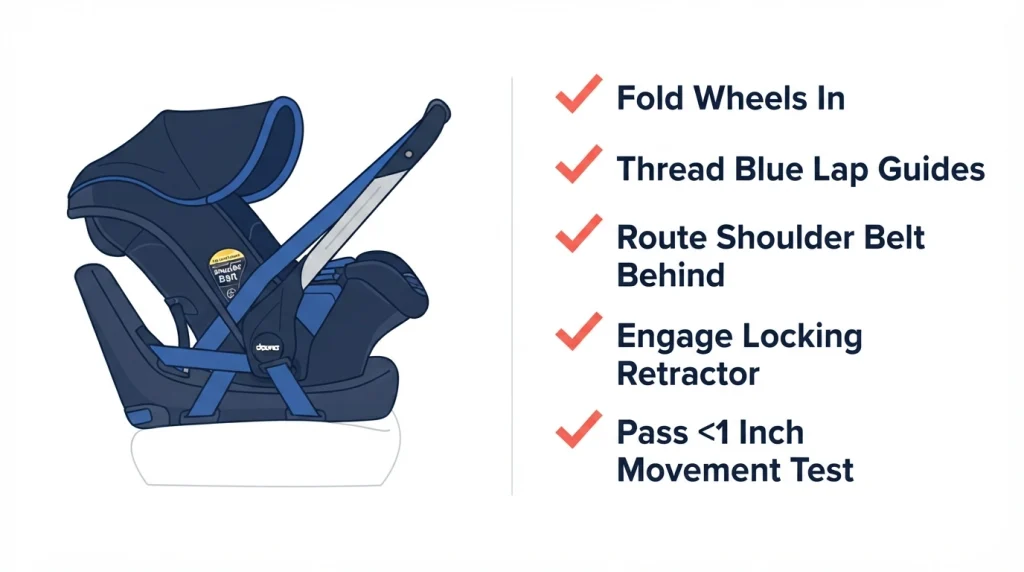
Can you install a Doona without the base? Yes, and this is one of its best features for taxis, rental cars, and travel.
The carrier has a European belt routing path, which means the lap and shoulder belt wrap around the carrier in a specific route. That route holds the seat steady without a base, so do not improvise a different path.
Start by folding the stroller wheels fully in and locking them. Place the carrier rear-facing on the vehicle seat, with the handle in the position your manual shows for a belt install.
Thread the lap belt through the blue belt guides on the carrier. Buckle it, then pull the lap portion tight while you press the carrier into the vehicle seat.
Now route the shoulder belt around the back of the carrier, through the guide at the rear. This is the step most first-time users miss, so follow the blue markings on the shell.
Seat belt install checklist
- Lock the belt: Pull the shoulder belt all the way out to engage the locking retractor, then let it feed back in.
- Remove slack: Press the carrier down and pull the belt tight at the buckle side first.
- Check the angle: Use the level indicator on the carrier side and adjust the carrier position if needed.
- Test for movement: Grip the carrier at the belt path and push side to side — it should move less than one inch.
- Confirm the handle: Set the handle to the drive position shown in the manual before you move off.
Practice this install at home before a trip, not at an airport kerb with a baby in your arms. I did my first baseless practice in my driveway, and the second try took half the time.
The seat belt installation method explains the locking retractor in more detail, which helps if your belt keeps feeding slack back in.
Section takeaway: Follow the blue belt path exactly, lock the belt, and pass the one-inch test — a baseless Doona install is safe when the belt route is correct.
How to Click the Doona Into the Base and Check the Fit
Once the base is tight, the carrier click-in is the easy part. Hold the carrier by the handle, line it up over the base, and lower it straight down.
Listen for a clear click, then lift the carrier handle gently to test the lock. If the carrier lifts off, it was not seated fully, so lift it out and try again.
Check the indicator on the base if your model has one. A green marker usually means the carrier is locked, while red means it is not.
Now check the harness before you put your baby in. The straps should sit at or below the shoulders for a rear-facing baby, with no twists in the webbing.
Buckle the chest clip at armpit level, and tighten the harness until you cannot pinch a fold of strap at the shoulder. This is the pinch test, and it takes five seconds.
Set the handle to the correct position for driving. Some Doona models use the handle as an anti-rebound bar in the car, so the position matters more than it looks.
Use this how to check whether your car seat is installed correctly guide as a second check after your first few Doona installs, until the routine feels automatic.
Section takeaway: Click, tug, and check the harness — the carrier is only ready when the lock holds and the straps pass the pinch test.
Doona Base vs. Seat Belt Install: Which Should You Use?

Both install methods are safe when done correctly, so choose by situation, not by habit. The base wins for daily use, and the belt wins for travel.
Use the base at home, because it is faster to click in and out and easier to get tight every time. Use the belt method in a taxi, a rental car, or on a plane trip where you cannot carry the base.
The base also gives you the load leg and a clearer level indicator. The belt method gives you freedom, but it needs more care with routing and locking.
| Method | Best for | Tightness check | Watch out for |
|---|---|---|---|
| Base with LATCH | Daily driving in your own car | Less than one inch at the belt path | LATCH weight limits, borrowed anchors |
| Base with seat belt | Cars without LATCH, or heavier babies | Less than one inch at the belt path | Belt not locked, slack creeping back |
| Carrier with seat belt, no base | Taxis, rentals, and air travel | Less than one inch at the belt path | Wrong belt route, shoulder belt missed |
Consumer Reports and Edmunds both publish car seat buying and fitting guidance that is useful when you compare install methods across brands.
Section takeaway: Base for daily use, belt for travel — pick the method that fits the car you are in, then run the same tightness check either way.
Common Doona Installation Mistakes to Avoid
A loose base is the top mistake, and it usually comes from not pressing down hard enough while tightening. Put real weight into the base, then pull the strap again.
A wrong recline angle is next, and it is risky for a newborn. A seat that is too upright can let a small baby’s head fall forward, so trust the level indicator, not a guess.
Loose harness straps are common after a clothing change. A thick coat or snowsuit adds slack, so dress your baby in thin layers in the car and add a blanket over the harness.
Forgetting the handle position is a Doona-specific mistake. Check the manual diagram each time until you know the drive position by heart.
Using both LATCH and a seat belt on the base at once is another error, unless both manuals allow it. Pick one method and do it well.
See the common car seat installation mistakes list for the wider errors that affect every infant seat, not just the Doona.
Section takeaway: Tight base, correct angle, snug harness, right handle position — fix those four, and most Doona installs are already safe.
Frequently Asked Questions
Can you install a Doona car seat without the base?
Yes, you can install the Doona carrier with a seat belt only, using the European belt routing path marked in blue on the shell. Lock the belt, remove the slack, and pass the one-inch test at the belt path before you drive.
Is the Doona rear-facing only?
Yes, the Doona is a rear-facing-only infant seat, with no forward-facing mode. Keep your baby rear-facing in the Doona until they pass its weight or height limit, then move them to a convertible seat.
How tight should the Doona base be?
The base should move less than one inch side to side or front to back when you push it at the belt path. If it moves more, re-centre it, press down firmly, and tighten the LATCH strap or seat belt again.
Where is the best place to install a Doona?
The centre rear seat is often a good choice if you can get a tight install there, but the outboard rear seats work well too. Use the seat where the base fits flat, the angle is correct, and the one-inch test passes.
Can you use a Doona on a plane?
Many airlines allow the Doona carrier on board as an infant seat, but rules vary by airline and aircraft. Check with your airline before you fly, and plan to check the base as luggage.
How do I know the carrier is locked into the base?
Lower the carrier straight down until you hear a click, then tug the handle to test the lock. Check the base indicator if your model has one, and confirm the carrier does not lift off the base.
Do I need a car seat check after installing a Doona?
A free check by a certified child passenger safety technician is a smart step after your first install. Car and Driver and safety groups both recommend a professional check if you are unsure about the fit, angle, or harness.
Installing a Doona gets easier every time you do it, and the first careful install is the one that teaches you the feel of a tight base. Take your time, run the checks, and trust the manual over a shortcut.

Daniel Brooks is an automotive writer and product researcher focused on car accessories, car tech, maintenance, and practical driving guides. At Plug-in Car World, he helps drivers make smarter automotive decisions through honest reviews and research-driven content.