How to Check the Correct Car Seat Installation Angle
Quick Answer
To check the correct car seat installation angle, park your car on level ground and check the built-in angle indicator on your car seat base. A rear-facing infant seat requires a 30- to 45-degree recline to keep an infant’s airway open, while forward-facing seats must sit flush against the vehicle seatback according to safety guidelines from the National Highway Traffic Safety Administration.
Quick Verification Steps
- Park level: Position your vehicle on a flat driveway or garage floor.
- Inspect indicator: Locate the bubble level, dial, or etched line on the child seat.
- Read child range: Match the bubble or needle to your child’s specific weight or age zone.
- Adjust base recline: Extend the built-in leveling foot if the indicator falls outside the target zone.
- Perform wiggle test: Firmly tug the belt path to ensure less than one inch of side-to-side motion.
Crucial Safety Tip
- Never place thick aftermarket seat covers or blankets underneath the base, as they compress during a crash and alter your recline angle.
Installing a child safety seat can feel like assembling high-stakes furniture inside a cramped vehicle. I have spent years testing vehicle accessories, child passenger gear, and seat protection setups, and the recline angle remains the easiest detail to get wrong.
This comprehensive guide walks through the exact steps to measure, verify, and lock in the proper angle on any vehicle seat. You will also learn how vehicle seat pitch and protective seat covers impact your final installation.
Why Does Car Seat Installation Angle Matter?
A correct installation angle protects a child’s vulnerable airway and manages crash forces across their body. When an infant sits too upright, their heavy head flops forward, which can pinch their trachea and restrict oxygen.
If a rear-facing seat reclines too far back, crash energy transfers into the child’s shoulders instead of dispersing along the seat shell. Proper alignment balances respiratory safety with dynamic crash protection.
Infants lack neck muscle strength during the first six months of life. Their airway is soft and narrow like a drinking straw.
Even a slight forward slump can drop blood oxygen levels significantly. That is why angle targets for newborns are so strict.
What Is the Proper Recline Angle for Rear-Facing and Forward-Facing Seats?
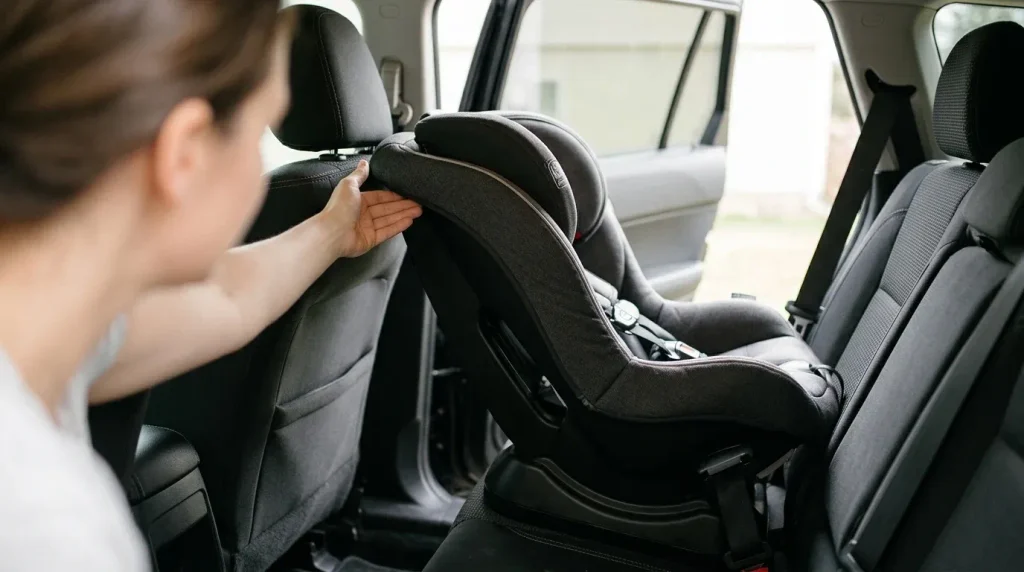
Rear-facing car seats must sit between 30 and 45 degrees of recline depending on the child’s age and developmental stage, while forward-facing seats install upright against the vehicle seatback.
Newborns require the maximum recline of roughly 40 to 45 degrees to maintain head support. Older toddlers with head control can ride safely between 30 and 35 degrees upright.
The chart below breaks down the target recline ranges across different seat configurations and developmental stages as of 2026 standards.
| Seat Stage | Child Age / Group | Target Angle | Key Safety Objective |
|---|---|---|---|
| Rear-Facing Infant | 0 to 4 months | 40° to 45° | Keeps chin off chest and airway open |
| Rear-Facing Convertible | 6+ months (head control) | 30° to 35° | Protects torso and fits tight rear cockpits |
| Forward-Facing Harness | 2 to 4+ years | Upright (seatback flush) | Reduces forward head excursion in a frontal impact |
| High-Back Booster | 4 to 8+ years | Vehicle seatback angle | Positions lap and shoulder belt on pelvic bone and clavicle |
Every brand engineers internal crash kinematics differently. Always prioritize the manufacturer label affixed to the plastic shell of your specific child seat over broad estimates.
The American Academy of Pediatrics offers extensive resources on transitioning between rear-facing and forward-facing setups.
How Do Built-in Car Seat Angle Indicators Work?
Built-in angle indicators are mechanical gauges molded onto the car seat base that signal when the seat rests within safe recline bounds.
Manufacturers integrate these tools so caregivers can evaluate installations instantly without needing specialized carpentry protractors.
Different car seat manufacturers use distinct types of mechanical angle indicators:
- Liquid bubble levels: A floating bubble must rest entirely between two indicator lines, similar to a carpenter’s level.
- Gravity ball dials: A small steel or plastic ball rolls across color-coded zones marked for newborn or toddler stages.
- Pendulum needles: A weighted swinging arm points to numbered degrees or shaded recline tracks.
- Molded level lines: A raised horizontal line embossed on the plastic shell that must align parallel to flat ground.
Read your bubble level at direct eye level. Looking down from above skews the bubble’s apparent position and can trick you into thinking a steep angle is safe.
How to Check the Correct Car Seat Installation Angle Step-by-Step
Checking your angle requires a flat working surface, proper seat preparation, and a methodical tightening sequence. Follow these step-by-step instructions to get a dependable result every single time.
Step 1: Park on Truly Level Ground
Driveway inclines distort built-in angle gauges completely. A 5-degree driveway slope will turn an acceptable 40-degree seat angle into a dangerously upright 35 degrees or a floppy 50 degrees.
Park inside an enclosed garage, on an empty commercial parking deck, or on an asphalt road surface without a heavy crown. Your vehicle suspension must rest evenly.
Step 2: Inspect Vehicle Seat Cushion Contour
Vehicle seats are angled back intentionally for adult thigh support, which creates deep bights at the seatbelt anchors. Bucket seats in sports sedans and crossovers often present extreme backward slopes.
These steep cushions force child seats to tip further upright than intended. Identify whether your bench has aggressive bolsters or flat seating areas before clipping your lower anchors.
Step 3: Route and Cinch the Anchor System
Connect your lower LATCH connectors or route the vehicle seatbelt through the marked rear-facing belt path. Press firmly into the center of the child seat with your hand or knee while removing belt slack.
Tighten the strap smoothly. Do not pull with extreme force at an awkward angle, which can lift one side of the base higher than the other.
Step 4: Read the Gauge at Rest
Step back from the open vehicle door and look straight at the indicator bubble or line. Ensure the bubble sits centered between the designated newborn lines if your child is under six months.
If your seat features a dual-zone pendulum, confirm the pointer rests inside the proper weight band. Note whether the base tipped during belt tightening.
Step 5: Perform the 1-Inch Belt Path Test
Grab the car seat shell right at the belt path using your non-dominant hand. Pull firmly side-to-side and front-to-back using moderate muscle force.
The seat should not move more than one inch in any direction. If the base slides freely, loosen the strap, adjust your recline foot, and re-tighten the system.
For independent safety testing data and defect notices, consult Consumer Reports before installing unfamiliar gear.
How Does a Car Seat Cover Affect Your Angle?
A vehicle seat cover alters how a car seat base grips the vehicle upholstery and can change your recline angle over time. Smooth PU leather and waterproof polyester covers introduce slip resistance differences compared to raw cloth benches.
Many vehicle owners use protective covers to shield expensive leather from baby spills and heavy plastic pressure marks. The issue arises when those protectors are excessively thick or heavily padded.
Watch for these common issues when pairing protective covers with child seats:
- Foam compression: Thick foam mats compress after a few miles of driving, introducing sudden slack into your tightened belt.
- Angle drift: Padded mats prop the heel of the base upward, pushing a rear-facing newborn seat into an unsafe upright tilt.
- Buckle interference: Stiff fabric can cover the lower LATCH anchors, preventing connectors from seating flat against the chassis wire.
- Surface slippage: Low-grip backing materials can slide across slick leather seats during aggressive cornering.
If you use a protective cover, pick an ultra-thin, dense mat designed specifically for crash compatibility. Verify that the seat manufacturer explicitly permits mats underneath their base.
I always test car seats with and without the mat installed. If the indicator bubble shifts positions when the mat is present, that protective layer is altering your safety geometry and must go.
How Can You Fix an Incorrect Recline Angle?
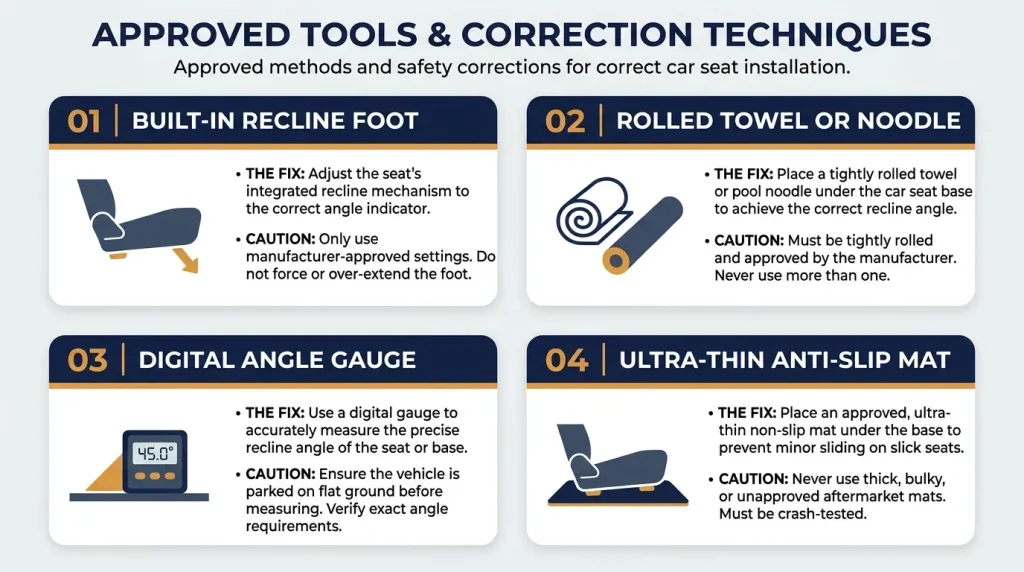
You can correct an improper car seat angle by using the base’s integrated leveling foot, adjusting vehicle seatback tilts, or using a tightly rolled towel when permitted by the manufacturer.
Most modern infant bases include multi-position adjustment dials. Extend the leveling leg out one click if your bubble shows the seat is sitting too upright.
If your base lacks an adjustable foot, consult your manual regarding tightly rolled towels or high-density foam pool noodles.
The following tools and accessories help you achieve and maintain an exact angle:
- Integrated recline foot: Push the release button under the base to drop the plastic kickstand down into deeper vehicle cushion pockets.
- Rolled towel or noodle: Place a tightly rolled cotton towel directly in the seat bight to lift the foot-end of the car seat.
- Digital angle finder: Place a digital inclinometer against the child seat backrest to verify angles within a tenth of a degree.
- Anti-slip thin protector: Use an ultra-thin rubber mat to stop slick car seat bases from sliding on treated vehicle leather.
Never layer more than one rolled towel or stack noodles unless your specific car seat instruction booklet explicitly allows it. Over-propping the base creates severe instability during sudden steering maneuvers.
What Are Common Car Seat Angle Mistakes to Avoid?
Caregivers frequently introduce hidden angle errors while tightening straps, organizing vehicle cargo, or compensating for child growth.
Catching these errors early prevents dangerous head slumping and keeps your harness positioned over vital skeletal structures.
Avoid these widespread car seat angle errors during your next check:
- Ignoring vehicle slope: Reading your bubble indicator while parked on a sloped residential driveway.
- Over-reclining older toddlers: Leaving an older child at a 45-degree recline, which exposes their shoulders to excess frontal impact load.
- Adding aftermarket head pillows: Shoving fluffy head huggers behind an infant’s neck, forcing their chin down toward their chest.
- Over-tightening forward tethers prematurely: Cranking down the top tether strap before the bottom belt path is locked, which can lift the base up.
Keep a simple digital level in your glove box. Measuring the vehicle door sill first gives you a true reference point before evaluating your car seat.
If you’re ready to pick gear that simplifies this process, here’s what I’d actually recommend based on real-world vehicle testing:
🏆 Best Overall Protector
Diono Super Mat Seat Protector
★★★★★
Dense vinyl-coated construction with ultra-thin profile that prevents compression. I use this specific mat because it shields leather without shifting the car seat angle or masking anchor bights.
🔧 Best Calibration Tool
Klein Tools Digital Angle Gauge
★★★★★
High-contrast backlit LCD with magnetic base and precision dual-axis range. This tool lets you zero out your vehicle floor slope so you get an undeniable angle reading on any car seat shell.
💰 Best Value Installation Aid
Munchkin Brica Elite Seat Guardian
★★★★☆
Molded dual-grip traction technology with high dirt-catching perimeter walls. It offers exceptional seat upholstery defense for messy toddlers while maintaining solid friction along vehicle leather.
Frequently Asked Questions
Can I use my smartphone level app to check the angle?
Smartphone level apps can be reasonably accurate if you calibrate them against a level surface first. Always place the long edge of the phone along the manufacturer’s molded reference line on the shell rather than against the soft fabric padding.
What should I do if my vehicle seats slope too steeply?
If your vehicle seats slope backward sharply, extend the child seat base’s built-in leveling foot to its lowest setting. If that fails to level the bubble, consult your car seat manual to confirm whether a tightly rolled towel is permitted in the bight.
Does the car seat angle change as my baby grows?
Yes, the required recline angle changes as your child develops upper body strength. Newborns require a deeper 40- to 45-degree angle to protect breathing, while toddlers past six to nine months can sit more upright at roughly 30 to 35 degrees.
Can a car seat cover void the car seat warranty?
Using unapproved aftermarket seat mats can void the warranty or crash guarantee of certain car seat brands. Always read your child seat user manual to confirm which under-seat protectors or seat covers are tested and permitted for that specific model.
Checking your car seat installation angle takes less than five minutes, but it provides vital protection for your child every time you put the car in drive. Take a moment today to park on flat ground, check your level indicator, and ensure your child rides safe, comfortable, and secure.

Daniel Brooks is an automotive writer and product researcher focused on car accessories, car tech, maintenance, and practical driving guides. At Plug-in Car World, he helps drivers make smarter automotive decisions through honest reviews and research-driven content.