Common Car Seat Installation Mistakes and How to Avoid Them
Quick Answer
The most frequent car seat installation errors involve loose harness straps, incorrect recline angles, and unsecured seat belts or LATCH anchors. Using bulky aftermarket padding or the wrong car seat cover can also interfere with side-impact airbags and harness tension.
Primary Installation Pitfalls
- Excessive base movement: The seat base moves more than one inch side-to-side at the belt path.
- Dual attachment error: Using lower LATCH anchors and the vehicle seat belt at the same time.
- Loose chest clip: Placing the harness retainer clip across the abdomen instead of armpit level.
- Omitted top tether: Skipping the top tether strap on forward-facing convertible seats.
The 10-Second Verification Test
- Perform the pinch test on the shoulder harness webbing; if you can pinch any slack vertically, tighten it further.
Installing a child restraint system can quickly turn frustrating when dealing with stiff latch belts and contoured vehicle cushions. A single misplaced strap or thick seat protector can compromise your child’s security during a sudden stop.
This hands-on guide details the most common installation blunders, how aftermarket seat protectors factor into fitment, and the exact steps to keep your setup rock-solid.
What Is the One-Inch Rule for Car Seat Stability?
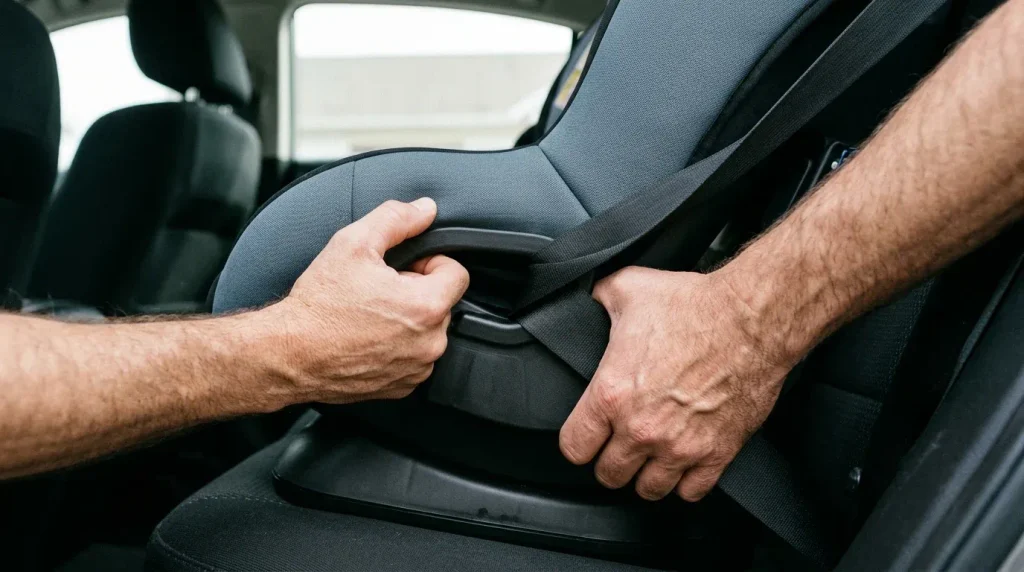
The one-inch rule states that a properly secured car seat base must not shift more than one inch in any direction when gripped directly at the belt path.
Testing this movement requires gripping the seat shell where the seat belt or lower anchor webbing routes through the plastic frame.
Push and pull firmly side-to-side and front-to-back using moderate physical force.
Movement at the top of the child seat does not indicate a loose installation. Only movement measured at the actual belt routing path counts toward the standard.
Pro Tip: Check your vehicle manual before tightening. Many automotive seat belts require pulling the shoulder webbing out completely to activate the automatic mechanical retractor lock.
Why Do Parents Accidentally Use Both LATCH and Seat Belts Together?
Many caregivers assume that combining lower LATCH straps with the vehicle’s standard three-point seat belt doubles crash protection.
Using both systems simultaneously can place unexpected shear loads on the seat base during a crash, unless both manufacturers specifically permit dual installation.
The two systems interact differently under heavy impact forces.
Child restraint crash structures are tested and rated for energy dissipation along a single, designated load path.
Federal safety agencies like the NHTSA advise selecting one attachment method unless the child seat manufacturer manual explicitly documents a dual-use exception.
Can a Car Seat Cover or Protector Compromise Installation Safety?
A thick car seat cover creates artificial clearance between the vehicle upholstery and child restraint base, allowing unexpected slack after heavy compression.
Soft foam padding compresses instantly during sudden deceleration, which turns a seemingly tight base into a loose installation.
Aftermarket covers can also obstruct critical vehicle safety hardware.
Here are the primary hazards associated with improper covers and protectors:
- Airbag deployment blockage: Side-impact airbags built into vehicle seat bolsters can fail to fire correctly through thick fabric seams.
- Anchor occlusion: Heavy neoprene slips over lower anchor steel bars, preventing positive latch clicks.
- False harness tension: Fluffy wearable blankets and thick seat covers keep internal harness buckles from latching flush against the child’s hips.
Look for ultra-thin, crash-tested protectors with non-slip grips that keep vehicle leather clean without adding bulky padding beneath the base.
Comparison of Securement Methods and Protector Types
Choosing the correct attachment method and seat protection setup depends directly on your vehicle’s seating structure and the child’s weight.
Review the technical trade-offs below before locking your seat into place.
| Installation Factor | Lower LATCH Anchors | Vehicle 3-Point Belt | Dense Foam Mat | Thin Anti-Slip Mat |
|---|---|---|---|---|
| Weight Limit | Max 65 lbs (seat + child) | Vehicle belt capacity | N/A (Avoid use) | Universal |
| Ease of Tightening | High (cam buckles) | Moderate (requires locking retractor) | Misleading tension | Maintains direct contact |
| Movement Resistance | Rigid at bight line | High with locking clip | Poor under impact compression | Excellent surface grip |
| Safety Recommendation | Ideal for early stages | Required for heavier children | Not approved by CPSTs | Approved if manufacturer allows |
How Do You Avoid the Most Critical Harness Routing Errors?
Harness straps must lie flat against the child’s chest without any twists or bunching along the plastic backplate.
Twisted harness webbing concentrates crash forces across a narrow area instead of spreading energy across the child’s skeletal frame.
Harness height changes depending on the seat’s orientation.
Position the straps using these spatial rules:
- Rear-facing position: Route harness straps through the slots at or directly below the child’s shoulders.
- Forward-facing position: Route harness straps through the slots at or directly above the shoulders.
- Retainer chest clip: Keep the plastic buckle level with the child’s armpits across the center of the sternum.
Never place the chest clip across the soft abdomen where it can cause internal injuries during a collision.
Take off bulky winter coats before buckling your child into the seat.
Puffy jackets leave inches of hidden slack that allows the child to slip loose during a rapid stop.
Why Is the Top Tether Frequently Ignored on Forward-Facing Seats?
The top tether reduces forward head excursion by up to eight inches during a frontal crash.
Head excursion refers to how far forward a child’s head and spine whip during a high-speed stop.
Caregivers frequently confuse rear cargo tie-downs with designated structural top tether anchors.
Cargo hooks are stamped metal rings designed for grocery nets, not multi-thousand-pound crash impacts.
Review your vehicle manual to locate the specific anchor symbol, usually stamped on the parcel shelf, seat back, or ceiling.
Organizations like the American Academy of Pediatrics urge using the top tether on every single forward-facing installation, whether secured with LATCH or seat belts.
What Is the Correct Way to Verify the Recline Angle?
Infants possess weak neck muscles that cannot support their heavy heads if the car seat sits too upright.
An improper recline angle allows the infant’s chin to drop down onto the chest, which can cause positional asphyxiation.
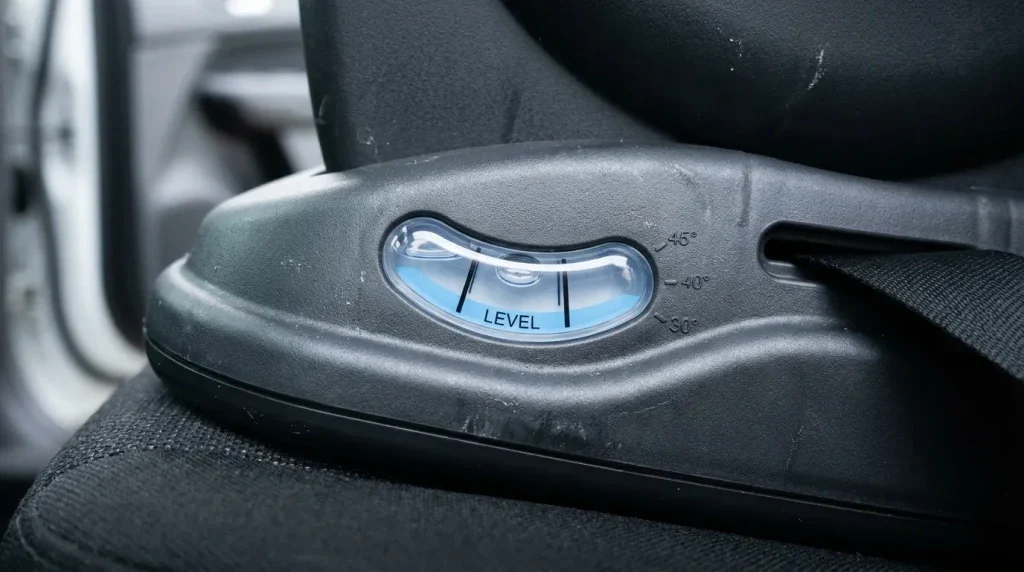
Most modern car seat bases feature integrated bubble levels or colored pendulum indicators on the plastic shell.
Park your vehicle on level ground before reading the indicator.
Sloped driveways throw off the bubble glass and lead to incorrect angle adjustments.
If you need deeper maintenance on your vehicle’s interior surfaces during changes, consult our EV seat upholstery cleaning tips to preserve your seat materials.
If you’re ready to pick gear that secures your seat and guards your vehicle upholstery without creating dangerous slack, here is what I recommend:
🏆 BEST OVERALL
Diono Ultra Mat Car Seat Protector
★★★★★
High-density molded panels with crash-tested webbing slots. It prevents deep upholstery gouges while keeping the base firmly planted without dangerous foam slip.
💰 BEST VALUE
Lunchkins Non-Slip Seat Guard
★★★★☆
Ultra-slim vinyl barrier featuring dual-sided traction dots. I keep one in our secondary commuter car because it adds zero bulk under the belt path.
🚗 BEST LOW-PROFILE COVER
Brica Seat Guardian Mat
★★★★☆
Dual Grip traction technology with molded spill catchments. It easily accommodates rear-facing foot angles without interfering with LATCH strap ratchets.
Frequently Asked Questions About Car Seat Installation
When should I switch my child from rear-facing to forward-facing?
Keep your child rear-facing as long as possible until they hit the maximum height or weight limit of the car seat. Most convertible seats support children up to 40 or 50 pounds rear-facing.
Can I install a car seat in the front passenger seat?
Never install a rear-facing car seat in the front passenger seat with an active front airbag. The force of a deploying passenger airbag can strike the child restraint shell and cause fatal injuries.
Do lower LATCH anchors expire or have weight limits?
Lower anchors have a combined weight limit of 65 pounds, which includes the weight of the car seat plus the child. Once exceeded, you must switch to the vehicle’s locked seat belt.
How do I verify if my car seat installation is fully correct?
Schedule an in-person inspection with a certified Child Passenger Safety Technician (CPST). Technicians inspect routing, seat belt locking mechanisms, and harness tension to ensure complete regulatory compliance.
Double-check your car seat installation before every road trip to catch loose straps or shifted bases early. Taking ten minutes to confirm your belt paths and harness clearances ensures your child stays fully protected on the road.

Daniel Brooks is an automotive writer and product researcher focused on car accessories, car tech, maintenance, and practical driving guides. At Plug-in Car World, he helps drivers make smarter automotive decisions through honest reviews and research-driven content.