How to Install a Rear-Facing Car Seat (and Seat Cover Safety)
Quick Answer
To install a rear-facing car seat correctly, position the base flat on your vehicle seat, route either the lower anchor strap or seat belt through the designated rear-facing belt path, press down firmly with your weight, and tighten until the base moves less than one inch at the belt path. Always verify child passenger safety standards via NHTSA guidelines before hitting the road.
Crucial Installation Steps at a Glance
- Select the seating position: Back seat placement is mandatory, with the center or rear passenger side being optimal.
- Choose your attachment method: Use either lower LATCH anchors or the vehicle seat belt, never both at once.
- Check the recline indicator: Align the built-in bubble or line level to the specified age angle.
- Apply downward body weight: Push down directly into the seat bight while cinching the webbing slack.
- Perform the one-inch test: Grip the belt path firmly; movement side-to-side or front-to-back must stay under one inch.
Vehicle Seat Cover Safety Rule
- Never install aftermarket seat protectors or thick upholstery covers unless explicitly crash-tested and approved by your child restraint manufacturer.
Installing your first rear-facing car seat feels overwhelming when you face confusing belts, metal latches, and tight cabin angles. I have spent years testing vehicle accessories and child seat setups, and I know how easy it is to second-guess yourself.
This hands-on guide walks you through every mechanical step, from routing anchors to pairing vehicle seat covers safely. You will finish with complete confidence that your child travels securely every mile.
What Is a Rear-Facing Car Seat Installation?
A rear-facing car seat installation is an engineered restraint system that positions an infant or toddler facing the rear window of a passenger vehicle. This orientation distributes crash impact energy across the child’s entire back, neck, and head rather than concentrating force on fragile cervical vertebrae.
Modern rear-facing seats secure to your vehicle structure using one of two approved systems:
- Lower Anchors and Tethers for Children (LATCH): Built-in metal bars hidden in the vehicle seat crease paired with dedicated car seat connector straps.
- Vehicle Seat Belt: A standard lap-and-shoulder belt routed through the safety shell and locked in place using a retractor mechanism or built-in lockoff clamp.
Both methods offer equal safety protection when installed correctly. You must select one system rather than trying to combine them.
Combining LATCH and a seat belt introduces unverified crash dynamics. Stick to one method unless your car seat manual specifically mandates a dual-attachment configuration.
Can You Use a Seat Cover Under a Rear-Facing Car Seat?
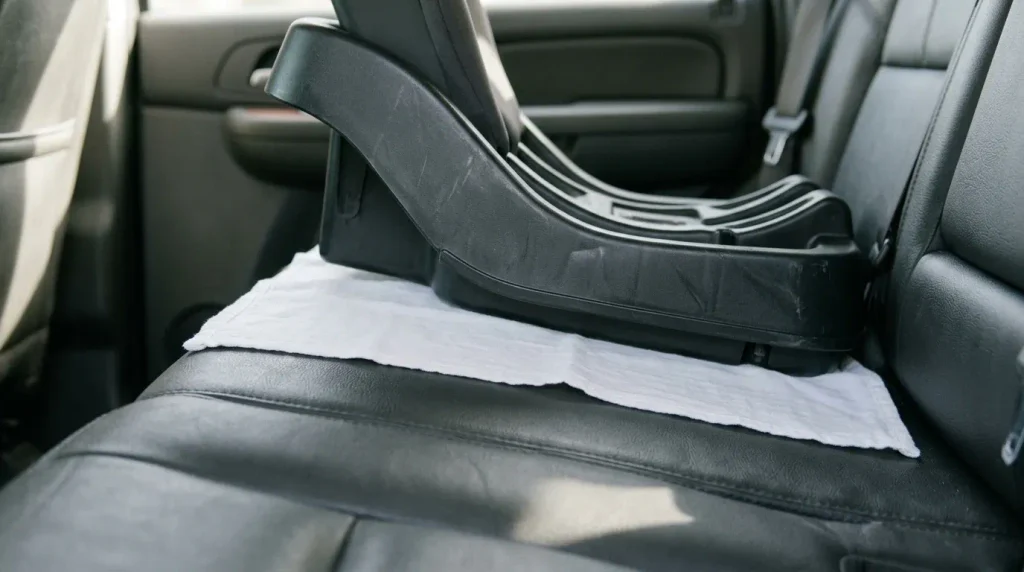
You should generally avoid placing thick, aftermarket seat covers or padded upholstery mats beneath a rear-facing car seat. Most child restraint manufacturers prohibit unapproved third-party covers because they introduce artificial slack during a high-speed collision.
Thick materials compress under extreme crash forces. That compression creates sudden looseness in your harness and vehicle belts.
This unexpected slack allows the restraint to slide violently forward. As of 2026, leading safety bodies and crash-test technicians caution against using non-certified seat protectors on car upholstery.
If you want to protect leather or fabric seats from permanent indentations, consider these safe alternatives:
- Manufacturer-tested mats: Use only seat guards sold or certified by your specific car seat brand.
- Thin cotton towel method: A single-layer, non-folded cotton receiving towel laid smoothly across the vehicle seat cushion if your car seat manual explicitly permits it.
- Crash-tested kick mats: Suspended fabric shields attached to the front seat backrest, keeping dirty toddler shoes off upholstery without sitting under the base.
Never compromise installation tightness for cosmetic interior preservation. Clean upholstery can never replace structural stability.
Step-by-Step Guide: How to Install a Rear-Facing Car Seat with LATCH
The lower anchor system provides a straightforward way to anchor your seat base directly to the vehicle chassis. Follow these numbered steps to lock it down properly.
- Locate the lower anchor bars: Run your fingers along the bight—the junction where your vehicle’s seatback meets the bottom cushion—to find the small horizontal steel anchors.
- Position the base or convertible seat: Set the restraint flat on the vehicle cushion, ensuring the base faces backward toward the trunk.
- Check the recline indicator: Adjust the seat’s leveling foot until the built-in bubble gauge or ball rests within the designated zone for your child’s age group.
- Route the lower anchor webbing: Thread the anchor strap through the clearly marked rear-facing belt channel, making sure the webbing lays flat without twists.
- Attach the connectors: Click each LATCH hook or rigid connector onto the corresponding vehicle anchor bar until an audible click sounds.
- Compress and pull: Place one hand firmly into the center of the car seat, press down with your upper body weight, and pull the free end of the strap parallel to the belt path.
- Verify the one-inch wiggle test: Grab the seat directly at the belt path with your non-dominant hand and pull firmly; movement must stay under one inch in all directions.
LATCH systems carry strict child-plus-seat weight limits, typically capping out between 65 and 69 pounds combined. Check your manual once your child hits toddler milestones to transition to the vehicle seat belt in time.
Step-by-Step Guide: How to Install with a Vehicle Seat Belt
Vehicle seat belt installations work universally across almost every vehicle make, model, and seat position. This approach eliminates worries about LATCH weight capacity as your child grows.
- Position the base and check recline: Place the seat against the vehicle cushion and align your recline angle indicator properly.
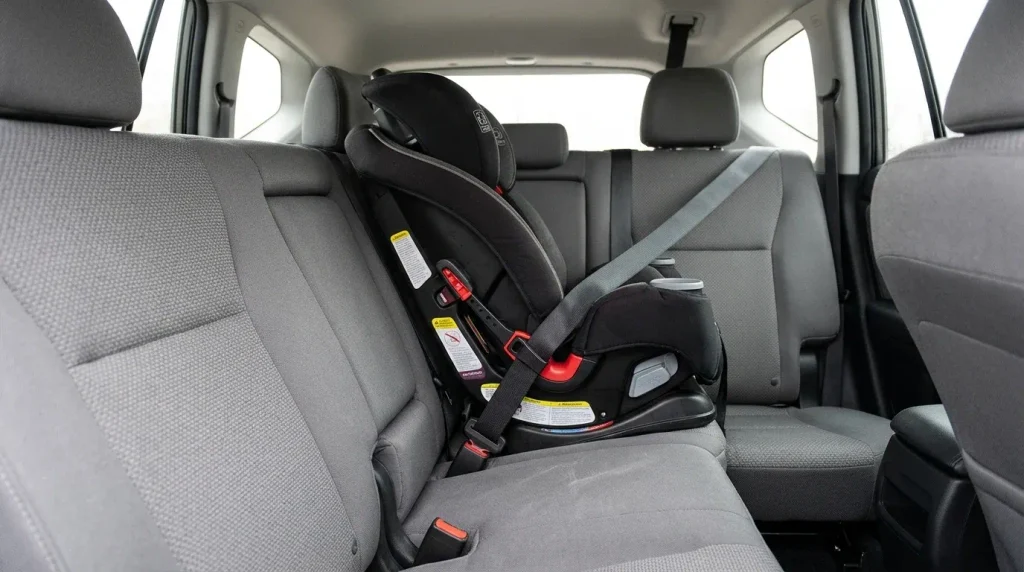
- Route the belt: Pull the vehicle belt webbing out and slide both the lap and shoulder sections through the rear-facing belt path slots.
- Buckle the latch plate: Push the metal latch plate into the vehicle buckle until it clicks securely into place.
- Activate the belt lock: Pull the shoulder strap all the way out until you hear a soft mechanical click to engage the emergency locking retractor (ALR mode), or clamp the seat’s built-in lockoff arm over the webbing.
- Apply firm downward pressure: Press your knee or palm into the center of the shell to compress vehicle seat padding.
- Feed the slack back: Push all remaining webbing back into the vehicle retractor while maintaining firm downward pressure on the seat.
- Confirm stability: Test the base at the belt path; it must not shift more than one inch from side to side or forward.
The belt must lock firmly into position. Unlocked seat belts allow the car seat to rotate freely during an abrupt stop.
LATCH vs. Vehicle Seat Belt Installation
Choosing between lower anchors and a standard seat belt depends on your vehicle layout, car seat design, and child weight. Both methods pass the identical federal crash testing standards.
| Feature | LATCH System | Vehicle Seat Belt |
|---|---|---|
| Seating Flexibility | Usually outboard seats only; rare in center | Works in virtually all rear seating spots |
| Weight Limits | Strict limits (usually 65 lbs combined weight) | No lower anchor weight limit restrictions |
| Installation Ease | Fast click-in design; can be hard to reach | Straightforward routing; requires retractor lock |
| Center Seat Borrowing | Prohibited unless car maker explicitly allows it | Fully permitted and recommended |
| Crash Performance | Equal safety rating | Equal safety rating |
Check your vehicle owner manual before attempting LATCH borrowing in the middle seat. Most automakers do not space center anchors for standard child seat attachments.
When in doubt, use the center seat belt. The center location provides maximum clearance from side-impact cabin intrusions.
Critical Rear-Facing Safety Rules to Remember
Small setup mistakes can reduce a car seat’s effectiveness. Keep these fundamental safety principles in mind before placing your infant in the restraint.
- Keep harness straps at or below the shoulders: In rear-facing seats, harness straps must emerge from slots located level with or slightly below your child’s shoulder line to prevent upward sliding.
- Set chest clips to armpit level: Fasten the chest retainer clip across the center of your child’s sternum, aligned with their armpits.
- Pass the pinch test: After tightening the harness, try pinching webbing horizontally at the child’s collarbone; if your fingers grasp extra fabric, cinch tighter.
- Avoid bulky winter coats: Puffy outerwear flattens in a collision, leaving dangerous harness slack. Dress infants in thin layers and tuck blankets over the buckled harness instead.
- Never place in front of an active airbag: An inflating passenger airbag will strike a rear-facing shell with severe force. Always install in the rear row.
Consult certified technicians through groups like Safe Kids Worldwide for hands-on seat checks. Having a professional inspect your work gives peace of mind.
If you need certified gear to keep your car clean while keeping installations safe, here is what I recommend:
🏆 BEST OVERALL PROTECTION
Diono Ultra Mat Car Seat Protector
★★★★★
Crash-tested high-density foam panels with water-resistant non-slip backing. I have used this mat across multiple vehicles without experiencing belt slippage or deep leather grooves.
💰 BEST BUDGET KICK MAT
Munchkin Brica Kick Mats (2-Pack)
★★★★☆
Durable polyester fabric with dual adjustable straps designed to hang on front seat backs. This shields your car from scuffs without interfering with base installation mechanics.
🛡️ BEST CONVERTIBLE RESTRAINT
Graco Extend2Fit Convertible Car Seat
★★★★★
Supports rear-facing setups up to 50 pounds with a 4-position extension panel for legroom. My favorite convertible seat for keeping kids rear-facing well into their toddler years.
Frequently Asked Questions
How long should a child stay in a rear-facing car seat?
Keep your child rear-facing as long as possible until they hit the maximum height or weight limit of their specific seat. The American Academy of Pediatrics recommends rear-facing up to age two or beyond, as toddler skeletons benefit from the full shell support during sudden stops.
Can a rear-facing car seat touch the front vehicle seat?
Check both your car seat and vehicle owner manuals, as rules vary by automaker. Many modern vehicles with advanced front passenger airbags require a clear gap between the child seat and front seatback to prevent sensor interference.
Is it safer to install a car seat in the middle or side rear seat?
The rear center seat is statistically the safest location because it sits furthest away from side-impact intrusions. However, an outboard seat with a rock-solid, tight installation is always safer than a poorly anchored center installation.
Do I use the top tether strap on a rear-facing car seat?
Most American rear-facing car seats do not use top tethers, though select European-style models and anti-rebound bars incorporate them. Always read your specific car seat instruction booklet to verify whether rear-facing top tethering is approved.
Secure Your Child Restraint Today
Achieving a safe rear-facing car seat installation requires patience, the right angle, and proper tightening. Put your weight into the seat base, confirm minimal play at the belt path, and keep non-approved seat covers off your upholstery.
Double-check your manual today to verify your current weight limits. Take ten minutes this weekend to run the one-inch test on your vehicle setup.

Daniel Brooks is an automotive writer and product researcher focused on car accessories, car tech, maintenance, and practical driving guides. At Plug-in Car World, he helps drivers make smarter automotive decisions through honest reviews and research-driven content.