How to Check Whether Your Car Seat Is Installed Correctly
Quick Answer
To check whether your car seat is installed correctly, grip it at the belt path and move it side to side and front to back. It should move no more than 1 inch (2.5 cm) in either direction. Also confirm the correct installation method, recline angle, tether connection when required, and harness fit using the NHTSA car seat installation guidelines.
Six essential safety checks
- One-inch movement: The installed seat moves no more than 1 inch at its belt path.
- Secure installation: The seat uses correctly routed, tightened, and secured lower anchors or a locked seat belt.
- Correct recline: A rear-facing seat’s angle matches its manufacturer’s indicator and instructions.
- Top tether: A forward-facing harnessed seat uses its approved tether anchor when permitted by both manufacturers.
- Snug harness: Shoulder straps lie flat, pass the pinch test, and position the chest clip at armpit level.
- Proper fit: The child meets the seat’s height, weight, and directional requirements.
Important safety reminder
- When in doubt: Have a certified Child Passenger Safety Technician inspect the installation before using the seat.
Installing a child car seat can feel straightforward until you start checking the details. A seat might look secure while hiding a loose belt, incorrect recline angle, or poorly positioned harness.
I prefer a simple inspection routine over guessing whether something feels right. This guide explains how to check your car seat installation, identify common mistakes, and know when professional help makes sense.
In This Guide
- How Can You Tell if a Car Seat Is Installed Correctly?
- How Do You Check a Car Seat Installation Step by Step?
- What Changes for Rear-Facing, Forward-Facing, and Booster Seats?
- How Do You Know the Car Seat Harness Fits Correctly?
- What Are the Most Common Car Seat Installation Mistakes?
- When Should You Get a Professional Car Seat Inspection?
- Frequently Asked Questions
How Can You Tell if a Car Seat Is Installed Correctly?
A correctly installed car seat stays firmly secured at its designated belt path, fits the vehicle, and follows both manufacturers’ instructions. The child must also fit the seat and be restrained correctly.
Those requirements work together. A tight installation cannot compensate for a loose harness or an unsuitable seat.
What does a properly installed car seat look like?
A properly installed seat should meet several visible and physical checks. Use this checklist before your next drive.
- The child restraint faces the approved direction for the child’s size and the seat’s limits.
- The seat belt or lower anchor strap follows the correct installation path.
- The installation does not shift more than 1 inch at the belt path.
- The installation belt remains secured and properly tightened.
- Any required recline indicator falls within its approved range.
- Required tether or support components follow the manufacturer instructions.
- The harness and buckle operate properly without damaged or twisted straps.
- The seat does not interfere with nearby passengers or vehicle safety equipment.
Check the seat’s instruction manual for features specific to your model. A load leg, anti-rebound bar, or special lock-off may require an additional check.
Start with the seat label and two instruction manuals
Before testing the installation, confirm that the child still fits the restraint. Read the car seat label, car seat manual, and vehicle owner’s manual.
These documents answer questions that a general installation video cannot resolve.
- Child limits: Confirm the allowed weight and height for the current seating direction.
- Vehicle seating position: Identify approved installation locations and anchor points.
- Installation method: Check whether the seat allows a seat belt, lower anchors, or particular combinations.
- Seat belt locking: Locate the vehicle’s instructions for securing a child restraint.
- Special requirements: Check recline indicators, tether routing, headrest rules, and accessories.
Look at the seat’s model number and manufacture date while you’re checking its label. These details also help you investigate expiration guidance and recalls.
Does the middle of the back seat always work best?
The rear seat is the recommended place for children under 13. The center position can be a good choice when the car seat installs correctly there.
However, some vehicles do not provide dedicated lower anchors in the center. Others have seat contours or belt geometry that complicate installation.
Never assume that the inner anchors from two outside seating positions can serve the middle seat. Both the vehicle and car seat manufacturers must expressly permit that arrangement.
A secure installation in an approved outer rear seating position is preferable to a poorly installed seat in the center.
Pro tip: Use your vehicle’s official seating-position diagrams rather than choosing an anchor based only on its appearance.
How Do You Check a Car Seat Installation Step by Step?
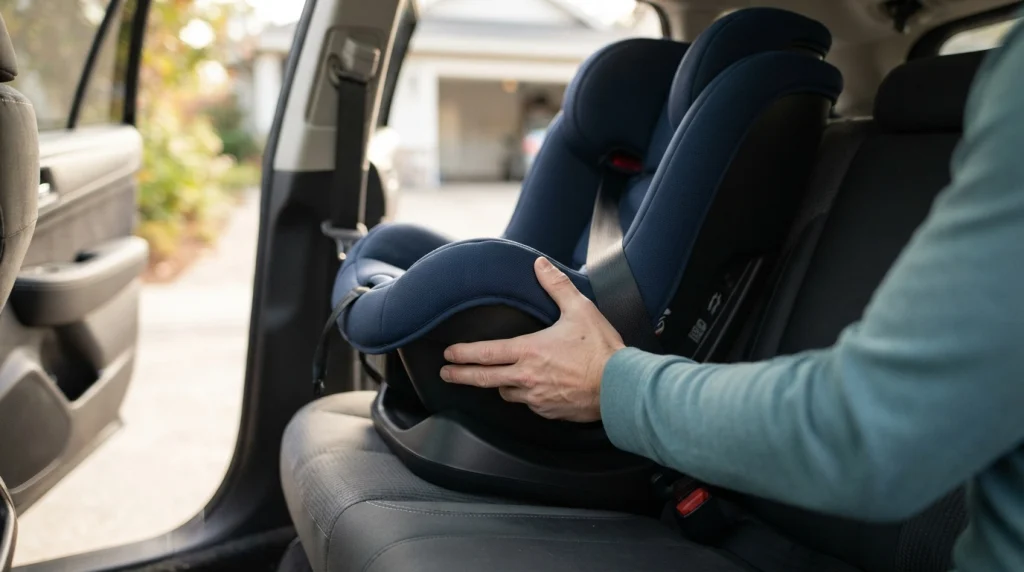
Start at the belt path, verify the attachment method, and then check the seat’s position and safety features. This sequence catches many installation problems without unnecessarily disturbing a secure seat.
Step 1: Perform the one-inch test
The one-inch test checks how securely a child restraint attaches to the vehicle. It applies to rear-facing and forward-facing harnessed seats.
- Locate the belt path used for the current installation.
- Place one hand on the car seat at that belt path.
- Apply a firm, controlled side-to-side movement.
- Check movement toward the front and rear of the vehicle.
- Confirm movement stays within 1 inch (about 2.5 cm) in both directions.
Do not test by aggressively shaking the top of the seat. The upper end of a rear-facing seat may move more because it is farther from its attachment point.
The measurement that matters is movement where the car seat connects to the vehicle. Safe Kids Worldwide also explains this in its car seat installation guidance.
If movement exceeds the limit, reinstall and retest according to the manuals. Do not drive with an installation that fails the test.
Step 2: Check the seat belt or lower anchors
There are two common installation methods in U.S. vehicles: the vehicle seat belt and lower anchors. Lower anchors are part of the LATCH system, meaning Lower Anchors and Tethers for Children.
Both methods can provide a safe installation when used correctly. Neither automatically becomes safer simply because its hardware looks more substantial.
| Check | Seat belt installation | Lower anchor installation |
|---|---|---|
| Attachment | Vehicle lap or lap-and-shoulder belt | Car seat connectors attached to approved lower anchor bars |
| Main check | Correct belt path, secure locking, and tight fit | Correct anchor points, secure connectors, and tight straps |
| Movement limit | No more than 1 inch at belt path | No more than 1 inch at belt path |
| Weight restriction | Follow child restraint and vehicle belt requirements | Follow the specified lower-anchor child weight limit |
| Forward-facing tether | Use the approved tether when permitted | Use the approved tether when permitted |
For a seat belt installation, confirm that the belt remains locked using the method required by the manuals. Some systems use a locking retractor, locking latch plate, or built-in car seat lock-off.
For a lower anchor installation, verify that each connector is attached to an actual lower anchor bar. Tug each connector according to the car seat instructions to confirm engagement.
Also check the anchor weight limits. The allowed child weight can depend on the car seat’s own weight and the manufacturer’s label.
You can review the terminology and equipment in NHTSA’s vehicle and car seat parts guide.
Step 3: Check for incorrect belt routing
A convertible car seat commonly has separate rear-facing and forward-facing belt paths. Using the wrong path can compromise the installation even when the belt feels tight.
- Find the correct belt path label for your current seating direction.
- Check that the belt or lower anchor strap runs through that exact path.
- Look for twists, trapped fabric, or routing around an unintended part.
- Confirm the buckle and connectors do not interfere with tightening.
- Check that built-in lock-offs close exactly as directed.
Different seat manufacturers use different markings, colors, and locking mechanisms. Follow your actual seat’s instructions rather than relying on a generic diagram.
Step 4: Confirm the recline and attachment features
Look at any built-in level indicator, recline foot, or adjustment mechanism. Confirm the displayed angle suits the child’s age or developmental stage and the seat’s instructions.
For forward-facing harnessed seats, verify the approved top tether connection. A top tether runs from the upper back of the child restraint to a designated vehicle tether anchor.
Check that it follows the required routing around or under the headrest and has no unnecessary slack. Never attach it to an ordinary cargo hook unless the vehicle manufacturer identifies that point as a tether anchor.
Section Takeaway: Test movement only at the belt path, verify the actual attachment method, and follow the seat-specific directions for every extra feature.
What Changes for Rear-Facing, Forward-Facing, and Booster Seats?
Different car seat types require different checks. A rear-facing infant seat needs a suitable recline angle, while a forward-facing harnessed seat usually needs an approved top tether connection.
Rear-facing car seat installation checks
A rear-facing seat supports a child’s head, neck, and spine during a crash. Children should remain rear-facing until reaching the manufacturer’s maximum rear-facing height or weight limit.
When checking a rear-facing installation, focus on these details:
- Recline angle: Read the manufacturer’s level indicator and follow the approved range.
- Belt path: Use the designated rear-facing route.
- Harness height: Position straps at or below the shoulders.
- Vehicle location: Use an approved rear seating position.
- Infant base: Confirm the detachable carrier locks securely into its base.
- Support features: Check any required load leg or anti-rebound bar.
Never place a rear-facing car seat in front of an active passenger airbag. Deployment could strike the back of the restraint with dangerous force.
One detail deserves special attention: the baby’s head position. A seat reclined incorrectly may allow an infant’s head to slump forward, potentially affecting breathing.
Do not improvise the angle with cushions or random padding. Use only manufacturer-approved adjustment methods and seek expert help if the correct angle is difficult to achieve.
Forward-facing car seat installation checks
A forward-facing harnessed seat needs a secure belt or lower anchor installation and its recommended top tether. The tether reduces forward head movement during a crash.
- Use the designated forward-facing belt path.
- Verify the seat’s forward-facing height and weight limits.
- Position harness straps at or above shoulder level.
- Connect the top tether to an approved vehicle tether anchor.
- Tighten the tether and confirm its routing matches the manuals.
- Perform the one-inch test at the forward-facing belt path.
Do not mistake a lower anchor for a tether anchor. They serve different purposes and appear in different vehicle locations.
The tether remains important when installing with a vehicle seat belt. NHTSA recommends using it whenever the seat and vehicle manufacturers permit it.
Booster seat installation and belt-fit checks
A belt-positioning booster differs from a harnessed child restraint. Its main job is to position the vehicle seat belt correctly across a child.
Check the booster instructions to determine whether its lower anchor attachments should be used. Some boosters allow anchors to stabilize the booster, but the vehicle belt still restrains the child.
- The lap belt lies low across the upper thighs and hips, not the abdomen.
- The shoulder belt crosses the center of the shoulder and chest.
- The child can sit upright without slouching or moving the shoulder belt.
- The vehicle belt retracts and remains properly positioned.
- The booster and vehicle head restraint provide the required head support.
Never route the shoulder belt behind the child’s back or under an arm. These positions can leave vulnerable body areas inadequately protected.
The American Academy of Pediatrics explains installation choices and seating positions in its car safety seat guidance for families.
How Do You Know the Car Seat Harness Fits Correctly?
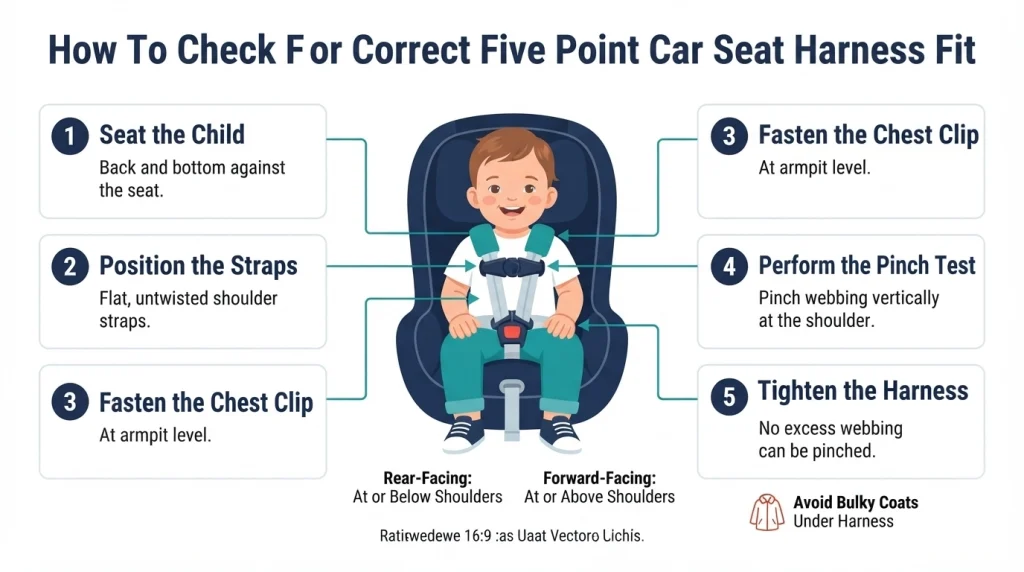
A correctly installed seat can still be unsafe if the harness does not fit the child. Check the shoulder strap height, harness tension, chest clip, and clothing every time you buckle up.
Perform the car seat pinch test
The pinch test checks whether the shoulder harness contains excess slack. It is useful for a properly fitted five-point harness.
- Seat the child with their back and bottom against the car seat.
- Position the harness over the shoulders without twisting the straps.
- Fasten the buckle and chest clip.
- Pull the harness adjustment strap until snug.
- Try pinching a fold of harness webbing vertically at the shoulder.
- If you can pinch extra webbing, tighten the harness and test again.
The harness should feel snug rather than painfully tight. Avoid judging fit by how easily you can slide several fingers underneath it.
Check shoulder height and chest clip placement
The proper harness height depends on the direction of travel. This is a simple distinction that’s easy to overlook when a child grows.
- Rear-facing: Harness straps begin at or below the child’s shoulders.
- Forward-facing: Harness straps begin at or above the child’s shoulders, following any reinforced-slot requirements.
- Chest clip: Position the clip at armpit level, centered on the chest.
- Crotch buckle: Use an approved buckle position that matches the child’s size and the manual.
Do not lower the chest clip toward the stomach for comfort. Its intended position helps keep shoulder straps correctly located.
Can a bulky jacket make a car seat unsafe?
Yes. Thick coats and padded snowsuits can create hidden slack because the clothing compresses under crash forces.
To check fit, buckle the child in regular, close-fitting clothing. Tighten the harness before placing a blanket or coat over the secured straps.
A blanket over the harness can provide warmth without creating padding between the child and restraint. Follow the car seat manufacturer’s instructions for any additional accessories.
Check infant inserts and extra padding
Newborns sometimes need manufacturer-supplied inserts that help achieve the approved fit. Those inserts may have specific weight or height limits.
Avoid adding aftermarket head cushions, body pillows, or extra padding underneath the harness unless the seat manufacturer explicitly approves them.
Also inspect the harness for frayed webbing, damaged buckles, or faulty adjustment hardware. Do not repair or modify safety straps with household materials.
Section Takeaway: The car seat and the child form one safety system. A tight vehicle installation and a snug, properly positioned harness are both essential.
What Are the Most Common Car Seat Installation Mistakes?
The most common problems include loose installations, incorrect belt routing, unlocked seat belts, and poor harness fit. Many mistakes are difficult to spot until someone performs a deliberate check.
Common problems and how to correct them
| Problem | Why it matters | What to do |
|---|---|---|
| More than 1 inch of movement | The installation is too loose | Retighten and reinstall according to the manuals |
| Wrong belt path | The restraint may not perform as intended | Reroute through the approved path |
| Unlocked vehicle belt | The car seat may loosen | Use the approved belt-locking method |
| Missing forward-facing tether | Increased forward head movement | Attach to the approved anchor when permitted |
| Incorrect rear-facing angle | Poor positioning and possible breathing concerns | Follow the seat’s recline indicator |
| Loose or twisted harness | Reduced restraint effectiveness | Flatten, adjust, and perform the pinch test |
| Unapproved extra padding | Changes the tested fit of the restraint | Remove it unless expressly approved |
Using the seat belt and lower anchors together
Using both attachment systems might seem stronger, but that assumption can be wrong. Most child restraints are designed for one installation method at a time.
Use both only when the child restraint and vehicle manufacturers explicitly allow that combination. A forward-facing top tether is a separate component and should not be confused with the lower anchor attachments.
Forgetting lower anchor weight limits
Lower anchors are not necessarily approved for every child who fits a particular convertible seat. Their allowable child weight can be lower than the car seat’s forward-facing harness limit.
In U.S. systems, the lower-anchor calculation commonly uses a 65-pound combined child-and-seat weight reference, subject to applicable manufacturer limits. Always follow the car seat label and vehicle instructions rather than relying on that number alone.
When the approved lower anchor limit is reached, reinstall using the vehicle seat belt if the child still fits the harnessed restraint. Continue using the approved forward-facing top tether as instructed.
Ignoring seat protectors and accessories
A decorative vehicle seat cover, thick seat protector, or aftermarket cushion can interfere with installation. Some materials change how the restraint contacts the vehicle seat.
Use only products and accessories specifically permitted by the child restraint and vehicle manufacturers. That includes protective mats, padding, cup holders, mirrors, and harness accessories.
Assuming the installation stays correct forever
A seat may become loose after removal, cleaning, vehicle maintenance, or a different caregiver’s installation. Children also grow beyond harness settings and installation limits.
Build a brief check into your routine and inspect the installation whenever the seat has been moved. There is no substitute for checking the actual fit.
Section Takeaway: Don’t judge installation by appearance alone. Check the belt path, locking system, anchor requirements, and child restraint fit.
When Should You Get a Professional Car Seat Inspection?

Seek help whenever you cannot achieve a secure installation or understand a seat-specific requirement. A certified Child Passenger Safety Technician can inspect your setup and teach you how to repeat it correctly.
Signs you should arrange a seat check
- The seat moves more than 1 inch despite repeated installation attempts.
- You cannot locate the correct lower anchors or tether anchor.
- The seat belt does not appear to lock as described in the manual.
- The rear-facing recline indicator will not reach its approved range.
- The car seat does not seem compatible with the vehicle seating position.
- You have questions about a newborn’s positioning or harness fit.
- You are installing multiple seats next to one another.
- The seat or vehicle has unusual hardware, modifications, or missing instructions.
A professional check is also useful after switching vehicles or changing seating configurations. Technicians can identify issues that are easy to miss during a quick visual inspection.
How do you find a certified car seat technician?
In the United States, you can locate inspection stations through the NHTSA car seat safety and inspection resources. Many locations provide free inspections, and some offer virtual assistance.
Not every fire department or police station has a certified technician. Contact the location first to confirm available services.
Outside the United States, consult your local road-safety authority, an appropriate child passenger safety organization, or the restraint manufacturer. National regulations and approval labels can differ.
What should you bring to an inspection?
- Your installed car seat and the vehicle in which it is used.
- The car seat instruction manual.
- The vehicle owner’s manual.
- The child’s current height and weight measurements.
- The child, when appropriate, to verify harness fit.
- Any manufacturer-approved inserts or installation components.
Ask the technician to demonstrate the correct method and then guide you through doing it yourself. The goal is to understand your installation, not simply receive a passing assessment.
When should you check the seat again?
Inspect the harness and buckle every trip. Recheck the installation regularly, particularly after moving the seat, changing the installation method, or adjusting the recline.
Also review your seat’s expiration guidance, recall status, and crash-replacement instructions. Manufacturers may require replacement after a crash depending on the seat model and circumstances.
Pro tip: Register the car seat with its manufacturer and consult official NHTSA recall information for U.S. models. Never assume that an undamaged-looking restraint is automatically safe after a collision.
Frequently Asked Questions About Car Seat Installation
How much should a properly installed car seat move?
A properly installed harnessed car seat should move no more than 1 inch (2.5 cm) side to side or front to back when checked at its belt path. Movement at the top of a rear-facing seat is not the same measurement. Always test at the actual attachment path.
Can a car seat be installed too tightly?
A firm installation is desirable, but excessive force can damage components or conflict with manufacturer instructions. Do not use unapproved tools or extra leverage to tighten straps. Follow the installation procedure and confirm that the one-inch test passes without stressing the hardware.
Is a car seat safer with LATCH or a seat belt?
Neither system is universally safer when both are installed correctly. Choose the method approved for your child restraint and vehicle that produces a secure fit. Lower anchors have specific weight limits, while a seat belt installation must use an approved locking method.
Should a rear-facing car seat move at the top?
Some movement at the upper end of a rear-facing restraint can be normal because the seat attaches near its base. The important movement test happens at the belt path. Follow the manufacturer’s instructions for anti-rebound features, load legs, and any other stabilizing equipment.
Do I need a top tether when using a seat belt?
Yes, for a forward-facing harnessed car seat, use the top tether whenever its use is permitted by both manufacturers. The tether serves a different purpose from the seat belt and helps limit forward head movement. Find the designated tether anchor in your vehicle manual.
How often should I check my child’s car seat installation?
Check the harness and buckle before every drive and examine the installation regularly. Repeat the full installation check whenever you move the car seat, switch vehicles, change attachment methods, or make significant adjustments. Reassess the child’s size and harness position as they grow.
Can I check my car seat installation myself?
Yes. You can perform the one-inch test, verify the attachment method, inspect the recline angle, and check harness fit using both manufacturers’ instructions. However, a home check does not replace expert help when something is unclear. A certified technician can provide additional assurance.
Final Takeaway: Make Every Car Seat Check Count
Checking whether your car seat is installed correctly takes more than a quick shake. The strongest routine combines the one-inch test, correct belt or anchor routing, suitable recline, and a properly fitted harness.
Start with your manuals, follow each required step, and address anything that fails inspection before driving. If you cannot get a secure fit, ask a certified technician for help.
Your next step: Check your car seat at its belt path today, confirm your child’s harness fit, and review any manufacturer-specific requirements. Repeat these checks as your child grows and whenever the seat is moved.

Daniel Brooks is an automotive writer and product researcher focused on car accessories, car tech, maintenance, and practical driving guides. At Plug-in Car World, he helps drivers make smarter automotive decisions through honest reviews and research-driven content.