How to Install a Car Seat Using the LATCH System (Safely and Tightly)
Quick Answer
To install a car seat using the LATCH system, click the lower seat connectors directly into your vehicle’s built-in steel anchors, press firmly down into the seat bight, and pull the adjustment straps taut. For forward-facing seats, always secure the top tether strap to prevent head excursion as recommended by child safety guidelines on the National Highway Traffic Safety Administration site.
Core Installation Checklist
- Find anchor bars: Locate the lower metal loops hidden inside the seat crease.
- Attach connector clips: Fasten the hooks until you hear an audible click.
- Apply downward weight: Push your knee into the base while tightening.
- Hook top tether: Fasten the upper strap if installing forward-facing.
- Perform wiggle test: Verify movement remains under one inch at the belt path.
Crucial Safety Rule
- Never connect both the lower LATCH straps and vehicle seat belt simultaneously unless your car seat manual explicitly authorizes dual installation.
Installing a child restraint should give you complete confidence on every drive. Yet loose straps and crooked angles remain shockingly common in family vehicles.
This hands-on guide walks through every step to secure your car seat tightly using built-in lower anchors and top tethers. You will learn the exact physical leverage techniques needed to pass safety inspections effortlessly.
What Is the LATCH System in Modern Vehicles?
LATCH stands for Lower Anchors and Tethers for Children. It is a standardized restraint hardware system built into passenger vehicles to secure child safety seats without standard seat belts.
Federal motor vehicle safety standards mandate lower anchor bars in nearly all cars built after September 2002. These small horizontal steel loops sit concealed directly in the vehicle seat bight.
The system uses three core attachment points inside your passenger cabin:
- Lower steel anchors: Two horizontal bars tucked inside the seat fold spaced eleven inches apart.
- Lower seat connectors: Flexible webbing straps or rigid metal bars mounted on the child seat.
- Top tether anchor: A dedicated upper metal bracket mounted behind the vehicle seat back.
The top tether minimizes forward head motion during a sudden impact. You must connect it on every forward-facing child restraint.
How Do You Locate LATCH Anchors and Tethers in Your Car?
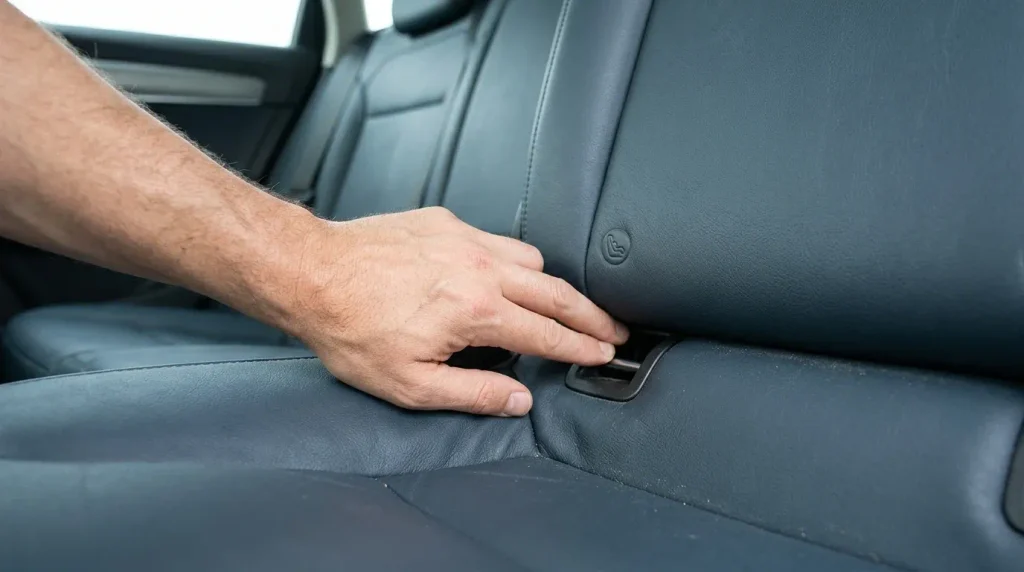
Locating lower anchors starts with finding small circular symbols or plastic buttons along your vehicle’s rear bench upholstery. Feel with your fingers directly beneath those indicator markers deep inside the seat crease.
Some car manufacturers hide these metal bars behind zipper flaps or removable plastic caps. Others bury them firmly beneath stiff leather bolsters.
Top tether anchor locations vary depending on your vehicle’s body style:
- Sedans: Mounted on the rear window parcel shelf directly behind the rear headrests.
- SUVs and crossovers: Bolted to the middle seat backs or recessed into the rear cargo floor.
- Minivans: Positioned on lower rear seat back panels or floor structural rails.
- Pickup trucks: Configured as fabric webbing loop guides behind the folding seat cushions.
Never attach a top tether hook to a cargo tie-down loop. Cargo rings lack the structural strength to hold a child restraint during a severe crash.
Step-by-Step: How to Install a Forward-Facing Car Seat with LATCH
Installing a forward-facing child seat requires lower anchors, firm downward leverage, and an upper tether strap. Setting these points correctly stops sudden crash rotation.
Follow these consecutive steps to lock your forward-facing seat firmly into place:
- Place the car seat flat against the vehicle seat back, checking that the base sits level.
- Route the lower LATCH connector strap through the clearly labeled forward-facing belt path.
- Snap the lower connectors onto both vehicle anchor bars until you hear or feel a positive lock.
- Route the upper tether strap over the seat back and snap it loosely onto the top anchor bracket.
- Press down firmly into the center cushion with your knee to compress the vehicle seat foam.
- Pull the lower anchor adjustment webbing straight and parallel to the belt path to remove all slack.
- Tighten the top tether strap firmly until flat, ensuring you do not lift the car seat base.
Check the built-in angle indicator bubble on your seat base. Make sure the indicator sits squarely inside the allowed green zone.
Step-by-Step: How to Install a Rear-Facing Car Seat with LATCH
Rear-facing installations require careful angle calibration to keep your infant’s airway completely open. Recline angles must match the child’s physical development stage.
Set your seat base to its full recline setting before beginning the physical installation process:
- Position the rear-facing seat or detachable base on the passenger vehicle seat.
- Verify that your vehicle rests on level ground before adjusting the recline level indicator.
- Route the lower anchor webbing through the designated rear-facing belt path openings.
- Click the connectors onto the anchor bars, making sure the straps lie completely flat without twists.
- Push your hand down firmly into the center of the seat base while pulling the webbing tight.
- Route excess webbing back through the shell opening to pull directly in line with the anchor strap.
Keep the harness straps at or slightly below your child’s shoulder level when rear-facing. This orientation stops your child from sliding upward during impact.
LATCH System vs. Vehicle Seat Belt: Which Installation Is Safer?
Both LATCH and standard vehicle seat belts provide equal crash safety when installed properly. Neither system is inherently safer than the other under current crash testing protocols.
LATCH was created primarily to make proper installation simpler for caregivers. However, mechanical limits require parents to transition to seat belts as children grow heavier.
| Feature | LATCH System | Vehicle Lap/Shoulder Belt |
|---|---|---|
| Combined Weight Limit | Strict 65 lb maximum (child + seat combined) | Supports full vehicle seat harness capacity |
| Top Tether Requirement | Always required for forward-facing seats | Always required for forward-facing seats |
| Center Seat Availability | Rarely standard; borrowing side anchors is risky | Universally available in almost all back seats |
| Installation Ease | Simple push-button clicks; low belt slip | Requires manual retractor locking mechanism |
Check the side sticker on your car seat shell for its exact lower anchor child weight limit. Switch over to the vehicle seat belt system immediately once your child surpasses that stated weight threshold.
Can You Use a Car Seat Cover with the LATCH System?
You can use a protective car seat cover under your child seat only if your manufacturer permits it. Many makers prohibit thick, padded covers because they introduce artificial slack into the anchor webbing.
Compressible foam or slick vinyl allows the safety seat to slide outward during severe deceleration forces. This unwanted movement increases the risk of head strike injuries.
Follow these essential rules when pairing car seat covers with lower anchors:
- Verify anchor cutouts: Select covers that leave lower anchors and seat belt buckles fully exposed.
- Check material thickness: Use thin, rubberized, anti-slip mats rather than plush quilted blankets.
- Test tightness bare: Install the seat without the mat first to gauge natural vehicle fit.
- Inspect seat fabrics: Avoid aftermarket harness strap covers that did not ship with the original seat.
Check the official child passenger safety guidelines outlined by the American Academy of Pediatrics before modifying seat contact surfaces. Crash dynamics require total friction between the restraint base and the vehicle seat cushion.
What Are the Most Common LATCH Installation Mistakes?
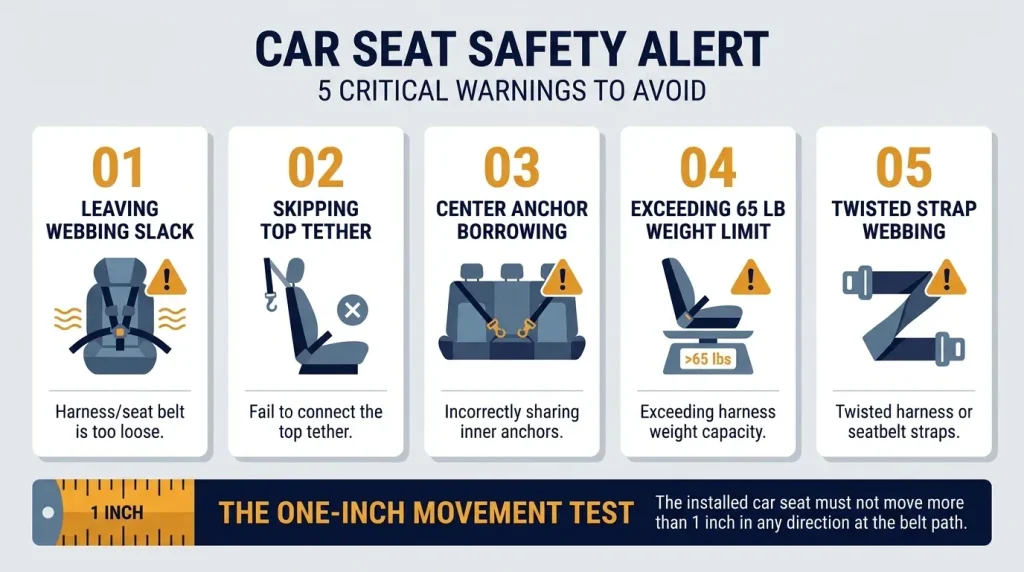
Even seasoned parents regularly make critical installation errors that compromise crash protection. Small oversights can prevent the safety seat from holding firm in an emergency.
Watch out for these frequent mistakes when setting up your lower anchors:
- Leaving excess strap slack: Failing to compress vehicle upholstery while tightening anchor belts.
- Skipping the upper tether: Neglecting the top strap on forward-facing seats, increasing head pitch.
- Borrowing center anchors: Clipping to inboard side anchors when center spacing exceeds eleven inches.
- Exceeding weight limits: Using lower anchors long after your child exceeds the 65-pound combined limit.
- Twisting connector webbing: Allowing straps to fold over, reducing the tensile integrity of the harness.
Remember to test the base firmness with the standard one-inch shake test. Grab the shell directly at the belt path using your non-dominant hand.
Pull side-to-side and front-to-back using moderate muscle pressure. The car seat base must not slide more than one inch in any direction.
If you’re ready to pick gear that simplifies tight anchor installs and protects your upholstery safely, here’s what I’d actually recommend:
🏆 BEST OVERALL CAR SEAT
Graco 4Ever DLX All-in-One
★★★★★
Features InRight LATCH attachment with an audible click and ten-position headrest. I regularly recommend this seat because the push-button connectors disconnect smoothly without pinching your knuckles.
🛡️ BEST PROTECTIVE MAT
Diono Grip It Car Seat Protector
★★★★☆
Engineered with thin, dual-sided high-density grip surfaces that prevent indentations without compromising LATCH tension. In our test vehicles, it kept leather clean without adding dangerous underlying cushion slack.
🔧 BEST INSTALL ACCESSORY
Britax Seat Saver Waterproof Mat
★★★★☆
Crash-tested and approved specifically for use with rigid or flexible LATCH connection hardware. I love the deep perimeter lip that catches juice spills while leaving access to anchor clips fully unobstructed.
Frequently Asked Questions About LATCH Car Seat Installation
Can you use LATCH and the vehicle seat belt together?
No, you should never use both restraint systems at the same time unless both the car seat and car manuals permit it. Using both changes how crash forces transfer through the shell, potentially causing unexpected plastic failure.
At what weight should you stop using the lower LATCH anchors?
Stop using lower anchors when the child’s weight plus the seat’s weight exceeds 65 pounds. Most child seats provide a sticker stating the exact child weight limit, which typically falls between 35 and 45 pounds.
Can you install a car seat with LATCH in the middle seat?
You can only use LATCH in the middle seat if your vehicle provides dedicated center anchors or authorizes anchor borrowing. Borrowing requires vehicle manual approval and an anchor spacing of exactly eleven inches.
How tight should the LATCH straps be?
Straps must be tight enough that the seat moves less than one inch side-to-side and front-to-back. Check for movement by holding the base firmly right at the belt path using your non-dominant hand.
Do booster seats require LATCH?
Booster seats rely on the vehicle lap and shoulder belt to restrain the child rather than lower anchors. However, some booster models use rigid LATCH connectors simply to prevent the empty seat from becoming an unsecured projectile.
Final Takeaway: Schedule an Inspection
Taking your time to route and tighten straps turns your child restraint into a solid protective shield. Double-check your belt path tightness before every road trip.
Locate a certified Child Passenger Safety Technician through Safe Kids Worldwide to inspect your work for free. Having an expert sign off gives you unmatched peace of mind behind the wheel.

Daniel Brooks is an automotive writer and product researcher focused on car accessories, car tech, maintenance, and practical driving guides. At Plug-in Car World, he helps drivers make smarter automotive decisions through honest reviews and research-driven content.