
What to Do When a Car Seat Is Not Level
Quick Answer
If your child’s car seat is not level, park on flat ground and check the manufacturer’s recline indicator. Adjust the built-in recline mechanism, reinstall the seat securely, and confirm the indicator shows the correct angle. Follow the official NHTSA car seat installation guidelines rather than estimating the angle by sight.
Five steps to correct the angle
- Park on level ground: Check the car seat while your vehicle is parked on a flat surface.
- Read the indicator: Check the bubble, ball, colored zone, or level line specified in the seat’s manual.
- Adjust the recline: Use the manufacturer’s approved recline foot, lever, or positioning mechanism.
- Secure the installation: Tighten the seat belt or lower-anchor system and check for excessive movement.
- Verify the final position: Recheck the angle after tightening and with the child seated, as directed.
Important safety reminder
- Never improvise: Use a rolled towel or pool noodle only when the specific car seat manufacturer permits it, and seek professional help if the correct installation cannot be achieved.
Discovering that your child’s car seat isn’t level can be unsettling, especially before a family trip. The good news is that many angle problems come from installation adjustments rather than a defective seat.
I approach car seat fitment by checking three things: the manufacturer’s instructions, the vehicle seating surface, and the finished installation. This guide explains how to identify the problem, correct the recline, and recognize when professional assistance is necessary.
In This Guide
- Why Does the Correct Car Seat Angle Matter?
- How Can You Tell if a Car Seat Is Not Level?
- How Do You Fix a Car Seat That Is Not Level?
- Do Different Types of Car Seats Need Different Angles?
- What Causes Car Seat Leveling Problems?
- When Should You Get Professional Installation Help?
- Frequently Asked Questions
Why Does the Correct Car Seat Angle Matter?
The correct car seat angle helps position a child safely within the restraint. It matters particularly for rear-facing infants, whose head and neck control is still developing.
Car seat recline angle refers to how far a child restraint tilts backward when installed in a vehicle. The approved angle depends on the restraint’s design, installation mode, and sometimes the child’s size or age.
How an incorrect angle affects infant safety
A rear-facing infant seat that sits too upright can allow a baby’s head to fall forward. This chin-to-chest position may narrow the airway, especially in newborns.
An excessively reclined seat can also fall outside the manufacturer’s approved installation range. Correct positioning is important for how the restraint manages crash forces.
The American Academy of Pediatrics emphasizes using the correct recline angle to prevent an infant’s head from falling forward. Its car safety seat guidance for families explains this concern.
Does a car seat need to be perfectly horizontal?
No. A child restraint does not need to look horizontally level with the vehicle floor.
For rear-facing restraints, the manufacturer’s level indicator identifies the acceptable recline position. A properly installed infant seat may appear noticeably tilted backward.
The word “level” usually refers to the indicator’s reading, not the entire car seat shell.
Is a 45-degree angle always correct?
No. Although approximately 45 degrees is often discussed for newborn positioning, it is not a universal installation requirement.
Some manufacturers specify different angle ranges based on the child or restraint design. Others use colored zones instead of published degree measurements.
- Newborns: May require a more reclined position within the manufacturer’s approved range.
- Older infants: May use a more upright position when their seat instructions permit it.
- Rear-facing toddlers: Must remain within the approved rear-facing recline range.
- Forward-facing children: Follow the manufacturer’s separate forward-facing positioning requirements.
Never force a seat to a particular number of degrees when its own instructions specify another method.
Pro tip: Consult the exact model’s instruction manual before changing its recline setting. The vehicle owner’s manual can also identify installation restrictions for particular seating positions.
How Can You Tell if a Car Seat Is Not Level?
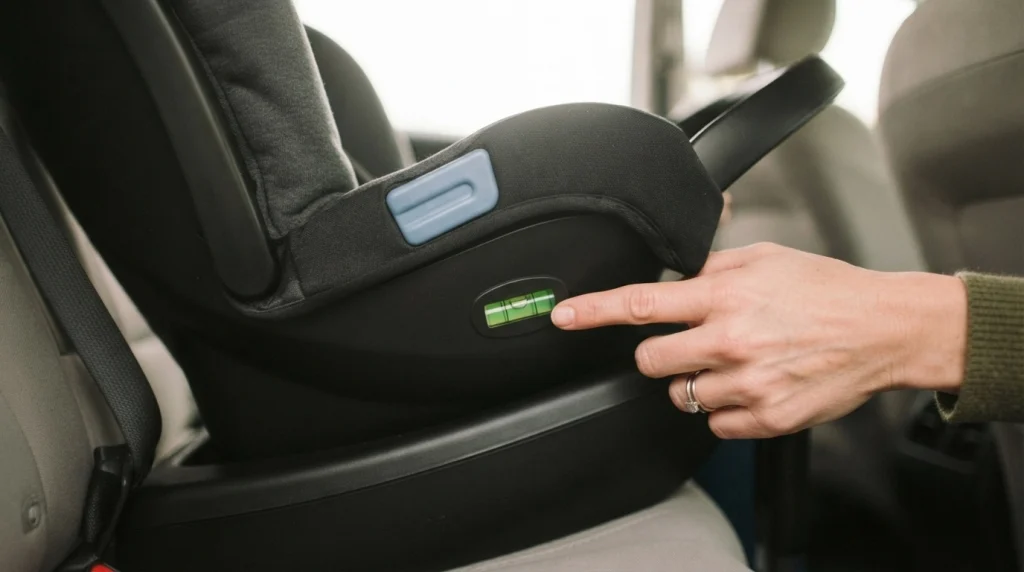
The most reliable way to identify a leveling problem is to read the car seat’s built-in recline indicator. Visual appearance alone cannot establish whether the seat is installed correctly.
Check the recline indicator
Rear-facing child restraints generally provide an angle indicator to guide installation. The design differs between manufacturers and models.
- Bubble indicator: A bubble must sit within the marked acceptable zone.
- Ball indicator: A small ball shows whether the recline falls within the approved range.
- Colored indicator: A specific color or marked area identifies the acceptable position.
- Level reference line: A printed line must be positioned relative to level ground as directed.
Check the vehicle’s parking surface first. An inclined driveway may produce a misleading reading.
For a bubble or ball indicator, follow the specific markings rather than assuming it belongs in the exact center.
Check the angle after tightening
A seat may show the correct recline before installation but shift when the belt or lower anchors are tightened. Compressing the vehicle cushion can change the final angle.
Always inspect the indicator after securing the restraint. Some manufacturers also instruct you to check it with your child seated.
Watch for signs of incorrect positioning
Physical observations can alert you to a possible problem, although they cannot replace the indicator.
- The indicator falls outside the approved range.
- The infant’s head repeatedly drops forward toward the chest.
- The seat base does not rest as required by the installation instructions.
- The recline mechanism is in the wrong position for rear-facing use.
- The installation shifts substantially when tested at the belt path.
A loose installation and an incorrect angle are separate problems. Both must be corrected before the restraint is used.
If your baby develops breathing difficulty, stop the journey safely and seek urgent medical assistance. Do not attempt to solve breathing symptoms solely by changing the seat angle.
How Do You Fix a Car Seat That Is Not Level?
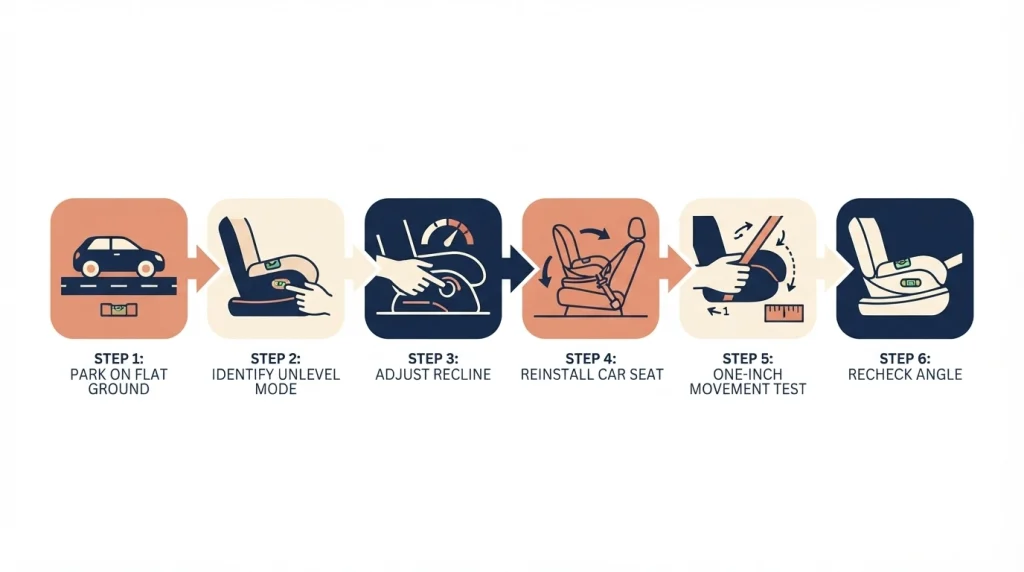
Start with the seat’s approved adjustment system and reinstall it carefully. The goal is a secure installation at the correct recline angle, not simply making the indicator look right.
Step 1: Park on a flat surface
Move the vehicle onto level ground, switch off the engine, and secure the parking brake. Remove the child from the seat before adjusting the installation.
A flat parking surface provides the correct reference for manufacturer level indicators.
Step 2: Identify the correct installation mode
Check whether the restraint is installed rear-facing or forward-facing. Convertible seats often use different recline settings and belt paths for each mode.
Consult the manual before moving an adjustment lever or changing the installation.
Step 3: Release and adjust the installation
Loosen or disconnect the existing installation as directed by the manufacturer. Use the built-in recline mechanism to select an approved position.
Common adjustment mechanisms include:
- Extendable recline feet beneath infant car seat bases.
- Rotating or sliding recline adjustments.
- Numbered recline positions on convertible seats.
- Built-in base adjustments operated by handles or buttons.
Not every setting works in every installation mode. Confirm that your selected position is approved for the child and seat orientation.
Step 4: Reinstall and tighten the car seat
Secure the restraint using an approved vehicle seat belt or lower-anchor installation. Follow both manuals for belt routing, seat belt locking, and anchor limits.
Do not combine the lower anchors and vehicle seat belt unless the manufacturers explicitly permit that installation.
Press on the restraint in the location specified by its instructions while removing slack. Avoid pulling the seat into an unauthorized angle just to achieve a tighter installation.
Step 5: Perform the one-inch movement test
Hold the installed restraint at the belt path and check movement from side to side and front to back. NHTSA specifies no more than one inch of movement in either direction at that location.
Do not judge installation tightness by pulling the top of a rear-facing seat. Movement away from the belt path can be normal, depending on the restraint design.
For a detailed installation walkthrough, see NHTSA’s rear-facing infant car seat installation instructions.
Step 6: Recheck the final recline angle
Inspect the level indicator once the installation is tight. If the reading changed, repeat the approved adjustment process.
Attach a removable infant carrier to its base before completing any additional checks required by the manufacturer. Confirm that it locks into position correctly.
Finally, secure the child with the harness properly adjusted. Follow any instructions to recheck the angle under the child’s weight.
Can you use a rolled towel or pool noodle?
Sometimes, but only with explicit manufacturer permission. Certain rear-facing restraints allow a tightly rolled towel or specified foam pool noodle to adjust the recline.
When permitted, these supports are commonly positioned at the vehicle seat crease, where the cushion meets the seatback. The correct placement and permitted configuration depend on the seat model.
- Check whether your exact model permits supplemental recline support.
- Follow the manufacturer’s placement and quantity instructions.
- Never add loose objects or arbitrary wedges beneath the restraint.
- Do not use towels or noodles to compensate for an incompatible installation.
- Recheck the tightness and recline angle after installation.
The child passenger safety resource Car Seats for the Littles explains approved recline supports and emphasizes checking the manufacturer’s instructions first.
Pro tip: Never assume a method approved for one manufacturer’s seat is acceptable for another model. When instructions are unclear, contact the manufacturer before adding support materials.
Section Takeaway: A safe correction requires the right recline setting and a tight installation. Always verify both after the final adjustment.
Do Different Types of Car Seats Need Different Angles?
Yes. Infant, convertible, forward-facing, and booster seats have different positioning requirements.
Recognizing these differences prevents caregivers from applying rear-facing installation advice to an unsuitable restraint.
Infant car seats with removable bases
Rear-facing-only infant seats frequently include an adjustable base and a recline indicator. The correct position helps maintain appropriate infant positioning.
Install the base using the manufacturer’s instructions. Then attach the carrier and complete the required checks.
Some infant carriers also permit installation without a base. That configuration may use a different indicator or reference line.
Convertible car seats
A convertible car seat supports both rear-facing and forward-facing use within its stated limits. Each orientation may require a different recline setting.
A position suitable for a forward-facing child may be prohibited for a rear-facing infant. Follow the numbered positions or approved zones in the manual.
Forward-facing car seats
Forward-facing restraints generally follow a different set of recline requirements. The seat may need a specific position, and an infant-style level indicator may not apply.
Use the required forward-facing belt path and top tether according to the instructions. The tether reduces forward head movement during a crash.
Booster seats
Booster seats position the child so the vehicle seat belt fits correctly. They do not use rear-facing infant recline requirements.
Follow the booster manufacturer’s instructions regarding seatback position, head support, and belt routing. Never recline a booster beyond its approved configuration.
Car seat angle comparison table
| Car Seat Type | Position Requirement | What to Check |
|---|---|---|
| Rear-facing infant seat | Approved infant recline range | Bubble, ball, colored zone, or reference line |
| Rear-facing convertible | Approved rear-facing setting | Recline position and indicator |
| Forward-facing harness seat | Approved forward-facing position | Recline setting, belt path, and tether |
| Booster seat | Manufacturer-approved seating position | Seatback support and seat belt fit |
These are general distinctions, not universal angle specifications. The exact car seat manual takes priority over a comparison chart.
What Causes Car Seat Leveling Problems?
Vehicle seating surfaces, recline mechanisms, and installation tension commonly affect a car seat’s final angle. Identifying the cause makes troubleshooting more effective.
Steeply sloped vehicle seats
Some rear seat cushions slope noticeably toward the seatback. This can leave a rear-facing child restraint too upright despite using its built-in adjustment.
Try another manufacturer-approved recline setting first. If that fails, check whether approved supplemental support or a different seating position is permitted.
Recline mechanism in the wrong setting
Convertible car seats often have several positions. Selecting one intended for forward-facing use can produce an incorrect rear-facing angle.
Locate the position markings and compare them with the installation instructions. Do not assume that a numbered setting works for every child.
Incorrect seat belt or lower-anchor tension
Installation tension can compress the vehicle cushion and affect the recline. A loose restraint may also move excessively during the belt-path test.
Reinstall carefully using the approved tightening method. Then inspect both the movement and the level indicator.
Seat position or compatibility problems
Some vehicle seating positions have contours, belt geometry, or other restrictions that complicate installation. A center position is not automatically the best choice when a secure installation cannot be achieved there.
Check the vehicle manual for permitted positions. Try another approved rear seating position if necessary.
Troubleshooting table
| Problem | Possible Cause | Recommended Action |
|---|---|---|
| Indicator shows too upright | Vehicle cushion slope | Adjust approved recline mechanism |
| Indicator shows too reclined | Incorrect adjustment position | Select a permitted more upright setting |
| Angle changes after tightening | Seat cushion compression | Reinstall and recheck final indicator |
| Car seat moves over one inch | Installation not secure | Correct belt routing and tightening |
| Angle cannot reach approved range | Possible seat-vehicle incompatibility | Contact manufacturer or certified technician |
Can a vehicle seat cover affect installation?
Yes. An aftermarket vehicle seat cover or thick protective mat beneath a child restraint may affect its fit or stability.
Only use a protector or other accessory if the child restraint manufacturer approves it for that installation. Also confirm compatibility with the vehicle’s seating system.
Do not add padding beneath the car seat to change its angle without explicit permission.
What if the seat becomes uneven during travel?
Stop somewhere safe and inspect the installation. Check whether the restraint has loosened or its recline adjustment has shifted.
Never attempt to adjust an installed child restraint while the vehicle is moving. Correct the problem before continuing the trip.
When Should You Get Professional Installation Help?

Contact a qualified child passenger safety technician when you cannot achieve both a correct recline and a secure installation. A technician can help assess the seat, vehicle, and installation method together.
Situations that deserve professional attention
- The recline indicator remains outside its approved range after permitted adjustments.
- The restraint moves more than one inch at the belt path.
- The manufacturer instructions are unclear or seem incompatible with the vehicle.
- The seat base or recline mechanism appears damaged.
- The restraint cannot be installed securely in the intended seating position.
- There are questions about using the seat correctly for a newborn or a child with special positioning needs.
For U.S. drivers, the NHTSA car seat finder and installation assistance resources can help locate certified inspection support. Many communities offer appointments at no charge.
What should you bring to an inspection?
- The car seat and all manufacturer-supplied installation components.
- The car seat instruction manual.
- The vehicle owner’s manual.
- Information about the child’s age, height, and weight.
- The child, when possible, for a harness-fit assessment.
A technician can demonstrate the correct installation and explain how to repeat it. You should understand how to verify the seat independently afterward.
When should you stop using the car seat?
Do not transport a child in an installation that you know fails the manufacturer’s required angle or security checks. Resolve the problem before driving.
If a recline component is cracked, broken, or no longer locks correctly, discontinue use until the manufacturer advises you. Do not attempt unapproved repairs.
When a seat cannot be installed correctly in your vehicle, another compatible restraint may be necessary.
Pro tip: Check the car seat model and manufacture date when contacting the manufacturer. For U.S. products, you can also use NHTSA resources to check applicable safety recalls.
Frequently Asked Questions
1. Is it safe to use a car seat that is not level?
It is not safe to knowingly use a child restraint outside its manufacturer’s approved installation angle. An incorrect rear-facing recline can affect infant positioning and airway protection.
Reinstall the restraint correctly and verify its security before driving.
2. Can I put a towel under a car seat to level it?
Some rear-facing car seats permit tightly rolled towels in a specific location to correct the recline. Others do not permit that method.
Check the exact model’s manual and use only the approved arrangement. Never substitute arbitrary padding or household objects.
3. Why is my infant car seat tilted too far forward?
A steeply sloped vehicle seat, incorrect recline setting, or installation compression can leave a rear-facing infant seat too upright. First park on flat ground and inspect the level indicator.
Then adjust and reinstall the restraint according to its instructions.
4. Should the car seat bubble always be centered?
Not necessarily. Some indicators require the bubble within a marked range, while others specify a particular position based on the child’s size.
Follow the indicator diagram in your instruction manual instead of assuming that exact center is correct.
5. Can I use my phone to check the car seat angle?
A phone’s angle-measuring application should not replace the manufacturer’s approved level indicator. The phone may measure a surface that is not the specified installation reference.
Use the car seat indicator and consult the manual whenever readings seem inconsistent.
6. What if my convertible car seat cannot recline enough?
Confirm that the seat is in an approved rear-facing recline position and installed in a permitted vehicle location. Check whether the manufacturer allows an additional recline support.
If the correct angle remains impossible, contact the manufacturer or a certified technician for guidance.
7. How often should I check my car seat’s level?
Check the installation whenever you install or move the restraint, change its recline setting, or suspect that it has shifted. Verify the indicator and belt-path tightness as directed.
Regular visual checks can help identify changes before a journey.
Final Takeaway: Correct the Angle Before Driving
When a car seat is not level, the solution begins with understanding the manufacturer’s approved recline range. Park on flat ground, check the indicator, adjust the installation, and verify that the restraint is secure.
A correctly positioned child restraint protects more than comfort. It supports safe positioning and proper use of the restraint system.
Before your next journey, take a moment to inspect the car seat’s level indicator and belt-path tightness. If you cannot achieve the required installation, get qualified assistance rather than improvising a fix.
A few careful installation checks can make every ride safer for your child.

Daniel Brooks is an automotive writer and product researcher focused on car accessories, car tech, maintenance, and practical driving guides. At Plug-in Car World, he helps drivers make smarter automotive decisions through honest reviews and research-driven content.