What to Do When a Car Seat Does Not Fit in Your Vehicle
Quick Answer
When a child car seat does not fit in your vehicle, don’t force it into place or use it with an unsafe installation. Check both instruction manuals, try another approved rear seating position, and consider switching between the vehicle seat belt and lower anchors. Follow the NHTSA car seat installation guidelines to confirm a secure fit. If no approved installation works, choose a different car seat that fits your child and vehicle.
What to do first
- Check both manuals: Confirm the approved seating positions, installation methods, and restrictions.
- Try another position: A rear outboard position may provide a better installation than the center.
- Change installation methods: Try the seat belt instead of lower anchors when both methods are permitted.
- Check the recline: Keep the rear-facing seat within its manufacturer’s approved angle range.
- Test for movement: The installed seat should move no more than 1 inch at its belt path.
- Get expert help: Consult a certified Child Passenger Safety Technician if the fit remains uncertain.
Important: Never transport a child in a car seat that cannot be installed according to both manufacturers’ instructions.
Discovering that your car seat doesn’t fit your vehicle can be frustrating, especially when you need it for everyday family travel. The problem may involve the seat’s dimensions, your vehicle’s seating design, or the installation method.
I recommend treating car seat fitment as a safety check rather than a simple question of available space. A seat that looks comfortable in the back row isn’t necessarily installed correctly.
This guide explains how to identify the problem, troubleshoot an incompatible car seat, and decide when replacement makes more sense. You’ll also learn which installation adjustments are safe and which shortcuts to avoid.
In This Guide
- Why Doesn’t a Car Seat Fit in Some Vehicles?
- What Should You Check Before Trying Another Installation?
- How Do You Fix a Car Seat That Won’t Install Tightly?
- What If the Car Seat Is Too Large for Your Vehicle?
- When Is a Car Seat Incompatible With a Vehicle?
- How Do You Choose a Car Seat That Fits Your Vehicle?
- Frequently Asked Questions
Why Doesn’t a Car Seat Fit in Some Vehicles?
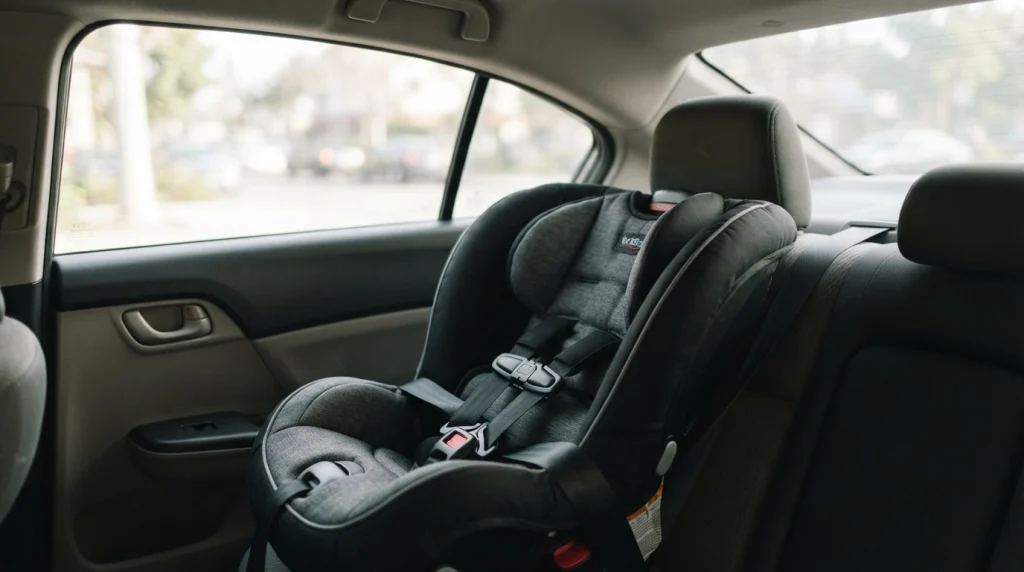
A car seat may not fit because its shape, installation requirements, or dimensions conflict with your vehicle’s seating design. The issue can involve physical space, belt geometry, lower-anchor locations, or the required recline angle.
Understanding the exact problem matters. Different fitment issues require different solutions.
1. Your Vehicle Has Limited Rear-Seat Space
Compact cars, small hatchbacks, and some sports sedans have limited front-to-back space behind their front seats. A large rear-facing convertible seat may need more room than the cabin can safely provide.
This becomes especially noticeable with infant seats that require a more reclined installation. The front passenger seat may need to move farther forward than its occupant can safely tolerate.
Check for these issues:
- The child restraint presses against the front seat contrary to manufacturer instructions.
- The front passenger cannot sit comfortably and safely.
- The rear-facing seat cannot reach its approved recline angle.
- The child restraint extends beyond the permitted vehicle-seat cushion support.
2. The Vehicle Seat Has an Unusual Shape
Some vehicles have strongly contoured cushions, raised side bolsters, or steeply angled seat bottoms. These features can affect how a child restraint sits against the upholstery.
A car seat base that rests unevenly may be difficult to tighten. An integrated head restraint can also interfere with certain forward-facing seats.
Not every visible gap means the installation is unsafe. The car seat manufacturer determines which contact points and gaps are acceptable.
3. The Seat Belt or Lower Anchors Are Difficult to Use
Lower Anchors and Tethers for Children, commonly called LATCH, provide an alternative installation system in many vehicles. However, lower-anchor locations and approved seating positions vary.
A center rear seat may not have its own lower-anchor pair. Some vehicle seat belts also have buckle positions that complicate installation.
The location of a buckle, belt anchor, or seat belt retractor can create fitment problems. These issues don’t automatically mean the car seat is defective.
4. The Car Seat and Vehicle Have Conflicting Requirements
A child restraint may require specific support, seatback contact, or approved installation angles. Your vehicle manufacturer may impose separate restrictions.
For example, a car seat may permit an installation method that your chosen vehicle seating position does not support. Both sets of instructions must allow the final installation.
Section Takeaway: Identify whether the problem involves space, geometry, anchoring, or manufacturer restrictions before changing anything.
What Should You Check Before Trying Another Installation?
Before reinstalling a child car seat, check the vehicle owner’s manual and the child restraint instruction manual. Together, these documents explain which installation methods and seating positions are permitted.
It’s tempting to start by pulling the seat belt tighter. I prefer checking compatibility requirements first, because a tighter installation cannot correct a prohibited setup.
Find the Correct Car Seat Instructions
Locate the manufacturer’s model number and instruction manual. If the original manual is missing, obtain the correct version from the manufacturer.
Review these details:
- Approved rear-facing and forward-facing installation methods.
- Child height and weight restrictions.
- Required recline positions for your child’s size.
- Rules covering base overhang and vehicle-seat contact.
- Approved use of load legs, anti-rebound bars, and built-in lockoffs.
- Restrictions involving head restraints and vehicle-seat design.
A load leg is a support extending from certain car seat bases toward the vehicle floor. An anti-rebound bar helps control rotation during a crash.
Both features must be used according to the car seat and vehicle manufacturers’ instructions. Never assume every vehicle floor or seating position supports them.
Read the Child Restraint Section of Your Vehicle Manual
Your vehicle manual identifies approved seating locations and explains the available anchor systems. It may also specify limitations for center seats or certain rear rows.
Pay attention to:
- Which seats have lower anchors.
- Where the top tether anchors are located.
- How the vehicle seat belts lock.
- Whether particular seating positions prohibit child restraints.
- Any special instructions for removable head restraints.
- Restrictions affecting front-seat contact or rear-seat adjustments.
Confirm That the Car Seat Fits Your Child
Vehicle compatibility is only half the equation. The child restraint must also accommodate your child’s current height, weight, and developmental needs.
The American Academy of Pediatrics’ car seat guidance explains why appropriate restraint selection and correct installation work together.
A child who has outgrown an infant seat may need a larger rear-facing convertible seat. However, a cramped vehicle is never a reason to turn a child forward-facing prematurely.
Use the child’s size, seat limits, and applicable safety recommendations to determine the appropriate restraint stage.
How Do You Fix a Car Seat That Won’t Install Tightly?
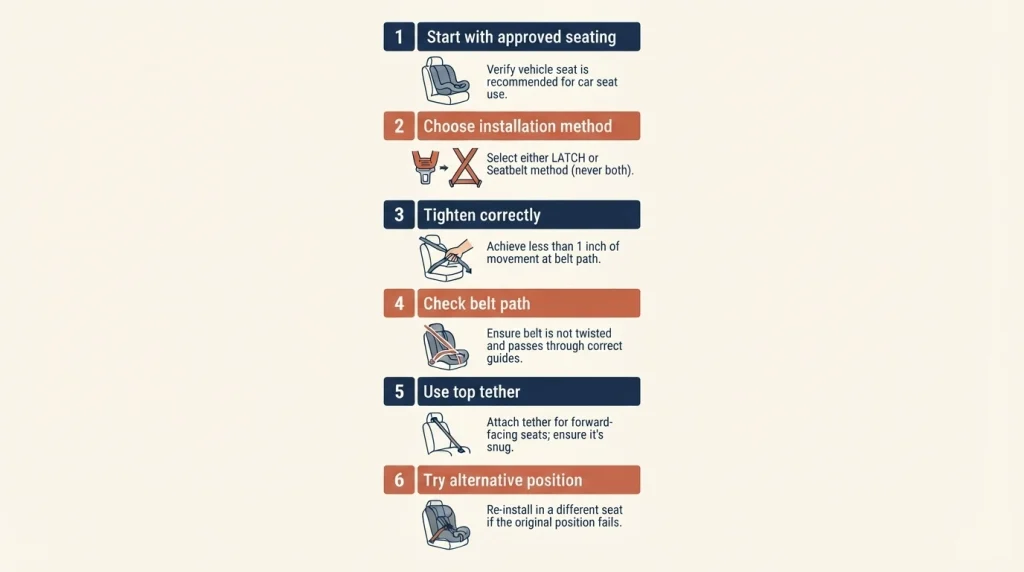
If a car seat moves excessively, first confirm that you’re using the correct installation method and belt path. A securely installed harnessed car seat should move no more than 1 inch side-to-side or front-to-back when tested at its belt path.
Test at the belt path, not the top of the shell. Some movement away from the belt path can be normal.
Step 1: Start With an Approved Rear Seating Position
Place the child restraint in a rear seating position permitted by both manufacturers. Remove any loose objects or unauthorized accessories beneath the seat.
Make sure the vehicle seat and child restraint are configured as instructed. Don’t remove or reposition a vehicle head restraint unless the vehicle and child restraint instructions permit it.
Step 2: Choose the Correct Installation Method
Most harnessed child restraints can be installed using either the vehicle seat belt or lower anchors. These methods are alternatives, not necessarily features you should combine.
Choose one approved method:
- Seat belt installation: Route the belt through the correct belt path and use the required locking method.
- Lower-anchor installation: Connect the approved lower-anchor attachments and tighten within the applicable weight limits.
Don’t use the seat belt and lower anchors together unless both manufacturers explicitly permit that combination. Check lower-anchor weight limits before choosing LATCH.
Step 3: Tighten the Installation Correctly
Follow the restraint manual’s instructions for applying pressure and removing slack. The correct direction of pressure can vary between seat designs.
For a seat belt installation, make sure the belt remains locked using the prescribed vehicle or restraint mechanism. A loose or unlocked seat belt may allow excessive movement.
Some seats include a built-in lockoff that secures the vehicle seat belt. Follow the manufacturer’s specific directions rather than assuming all lockoffs work alike.
Step 4: Check the Belt Path
The belt path is the designated opening or channel through which the vehicle belt or lower-anchor strap secures the child restraint. Rear-facing and forward-facing belt paths may be different.
Grasp the restraint near that path and apply a firm side-to-side and front-to-back movement. It should move no more than 1 inch in either direction.
If the seat moves more than this, reinstall it or try another approved installation method.
Step 5: Use the Top Tether When Required
Forward-facing harnessed car seats generally use a top tether to reduce forward head movement during a crash. The tether connects to a designated tether anchor in the vehicle.
Don’t attach it to a cargo hook or an unidentified metal bracket. Use only the correct anchor identified in your vehicle manual.
Step 6: Try an Alternative Approved Seating Position
A car seat that installs poorly in the center might install securely behind the driver or front passenger. This is common enough that trying another approved position is a useful troubleshooting step.
The Safe Kids Worldwide installation guide explains why seating positions and installation methods deserve individual attention.
A secure outboard installation is preferable to an insecure center installation. Always prioritize correct installation over choosing the center position at any cost.
Section Takeaway: A different installation method or approved seating location may solve a loose fit. Never use improvised hardware or extra restraints to compensate for an incompatible installation.
What If the Car Seat Is Too Large for Your Vehicle?
If a car seat is physically too large, check whether approved recline adjustments or another seating position provide enough clearance. If those options fail, a more compact compatible restraint may be necessary.
The correct solution depends on whether the seat is rear-facing, forward-facing, or a booster.
Rear-Facing Car Seat Takes Up Too Much Space
Rear-facing restraints often require considerable front-to-back room. Their recline angle helps support the child’s position and must remain within the manufacturer’s allowed range.
Some convertible seats offer different approved recline settings for different child sizes. Older infants or toddlers may qualify for a more upright setting, depending on the model.
Consider these solutions:
- Check the approved recline range for your child’s current size.
- Try the restraint in another permitted rear seating position.
- Check whether adjusting the vehicle seatback is allowed.
- Confirm the front passenger retains a safe seating position.
- Compare compact rear-facing restraints if space remains insufficient.
Never make the child restraint more upright than its instructions allow. A vehicle’s limited space does not override a required newborn recline angle.
Don’t place a rear-facing child restraint in front of an active passenger airbag.
The Front Passenger Seat Cannot Move Back Far Enough
Sometimes the car seat fits the rear cushion but prevents the front passenger from sitting safely. This is a passenger-space compatibility problem, even if the child restraint feels secure.
The front occupant still needs a proper seating position and adequate clearance from the airbag. Never force the front passenger into an unsafe posture to create room.
Try the other rear outboard position when permitted. Different front-seat settings and rear-seat geometry may provide better clearance.
The Car Seat Base Extends Beyond the Cushion
Some child restraints permit a limited amount of base overhang, while others require more complete support. There is no universal safe overhang percentage for every model.
Check the specific manufacturer requirement. Never assume that a certain amount of unsupported base is acceptable because another car seat allows it.
Three Car Seats Won’t Fit Across the Back Seat
Installing three child restraints across one row creates additional challenges. The seat shells, buckles, belt paths, and vehicle-seat contours all affect the available space.
A three-across installation must allow each restraint to function independently. One car seat must not depend on its neighbor for stability.
Check every restraint separately and verify that each remains secure when adjacent seats are removed. Confirm that all buckles and tether attachments remain accessible and correctly routed.
Narrower restraints may help, but exterior width alone cannot guarantee compatibility.
Can You Use Towels or Extra Padding?
Some child restraint manufacturers allow a tightly rolled towel or pool noodle to correct a rear-facing recline angle. Others restrict or prohibit these methods.
Use such items only when the exact car seat instructions permit them. Never add arbitrary cushions, wedges, seat protectors, or padding to improve fit.
Unauthorized accessories may change the restraint’s position or interfere with its intended crash performance.
Pro tip: If the approved recline position, base support, or front-seat clearance remains uncertain, contact the car seat manufacturer before using the installation.
Section Takeaway: A car seat must fit both the vehicle and its passengers without violating installation requirements. Physical clearance alone does not prove safety.
When Is a Car Seat Incompatible With a Vehicle?
A car seat is incompatible when the vehicle and restraint cannot meet all applicable installation requirements together. A tight installation is necessary, but it is not the only condition.
For example, a seat might pass the movement test while violating a required recline angle. It may also obstruct another passenger’s seat belt or lack a suitable tether anchor.
Car Seat Fit Problems and Recommended Solutions
| Fit Problem | What to Check | Recommended Action |
|---|---|---|
| Seat moves more than 1 inch | Belt path, locking method, lower-anchor tension | Reinstall correctly or try another approved method. |
| Rear-facing seat is too reclined or upright | Angle indicator and child-specific recline rules | Use only approved recline adjustments. |
| Front passenger lacks safe space | Front-seat position and contact restrictions | Try another rear position or a shorter restraint. |
| Center lower anchors unavailable | Approved anchor positions | Use an approved seat belt installation or another position. |
| Base extends beyond allowed support | Manufacturer overhang limits | Change position or choose a compatible restraint. |
| Forward-facing tether unavailable | Approved tether anchor location | Use a permitted tether-equipped seating position. |
| Booster belt fits incorrectly | Lap belt, shoulder belt, head support | Try an approved position or different booster. |
Signs You Should Stop Attempting the Installation
Some fitment problems cannot be fixed through ordinary adjustments. Continuing to improvise can create additional hazards.
Stop and seek guidance if:
- The restraint cannot remain tight at the belt path.
- Its required recline angle cannot be achieved.
- The installation violates either manufacturer’s instructions.
- The required tether or other installation component cannot be used correctly.
- The child restraint interferes with another occupant’s safe seating position.
- A damaged buckle, anchor, or belt prevents proper installation.
When Should You Contact a Certified Technician?
A certified Child Passenger Safety Technician, or CPST, can help identify installation errors and assess fitment options. Technicians can also explain manufacturer requirements and demonstrate correct techniques.
In the United States, the NHTSA car seat safety resource provides access to installation guidance and inspection services.
Inspection availability and costs vary by location, although many U.S. checks are free. Outside the United States, seek an appropriately trained local child passenger safety specialist.
Bring both instruction manuals, the vehicle details, and the actual child restraint. If possible, bring your child so the technician can also evaluate harness positioning.
Section Takeaway: If no permitted installation achieves a safe fit, don’t use that car seat in that vehicle. Get qualified help or select a compatible replacement.
How Do You Choose a Car Seat That Fits Your Vehicle?
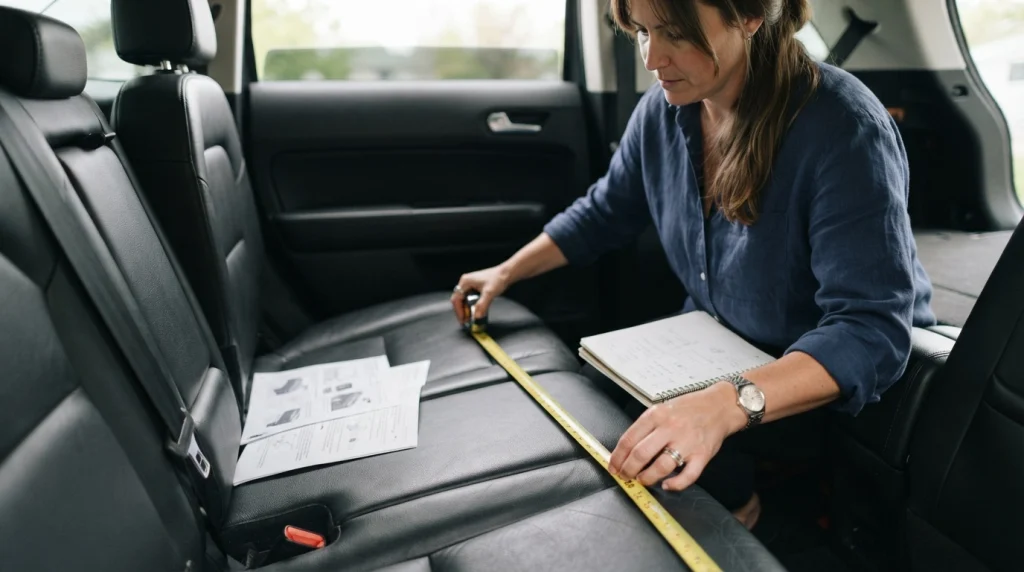
Choose a car seat by checking your child’s needs first, then verifying compatibility with your specific vehicle. A seat advertised as compact or universal still requires a proper installation in your car.
As of 2026, families can compare many restraint designs, but manufacturer instructions remain the deciding reference for compatibility.
Measure Your Available Space
Basic vehicle measurements can help narrow your search. However, measurements alone cannot guarantee a successful installation.
Record the following:
- Available front-to-back room behind the front seats.
- Usable width of the intended rear seating position.
- Vehicle seat cushion depth and shape.
- Location of seat belt buckles and lower anchors.
- Head restraint shape and adjustment options.
- Available tether anchors for forward-facing restraints.
For example, a rear seating area might offer about 18 inches of cushion depth. That number describes the vehicle but doesn’t establish whether a particular car seat base is adequately supported.
Compare manufacturer requirements rather than assuming the base must match the cushion dimensions exactly.
Consider the Right Type of Child Restraint
The best design depends on your child’s size and developmental stage. Different restraint categories also have different installation characteristics.
- Rear-facing infant seat: Usually provides a removable carrier and compatible base, although some models also permit baseless installation.
- Convertible car seat: Supports rear-facing use and later forward-facing use within its stated limits.
- All-in-one car seat: Offers multiple stages, but its dimensions may make installation harder in certain vehicles.
- Forward-facing harnessed seat: Requires careful attention to tether compatibility, harness limits, and vehicle positioning.
- Belt-positioning booster: Must position the vehicle’s lap-and-shoulder belt correctly on the child.
Do not select a later restraint stage merely because it occupies less room. Keep children rear-facing as long as their restraint’s height and weight limits allow.
Test the Seat in Your Actual Vehicle
Fit testing is often more useful than comparing product dimensions online. Two seats with similar exterior measurements may install differently because of their bases and belt paths.
If possible, ask a retailer whether you can test the display model in your vehicle under their supervision. Confirm the return policy before purchasing.
During the test:
- Verify that the restraint suits your child’s size.
- Confirm the selected seating position is approved.
- Install the restraint using an allowed method.
- Check the recline indicator, if applicable.
- Perform the movement test at the belt path.
- Check front passenger clearance and neighboring seat belts.
- Confirm the child harness or booster belt fit.
For infant seats, check carrier clearance and handle-position requirements. Certain models have specific rules for the handle’s position during vehicle travel.
Contact the Manufacturer Before Making a Final Decision
If compatibility remains unclear, contact the car seat manufacturer with your vehicle’s year, make, and model. Include the child restraint’s exact model number and the seating position you plan to use.
Ask which approved installation methods work and whether any known restrictions apply. Vehicle manufacturers can also clarify seat belt, lower-anchor, and tether limitations.
Check for Recalls and Product Restrictions
Before using a new or existing child restraint, check for current safety recalls. In the United States, you can search the NHTSA recall database for vehicle and child restraint information.
Register the car seat with its manufacturer so you can receive safety notifications. Also check the seat’s service-life information, history, and condition before use.
Section Takeaway: Choose the restraint that fits your child, installs correctly in your vehicle, and works safely for every passenger. A successful real-world fit test matters more than marketing claims.
Frequently Asked Questions
Can a car seat fit in any vehicle?
No. Child restraints are not guaranteed to fit every vehicle or seating position. Differences in seat geometry, anchor locations, belt design, and available space can prevent an approved installation.
Always check both manufacturer manuals and confirm that the final installation meets every requirement.
What should I do if my car seat is too big for my back seat?
Check the approved recline settings and try another permitted rear seating position. If the restraint still interferes with safe passenger seating or cannot meet its installation requirements, choose a compatible model with more suitable dimensions.
Never sacrifice the required recline angle or passenger safety to make it fit.
Can I install a car seat using a seat belt instead of LATCH?
Yes, many child restraints allow installation with either the vehicle seat belt or lower anchors. Use the method permitted by the specific car seat and vehicle manuals, and follow the correct belt locking instructions.
Don’t combine both methods unless both manufacturers specifically allow it.
Is the center of the back seat always the safest location?
The center rear position can offer safety advantages when a child restraint installs correctly there. However, some vehicles lack suitable center anchors or have seat shapes that complicate installation.
A correct rear outboard installation is safer than an incorrect center installation.
Can I put a towel under a car seat to make it fit?
Only if the car seat manufacturer explicitly permits that particular method. Some rear-facing seats allow a rolled towel or pool noodle to achieve the correct recline, but arbitrary padding is not an acceptable solution.
Never add extra material simply to stop movement or fill an unsupported gap.
How much movement is acceptable after installing a car seat?
For a harnessed car seat, movement should not exceed 1 inch side-to-side or front-to-back when checked at the belt path. Movement at the top of the restraint is not the correct way to perform this test.
If it exceeds the limit, reinstall the restraint before use.
What if my car seat still doesn’t fit after trying everything?
Stop using the unsuccessful installation and contact the child restraint manufacturer or a certified child passenger safety technician. They can help identify whether another approved option exists.
If the seat remains incompatible, replace it with a restraint suitable for both your child and vehicle.
Final Takeaway: Never Force a Car Seat to Fit
When a car seat does not fit your vehicle, the safest response is to identify the exact problem rather than improvise a solution. Sometimes changing to another approved seating position or installation method solves the issue.
Other situations require a different child restraint. A secure fit, correct recline angle, suitable vehicle location, and properly restrained child must all come together.
My preferred approach is simple: check the manuals, verify the installation, and seek qualified help when anything remains uncertain. A car seat is the right choice only when you can use it correctly on every journey.
Before your next trip: Recheck the restraint at its belt path, confirm the harness or booster belt fit, and make sure every passenger has a safe seating position.

Daniel Brooks is an automotive writer and product researcher focused on car accessories, car tech, maintenance, and practical driving guides. At Plug-in Car World, he helps drivers make smarter automotive decisions through honest reviews and research-driven content.