
A Parent’s Checklist for Car Seat Transitions
Quick Answer
A car seat transition means moving your child to the next stage only when they outgrow the current seat’s height or weight limit, not on a birthday alone. That usually means rear-facing as long as the seat allows, then forward-facing with a harness, then a booster, then a seat belt alone, with the back seat first at every stage. Use this checklist to check the seat manual, the harness fit, and your state rules before you switch, and see the rear-facing vs. forward-facing guide for the first big change.
Move up only when all of these are true
- Height and weight first: Your child has reached a limit in the current seat’s manual, or is close enough that a switch is planned, not rushed.
- Harness fit next: The harness still fits correctly in the current seat, or the next stage gives a better, safer fit.
- Booster fit test: A booster is used only when the seat belt fits low on the hips and across the shoulder, not the neck or belly.
- Back seat rule: The back seat stays the first choice at every stage, unless a lawful exception applies.
- Manual wins: The seat manual and your state rules both allow the move, and the seat is not expired, recalled, or crash-damaged.
Before you move up
- Read the height, weight, and harness-height limits on the seat label.
- Do a fit check in your own car, with your child in the seat.
- Re-check the install after the switch, including tightness and tether use where the manual requires it.
Welcome to a checklist that slows the decision down, in a good way. I know how tempting it is to move a child up early, especially when friends are doing it or a birthday is near.
This guide goes deeper than a single age chart, because it walks through each stage, each fit check, and each common mistake. It gives general guidance, not a test of one seat, so your seat manual and local rules are the final check.
A quick note on terms: this guide is about child car seats, also called child restraints, not about protective covers that go over a vehicle’s seats. A cover is a separate accessory, and it must never change how a child seat fits or how a harness works.
In This Guide
- What Is a Car Seat Transition?
- When Should a Child Move From Rear-Facing to Forward-Facing?
- When Is a Child Ready for a Booster Seat?
- When Can a Child Stop Using a Booster Seat?
- When Can a Child Safely Sit in the Front Seat?
- How Do You Check Fit, Laws, and Expiry Before Every Transition?
- Frequently Asked Questions
What Is a Car Seat Transition?
A car seat transition is the move from one child restraint stage to the next as a child grows. It is not a reward for a birthday, and it is not a switch you make early for convenience.
The stages follow a simple order, even though the timing varies by child and by seat. Each stage is designed to fit a smaller body in a different way.
- Rear-facing seat: The child faces the back of the car, with a harness holding the body in the seat shell.
- Forward-facing seat: The child faces forward, still held by a harness, with a top tether where the manual requires it.
- Booster seat: The booster lifts the child so the vehicle seat belt fits the hips and shoulder correctly.
- Seat belt alone: The child uses the vehicle seat belt only, once the belt fits without a booster.
Why does moving up too early matter?
Moving up too early can leave a gap in protection, because the next stage is built for a larger body. A harness that is too loose, a belt that rides up on the belly, or a child who cannot sit still can all reduce how well the restraint works.
Staying in the current stage until its limits are reached is usually the safer choice. That rule holds even when a child seems ready, tall for their age, or eager to face forward.
Section takeaway: A transition is a fit decision, not a milestone celebration. Check limits first, then fit, then the law.
When Should a Child Move From Rear-Facing to Forward-Facing?

Keep a child rear-facing until they reach the maximum height or weight for that rear-facing seat, as shown in its manual. Age alone does not end the rear-facing stage.
Many parents ask about this stage first, because it feels like the biggest change. It is also the stage where a manual check matters most, since limits differ from seat to seat.
How do you know the rear-facing seat is outgrown?
Check the manual for its rear-facing height limit, weight limit, and headroom rule. Do not use a limit from another seat, a friend’s seat, or a general chart in place of your own manual.
- Weight limit reached: The child’s weight meets the rear-facing maximum printed for that seat.
- Height limit reached: The child’s height meets the rear-facing maximum printed for that seat.
- Headroom limit reached: The child’s head reaches the headroom point the manual sets for that seat.
As an illustrative example, picture a checklist taped inside a garage cabinet, with the seat’s limits written in plain numbers. That simple habit makes the next check faster, and it stops a guess from turning into a switch.
What changes when you turn the seat forward?
The harness routing, harness height, and recline setting may all change, so re-read those pages before you reinstall. The top tether also becomes part of the install for most forward-facing seats, where the vehicle and seat manuals require it.
For a closer look at this first change, read when to turn a car seat forward-facing before you move the seat. It covers the timing question in more detail, without replacing your own manual.
Pro tip: For airbag, tether, and install questions, check the vehicle owner’s manual, the seat manual, and NHTSA resources, or ask a certified child passenger safety technician.
Section takeaway: Rear-facing ends at the seat’s limits, not at a birthday. Re-read the manual before you turn the seat.
When Is a Child Ready for a Booster Seat?
A child is ready for a booster when they outgrow the forward-facing harness seat by height or weight, and can sit correctly for the whole ride. Both parts matter, and the second part is easy to overlook.
A booster does not hold a child the way a harness does. It positions the vehicle belt, so the child must stay in position for the belt to work.
What does booster readiness look like in the car?
Watch a full, ordinary ride, not just a quick sit in the driveway. A child who slumps, leans, plays with the belt, or falls asleep out of position is not yet getting full benefit from a booster.
- Sits upright: The child sits with their back against the vehicle seat back for the whole ride.
- Knees bend naturally: The knees bend at the edge of the vehicle seat, without slouching forward.
- Belt stays put: The lap belt stays low on the hips, and the shoulder belt stays across the shoulder and chest.
- Stays in place: The child can stay seated correctly without frequent reminders, even on a longer trip.
High-back or backless: which booster fits the ride?
A high-back booster can help when a vehicle seat has no head support, or when a child needs help staying in position. A backless booster can work when the vehicle seat and head restraint already give good head support, and the belt fits well.
The right choice depends on your vehicle seat, your child’s size, and the belt fit in that exact seating spot. For the timing question itself, see when a child should switch to a booster seat alongside your seat manual.
Section takeaway: A booster is ready when the harness seat is outgrown and the child can sit correctly for a whole ride. Fit in your car is the test.
When Can a Child Stop Using a Booster Seat?
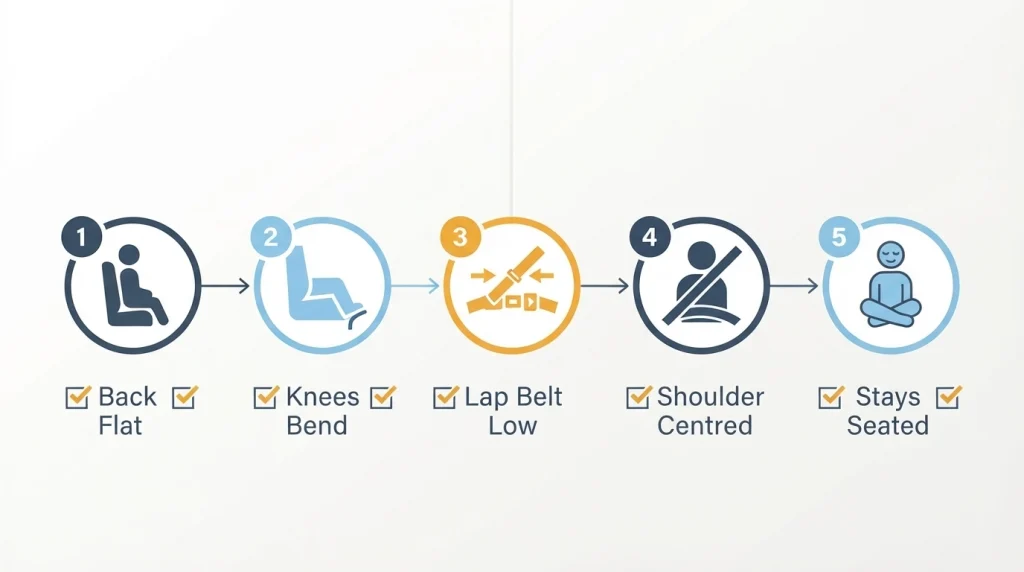
A child can stop using a booster when the vehicle seat belt fits correctly without it, in that seating position, every time. That fit test matters more than age, and more than height alone.
Many guides mention around 4 feet 9 inches as a general height reference for seat belt fit. Treat that number as a rough guide only, because belt shape, seat shape, and body proportions all change the fit.
What is the five-step seat belt fit test?
Use this test in the actual car and seating position, with the child sitting normally. Every step must pass, not just most of them.
- Back flat: The child sits with their back flat against the vehicle seat back.
- Knees bend: The knees bend comfortably at the edge of the seat, without slouching.
- Lap belt low: The lap belt sits low on the hips and upper thighs, not on the belly.
- Shoulder belt centred: The shoulder belt crosses the shoulder and chest, not the neck or face.
- Stays seated: The child can stay in that position for the whole ride, without shifting the belt.
If any step fails, keep the booster, even if the child is older than friends who stopped using one. A booster is a fit tool, not a baby seat, and keeping it longer is not a setback.
For the exit timing in detail, read when a child can stop using a booster seat before you retire the booster. Re-test the fit after a growth spurt, a new car, or a new seating position.
Section takeaway: The booster ends when the belt fits without it, on all five steps. If one step fails, keep the booster.
When Can a Child Safely Sit in the Front Seat?
The back seat is the safest seating position for children, so it stays the first choice even after the booster stage. A move to the front seat is a separate decision from stopping booster use.
Front passenger airbags are designed for larger, adult-sized occupants, and they can injure a smaller child. Never place a rear-facing seat in front of an active front airbag.
What should you check before any front-seat ride?
Check your state rules first, since front-seat age and size rules vary by state. Then check the vehicle manual for airbag warnings, seat position guidance, and any front-seat limits it sets.
- State rule: Your state allows a child of this age and size in the front seat, for this type of ride.
- Seat position: The front seat is moved as far back as practical, with the belt fitting correctly.
- Airbag status: You know whether the front airbag is active, and you have followed the vehicle manual for that setting.
- Need for the move: The front seat is needed for a real reason, not just for convenience on a short trip.
For a fuller front-seat checklist, see when a child can safely sit in the front seat. It covers back-seat safety, belt fit, and the cases where a front ride cannot be avoided.
Pro tip: For airbag and front-seat safety questions, check the vehicle owner’s manual and HealthyChildren, the American Academy of Pediatrics family site, or ask a certified technician.
Section takeaway: The back seat stays first, even after the booster ends. Front-seat rides need a state check, a manual check, and a real reason.
How Do You Check Fit, Laws, and Expiry Before Every Transition?
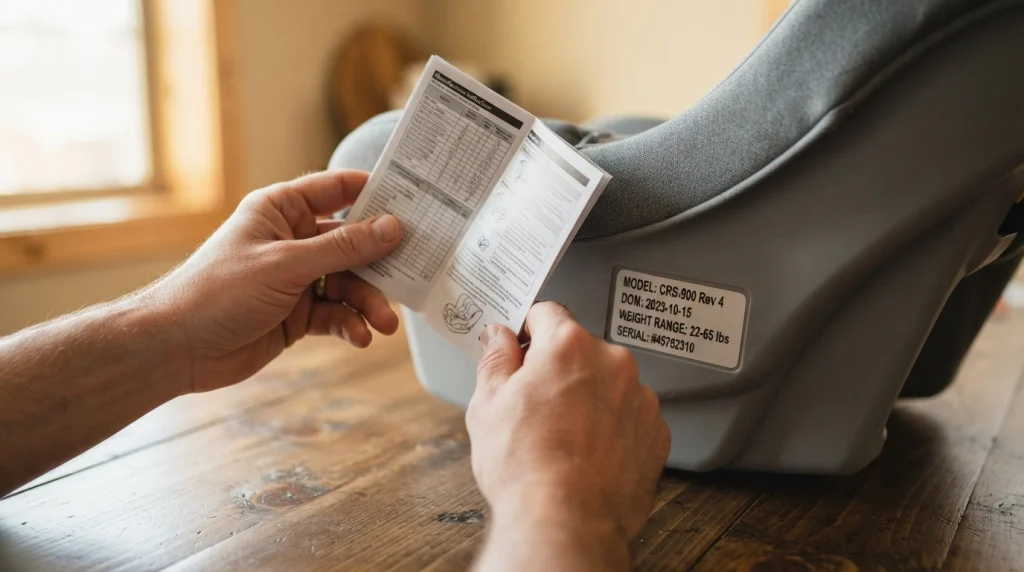
Use three checks before every transition: the seat manual, the fit in your car, and your state rules. As of 2026, state rules still vary, so a rule that fits one state may not fit another.
Do these checks in order, and stop the switch if any check fails. A transition that passes two checks but fails the third is not ready yet.
What should you check on the seat label and manual?
Start with the label on the seat shell, then read the manual pages for that stage. Keep the manual with the seat, or keep a photo of the key limit pages where you can find them.
- Height and weight limits: The limits for the current stage, and for the next stage if you are planning ahead.
- Harness height: The correct harness slot or headrest position for the child’s current height and facing direction.
- Expiry date: The seat’s expiry or useful-life date, as printed by the manufacturer.
- Recall status: Whether the seat model has an open recall, and what the manufacturer instructs you to do.
- Crash history: Whether the seat was in a crash, and what the manual says about replacement after a crash.
How do state laws fit into this checklist?
State laws set minimums, while seat manuals set the limits for that specific seat. Follow both, and do not move up if either one says the child is not ready.
For the size and age rules in one place, see car seat age, height, and weight requirements. Then confirm the current rule for your own state, since laws can change and local rules can add details.
When you compare seats or plan a next purchase, Consumer Reports can help you compare ratings and features, but it does not replace the manual for your seat. Use ratings as background, and fit as the deciding check.
What does each transition change at a glance?
Use this table as a quick recap, not as a replacement for your manual. Each row shows the job of the stage, and the check that ends it.
| Stage | Main job | Move up when | Check before you switch |
|---|---|---|---|
| Rear-facing | Harness holds the child in the seat shell, facing the rear | Height, weight, or headroom limit is reached | Manual limits, recline, and install tightness |
| Forward-facing harness | Harness holds the child facing forward, with a tether where required | Harness height or weight limit is reached | Harness fit, tether use, and sitting still for a full ride |
| Booster seat | Lifts the child so the vehicle belt fits hips and shoulder | Seat belt fits correctly without the booster | Five-step belt fit test in that seating position |
| Seat belt alone | Vehicle belt fits hips and shoulder, with back-seat seating first | No further stage, but re-test after growth or a new car | Belt fit, back-seat choice, and state front-seat rules |
Section takeaway: Manual, fit, and law must all agree before a switch. If one check fails, the current stage stays.
Frequently Asked Questions
Should I move my child up on their birthday?
No, a birthday alone is not a fit check, and it does not change the seat’s height or weight limits. Wait until the manual limits, the harness or belt fit, and your state rules all point to the next stage.
Does a taller child need to move up sooner?
A taller child may reach a height limit sooner, but height alone does not decide the switch. Check the manual’s height limit, the harness position, and how the child sits in that exact seat.
Can I use a booster for a short trip if the harness seat is in another car?
Do not use a booster as a shortcut for a short trip when the child still needs a harness seat. Keep the correct stage in each car you use regularly, or plan the trip around the seat that fits.
Is the front seat safe if the airbag can be turned off?
Turning off an airbag does not make the front seat equal to the back seat, and front-seat rules still vary by state. Keep children in the back when you can, and follow the vehicle manual for any front-seat exception.
What if my state law and my seat manual seem different?
Follow both, and do not move up if either one says the child is not ready for the next stage. When the two seem to conflict, follow the stricter requirement and ask a certified technician for help.
Do I need a new seat after a crash, even for a transition?
Often yes, because many manuals require replacement after a crash, even when damage is not visible. Check the manual’s crash-replacement guidance, contact the manufacturer if you are unsure, and do not reuse an expired or recalled seat.
Closing takeaway: Before your next ride, check one thing in your car, not just on a chart.
- Read the limit: Find the height and weight limit for the stage your child is in now.
- Test the fit: Check the harness or belt fit with your child seated normally.
- Confirm the rule: Confirm your state rule and the seat’s expiry and recall status.
If all three pass, you are ready to plan the next stage. If any one fails, staying in the current stage is the safer, simpler choice.

Daniel Brooks is an automotive writer and product researcher focused on car accessories, car tech, maintenance, and practical driving guides. At Plug-in Car World, he helps drivers make smarter automotive decisions through honest reviews and research-driven content.