How Do You Loosen a Steering Wheel Cover That Is Too Tight?
Quick Answer
You can loosen a tight steering wheel cover by warming it, easing it off in sections, and stretching it evenly. Warmth makes leather, synthetic leather, and silicone more flexible. Avoid yanking one edge or cutting the cover free, and check vehicle safety guidance if your work nears the airbag area.
Fastest safe approach
- Warm first: Heat one small section at a time until it feels pliable, not hot.
- Work in sections: Ease the cover off a few inches at a time, rather than pulling from one point.
- Stretch evenly: Pull the material outward with both hands to spread tension across the cover.
- Check the fit: Compare the cover size with your wheel diameter before you refit it.
- Stop if stressed: Pause if stitching pulls, seams whiten, or the material feels brittle.
Avoid these mistakes
- Do not cut the cover while it sits on the wheel.
- Do not use high heat on leather or stitched seams.
- Do not force a cover that leaves part of the rim exposed.
A tight cover can turn a simple upgrade into a wrestling match. This guide breaks the fix into safe, repeatable steps.
It also covers wrong-size signs and a snug refit.
In This Guide
- Why Is My Steering Wheel Cover So Tight?
- What Do You Need Before You Loosen It?
- How Do You Loosen a Steering Wheel Cover Step by Step?
- What If the Cover Still Won’t Budge?
- How Do You Tell If the Cover Is the Wrong Size?
- How Do You Refit a Cover So It Stays Snug but Not Too Tight?
- Frequently Asked Questions
- Final Takeaway
Why Is My Steering Wheel Cover So Tight?
A steering wheel cover is a sleeve that fits over the rim of a steering wheel. It adds grip, protects the original surface, and changes how the wheel feels in your hands.
A new cover often feels tight by design. Makers size covers close to the wheel so they do not slip while you turn.
Cold weather can make the problem worse. Leather stiffens in the cold, and some synthetic materials lose flex until they warm up.
Other causes are easy to miss. Use this list to narrow down your case:
- New material: Fresh leather and thick padding need time and warmth to settle.
- Wrong diameter: A cover made for a smaller wheel will fight you at every inch.
- Thick rim: Some wheels already have a chunky rim, so a padded cover adds extra bulk.
- Uneven fitting: A cover pulled tight on one side will bunch or resist on the other side.
- Cold start: A cover fitted in winter may feel far tighter than the same cover in summer.
Most passenger-car wheels measure 14.5 to 15.5 inches across, or about 37 to 39 cm. As of 2026, most covers still list that range on the label, so check it before you blame the material.
For general material care basics, Consumer Reports is a useful starting point. It will not give you a size for your exact car, so your own measurement still matters most.
Section takeaway: A cover that feels tight is often new, cold, or one size too small — not broken.
What Do You Need Before You Loosen It?
You do not need special garage tools for this job. Most drivers can loosen a cover with items already at home.
Gather these items before you start:
- A hair dryer with low and medium settings
- A clean microfiber towel
- Thin gloves, if your hands slip on smooth material
- A soft plastic trim tool or an old card, for gentle leverage only
- A tape measure, for checking wheel diameter
Park on level ground and switch the engine off. Keep the wheel straight so you can work around it in even sections.
Work on the rim only, not the centre hub. The hub holds the horn and, in most modern cars, the SRS airbag system.
Pro tip: Check your vehicle’s owner’s manual for airbag and steering-wheel safety notes before you work near the hub, or ask a certified mechanic if anything looks damaged.
Avoid sharp knives, screwdrivers, and metal scrapers. They can cut stitching, nick the wheel surface, or tear the cover in one slip.
Section takeaway: Warmth, patience, and soft tools beat force every time.
How Do You Loosen a Steering Wheel Cover Step by Step?
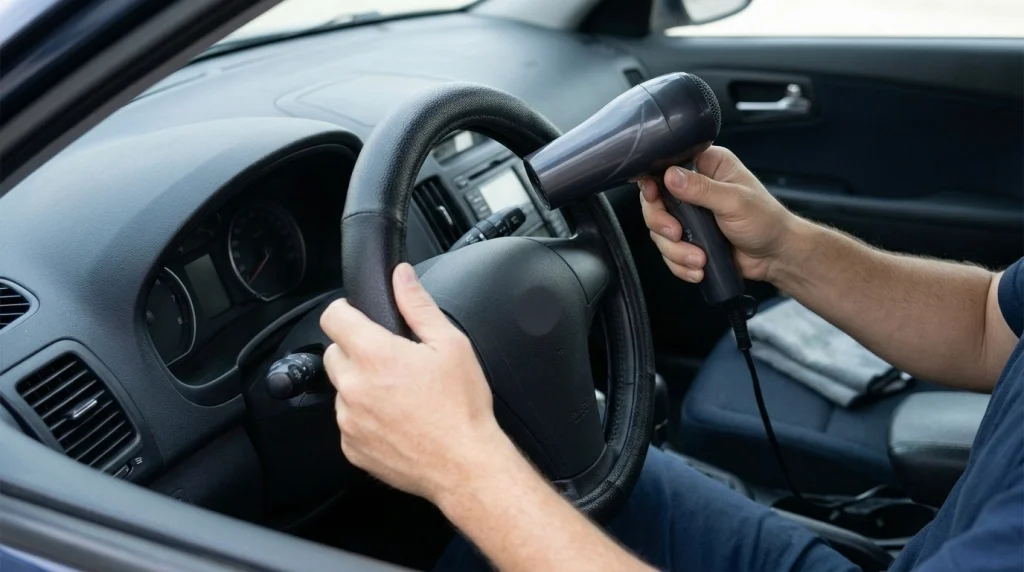
Start at the top of the wheel and move in short sections. This keeps tension even and stops one side from stretching more than the other.
Follow these steps in order:
- Warm one section: Hold a hair dryer 15 to 20 cm away on low or medium heat. Move it slowly for 30 to 60 seconds.
- Test the feel: Press the warmed section with your palm. It should feel pliable, not hot or tacky.
- Ease the edge off: Roll the inner edge outward with your thumbs. Work across 10 to 15 cm at a time.
- Stretch as you go: Pull the loosened section gently outward. Keep both hands close together to spread the load.
- Turn the wheel: Rotate it a quarter turn and repeat the warm-and-ease pattern. This gives you a fresh, comfortable working angle.
- Check the seams: Look for pulled thread or whitening at stitched joints. Pause if either appears.
- Remove and rest: Once the cover comes free, lay it flat for 10 to 15 minutes. It should relax before you refit it.
Silicone covers often respond faster than leather. Leather needs slower heat and more patience, since high heat can dry it out.
Do not soak a leather cover to soften it. Water can stain the surface and weaken stitching over time.
If the cover still grips hard after two warm passes, move to the next section. Forcing a cold, stiff section is how seams split.
Section takeaway: Warm a little, ease a little, and repeat — that rhythm loosens most tight covers without damage.
What If the Cover Still Won’t Budge?
A stubborn cover usually needs more warmth, more time, or a different angle. It rarely needs more force.
Try parking in direct sun for 20 to 30 minutes on a warm day. Sunlight warms the whole cover evenly, which a hair dryer cannot always do.
For a silicone cover, a towel dampened with warm water can help. Wipe the outer surface, wait a few minutes, then try the easing steps again.
| Method | How it helps | Time needed | Watch out for |
|---|---|---|---|
| Hair dryer, low heat | Softens one section at a time | 30 to 60 seconds per section | Overheating leather or seams |
| Sun warming | Warms the full cover evenly | 20 to 30 minutes | A hot wheel surface on summer days |
| Warm damp towel | Adds gentle heat to silicone | 5 to 10 minutes | Soaking leather or stitched covers |
| Off-wheel stretching | Lets the material relax evenly | 10 to 15 minutes flat | Uneven pulling on one side |
Use a plastic trim tool only as a gentle lever. Slide it under the inner edge, lift a small amount, then finish the section by hand.
Stop and reassess if the cover tears, a seam opens, or the wheel surface shows damage. A replacement cover often costs far less than a wheel repair.
Replacement covers commonly fall in a general $15 to $40 range, depending on material and brand. Check local retailers for a current price before you buy.
If steering itself feels stiff, heavy, or loose, that is a separate issue. RepairPal lists general repair cost ranges, but get a local quote for your car.
Section takeaway: If gentle heat and even stretching fail twice, the size — not your technique — is likely the problem.
How Do You Tell If the Cover Is the Wrong Size?
Measure the wheel before you buy a replacement. Guesswork is the main reason this job repeats itself.
Measure straight across the centre of the wheel, from outer edge to outer edge. Do not measure around the rim, since that gives a much larger number.
Compare that number with the size range printed on the cover label. A 15-inch wheel needs a cover rated for 15 inches, not one rated up to 14.5 inches.
These signs point to the wrong size:
- Part of the rim stays exposed after full fitting.
- The cover will not close evenly around the back of the rim.
- Seams split or pull apart during fitting.
- The cover bunches at the bottom while the top stays drum-tight.
- Your measured diameter sits outside the label range.
A cover that is only slightly tight may settle after warming and refitting. A cover that is a full size too small will not stretch into a safe fit.
Vehicle specs can help you double-check the stock wheel size. Edmunds lists many models, but your tape measure beats a spec page for an aftermarket wheel.
Section takeaway: Measure first, then match the label — a correct size should feel snug, not like a fight.
How Do You Refit a Cover So It Stays Snug but Not Too Tight?
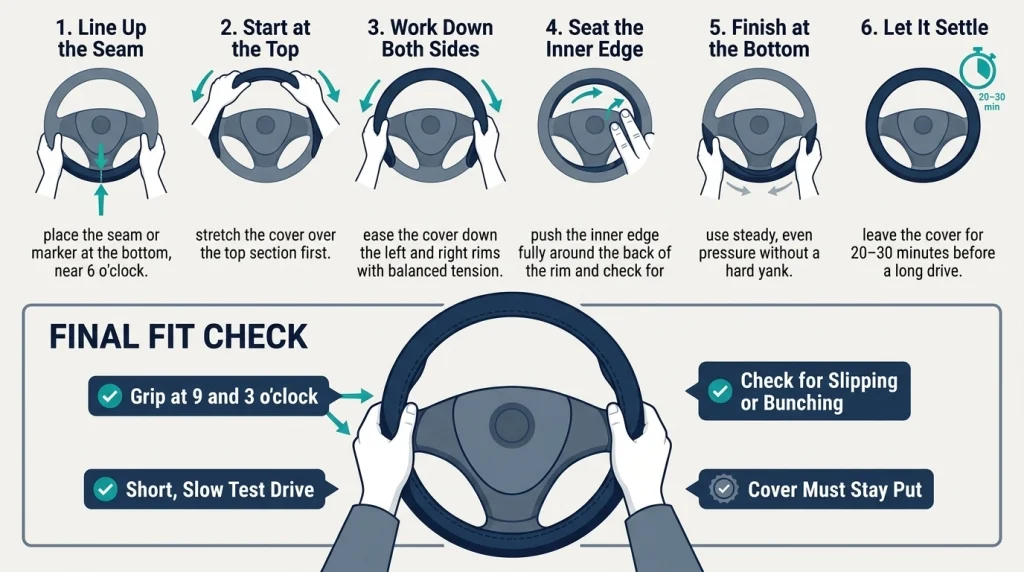
Refitting matters as much as loosening. A rushed refit can recreate the same tight spots you just fixed.
Warm the cover lightly first, especially on a cool day. A pliable cover seats more evenly than a cold, stiff one.
Follow these refit steps:
- Line up the seam: Place any seam or marker at the bottom of the wheel, near the 6 o’clock position.
- Start at the top: Stretch the cover over the top section first. This anchors the fit before you work down the sides.
- Work down both sides: Ease the cover down the left and right rims in turn. Keep the tension balanced.
- Seat the inner edge: Push the inner edge fully around the back of the rim. Check for twists as you go.
- Finish at the bottom: Pull the last section into place with steady, even pressure. Avoid a final hard yank.
- Let it settle: Leave the cover for 20 to 30 minutes before a long drive. It should cool and hold its shape.
Test the fit with a short, slow drive around your street. Grip the wheel at 9 and 3 o’clock and check for slipping or bunching.
A good fit stays put when you turn, yet still lets you slide your fingers under the inner edge. A cover that rotates on its own is too loose for safe use.
Section takeaway: An even, balanced refit gives you grip without the struggle — and it lasts longer than a forced fit.
Frequently Asked Questions
Can I use a hair dryer on a leather steering wheel cover?
Yes, on a low or medium setting, and keep the dryer moving at all times. Hold it 15 to 20 cm away for 30 to 60 seconds per section, then test the feel before adding more heat.
Will a tight cover damage my steering wheel?
A snug cover should not damage a healthy wheel surface, but a forced fit can stress stitching and trim. Stop if you see pulled thread, cracking, or marks on the original wheel material.
Should I cut a cover that is too tight?
No, cutting rarely gives a clean or safe result, and it ruins the cover for return or reuse. Warm it, ease it off in sections, and replace it if your measurement shows the wrong size.
How long should loosening a steering wheel cover take?
Most covers loosen in 15 to 30 minutes, including warming and resting time for the material. Leather and thick padded covers may need longer, while thin silicone covers often loosen faster.
Can I stretch a cover permanently?
You can relax a new cover slightly with warmth and even stretching, but you cannot safely turn a small cover into a larger one. A cover that still leaves rim exposed after warming is the wrong size.
Does a loose cover create a safety risk?
Yes, a cover that slips or rotates can reduce your control during a quick turn or emergency move. Replace a loose cover, and never use tape or glue to hold a slipping cover in place.
Final Takeaway
Warm the cover, work in small sections, and stretch it evenly. That simple pattern solves most tight-cover problems without tools, cuts, or damage.
Measure your wheel before your next purchase. A correct size feels snug from the first fit, and it stays comfortable for far longer.

Daniel Brooks is an automotive writer and product researcher focused on car accessories, car tech, maintenance, and practical driving guides. At Plug-in Car World, he helps drivers make smarter automotive decisions through honest reviews and research-driven content.