Where Should the Car Seat Chest Clip Be Positioned?
Quick Answer
The car seat chest clip should sit at armpit level, centered on the chest. Check the same spot on every ride, and confirm the details in the seat manual and at NHTSA.
The correct position in seconds
- Armpit level: Line the top or center of the clip up with the child’s armpits.
- Centered chest: Keep the clip in the middle of the chest, not shifted to one side.
- Flat straps: Keep both harness straps flat and untwisted under the clip.
- Snug harness: Tighten the harness first, then slide the clip into place.
- Every ride: Recheck the clip after coats, blankets, or a wriggly buckle-up.
If it looks wrong
- Move a clip on the neck down to armpit level.
- Move a clip on the belly up to armpit level.
- Stop and re-tighten the harness if the straps still feel loose.
The chest clip is a small part, and it causes a lot of second-guessing. Its job is simple, but its position changes how well the harness stays where it should.
This guide gives the exact landmark to use, shows what too high and too low look like, and walks through a quick check. It also covers rear-facing seats, forward-facing seats, booster seats, and common seat-cover mistakes.
In This Guide
- What Is a Car Seat Chest Clip?
- Where Should the Car Seat Chest Clip Be Positioned?
- What Happens If the Clip Is Too High or Too Low?
- How Do You Check and Adjust the Chest Clip?
- Does Chest Clip Position Change by Seat Type?
- What Are the Most Common Chest Clip Mistakes?
- Frequently Asked Questions About Chest Clip Position
What Is a Car Seat Chest Clip?
A chest clip is the small plastic clip that joins the two harness straps across a child’s chest. It is also called a harness retainer clip.
The clip is not the main restraint. The harness straps, buckle, and car seat shell do the main work in a crash.
Think of the clip as a positioning aid. It helps keep the straps on the shoulders and centered on the chest before and during a crash.
That role still matters. Straps that slide off the shoulders cannot spread crash forces as designed.
Why is it called a retainer clip?
The name gives away the job. The clip retains, or holds, the straps in position.
It does not replace a snug harness. A loose harness with a perfectly placed clip is still loose.
Section takeaway: The chest clip keeps the harness positioned, but the harness itself must be snug and correctly routed.
Where Should the Car Seat Chest Clip Be Positioned?
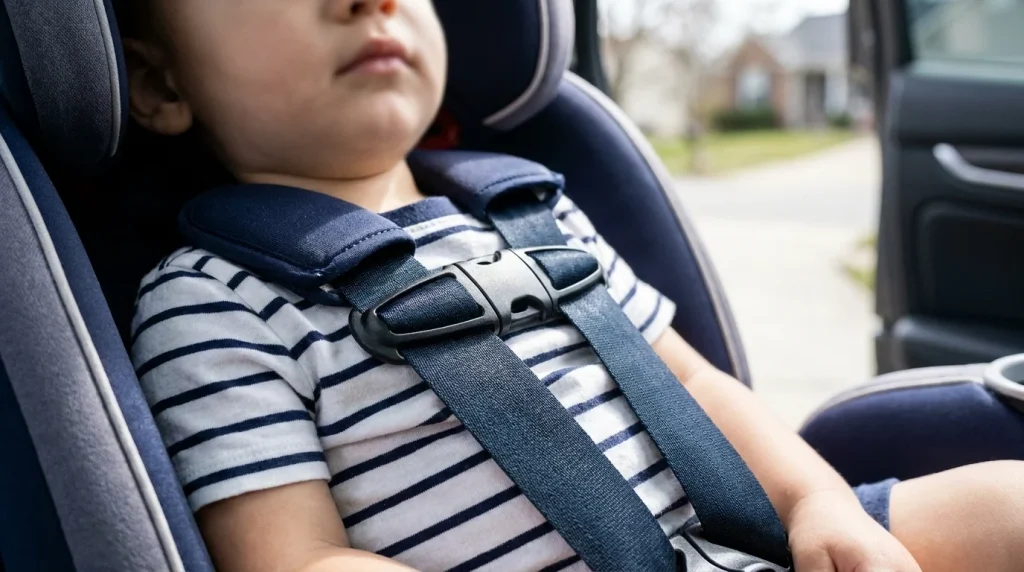
Place the chest clip at armpit level. Line it up with the child’s armpits, centered on the chest.
Use the child’s body as the guide, not the car seat shell. Children grow fast, so the right spot moves as they grow.
The clip should lie flat against the chest. It should sit over the breastbone, or sternum, in the center of the chest.
Both harness straps should pass straight through the clip. Neither strap should bunch, twist, or ride up toward the neck.
How do you find armpit level quickly?
Look at the child from the front after buckling. Find the line across the chest where the armpits sit.
Slide the clip up or down until its center lines up with that line. Small adjustments count, so move it in short steps.
Check from the side if you are unsure. A clip that looks centered from the front can still sit high near the throat.
Should the clip sit a little above or below the armpits?
Aim for level, not close enough. A clip just above the armpits can creep toward the neck during a ride.
A clip just below the armpits can let the straps drift outward. Use the armpit line as the target each time.
Pro tip: Always confirm the exact clip design and routing in the car seat manual, and check NHTSA guidance if the manual and a general guide seem to differ.
Section takeaway: Armpit level, centered, and flat is the position to use on every ride.
What Happens If the Clip Is Too High or Too Low?
A clip that is too high can press on the neck or throat area. It can also feel uncomfortable, which makes a child more likely to fuss with it.
A clip that is too low can let the harness straps slide off the shoulders. That risk is the main reason the belly is the wrong spot.
Low placement also changes how the harness holds the upper body. The straps need to stay on the strong parts of the shoulders and chest.
| Clip position | What you see | Why it matters |
|---|---|---|
| Correct | Clip at armpit level, centered, straps flat | Straps stay on the shoulders and across the chest |
| Too high | Clip near the neck or throat | Pressure near soft tissue, and straps may pull inward |
| Too low | Clip on the belly or below the chest | Straps can slide off the shoulders in a crash |
Do not use the belly as a shortcut for a child who dislikes the clip. Move it to armpit level and check the harness tension instead.
Discomfort often points to a twisted strap, a bulky coat, or a harness that needs adjusting. Fix that cause rather than moving the clip to the wrong spot.
Section takeaway: Too high risks neck pressure, too low risks straps sliding off, and armpit level avoids both problems.
How Do You Check and Adjust the Chest Clip?
Check the clip after the harness is snug, not before. Tightening the harness can shift the clip, so order matters.
Use this short sequence on every ride. It takes under a minute once it becomes habit.
- Buckle the harness and remove slack from the hip straps first.
- Pull the harness adjuster strap until the harness feels snug.
- Try the pinch test at the collarbone: pinch the strap vertically, and no slack should fold between your fingers.
- Slide the chest clip up or down to armpit level.
- Confirm the clip is closed, centered, and flat against the chest.
- Recheck the straps for twists before you drive off.
Do not slide the clip by yanking one strap. Hold both straps steady and move the clip in small steps.
If the clip keeps sliding down, check the harness tension first. Loose straps give the clip room to move, and a snug harness often fixes the drift.
Illustrative example: the 30-second recheck
Illustrative example: a caregiver buckles a toddler, tightens the harness, and finds the clip sitting on the belly. The caregiver slides it up to armpit level, rechecks the pinch test, and confirms both straps lie flat.
That short pause catches the two most common errors at once. It checks both tightness and position, rather than position alone.
Section takeaway: Tighten first, pinch-test second, and place the clip at armpit level last.
Does Chest Clip Position Change by Seat Type?
The armpit-level rule stays the same for rear-facing and forward-facing harness seats. Direction changes how the seat faces the road, not where the clip belongs on the chest.
Rear-facing infants need the same check, even when the seat looks snug. Small babies shift in thick blankets and sleep suits, so recheck after settling them in.
Forward-facing toddlers and preschoolers need the same check too. Growth spurts and new coats can change the fit from one week to the next.
What about booster seats?
Booster seats do not use a harness or a chest clip. They lift the child so the vehicle seat belt fits across the strong parts of the body.
Do not add a chest clip to a booster seat. Use the vehicle lap and shoulder belt as the booster manual directs.
That difference trips up a lot of parents during the switch. The harness stage ends, and the belt stage uses a different fit check.
What if a seat has no chest clip?
Some seats sold outside the United States do not include a chest clip. Follow that seat’s manual rather than adding a part it was not designed to use.
Do not buy an aftermarket clip for a seat that did not come with one. Aftermarket parts can change how the harness works, and the manual is the authority for that seat.
Section takeaway: Rear-facing and forward-facing harness seats use armpit level, booster seats use the vehicle belt, and a seat without a clip should stay that way.
What Are the Most Common Chest Clip Mistakes?
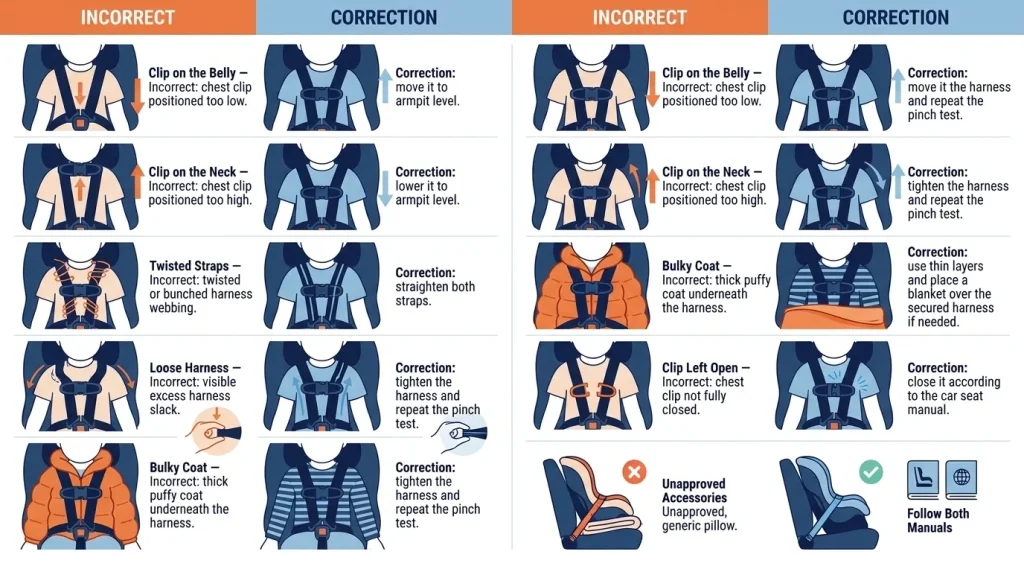
Most chest clip errors come from rushing the buckle-up. A quick scan catches them before the car moves.
- Clip on the belly: Slide it up to armpit level and recheck harness tension.
- Clip on the neck: Slide it down to armpit level and check for twisted straps.
- Twisted straps: Untwist each strap fully so it lies flat through the clip.
- Loose harness: Tighten the harness, then redo the pinch test at the collarbone.
- Bulky coat: Remove the coat, buckle snugly, then place a blanket over the harness if needed.
- Clip left open: Close it fully and confirm it clicks or locks as the manual describes.
Bulky clothing deserves a special note. A puffy coat can hide slack in the harness, and that slack can let the clip and straps shift.
Thin layers work better for the buckle-up. Add warmth over the harness after the child is secured, not under it.
Do car seat covers affect the chest clip?
Vehicle seat covers and child seat inserts are not the same thing. A cover on the vehicle seat sits under the child seat, while an insert sits inside the child seat harness system.
Do not place a loose cover, towel, or insert under or behind a child seat unless both manuals allow it. Extra layers can change the seat install and the harness fit.
The same caution applies to strap covers and clip pads. Use only parts approved for that exact seat, and check that they do not push the clip off armpit level.
For vehicle seat protection separate from a child seat install, related reading includes a cooling car seat cover review. It covers a vehicle seat product, not a child harness part.
Two more vehicle seat cover reviews in the same cluster are the Sprints car seat cover review and the Astonish car seat cover review. Read them as vehicle interior guides, and keep child seat fit rules separate.
Pro tip: If a cover, insert, or pad changes the harness route or clip position, remove it and check the seat manual or a certified child passenger safety technician before using it again.
Section takeaway: Keep the harness route clean, skip unapproved inserts, and never let a cover move the clip off armpit level.
Frequently Asked Questions About Chest Clip Position
Should the chest clip be at armpit level for every child?
Yes, for harness seats that include a chest clip, armpit level is the standard position. The child’s armpits set the landmark, so the spot moves as the child grows. Always follow the seat manual if it gives a model-specific detail.
Does the chest clip hold the child in during a crash?
No, the clip alone does not hold the child in. The harness straps, buckle, and seat structure carry the main load. The clip helps keep the straps positioned on the shoulders and chest.
Can the chest clip sit on the belly if the child complains?
No, the belly is not a safe substitute position. A low clip can let the straps slide off the shoulders. Check for a twisted strap, a bulky coat, or a loose harness first.
Why does the chest clip keep sliding down?
Loose harness straps are the most common cause. Tighten the harness and redo the pinch test, then reset the clip to armpit level. If it still slides, check the manual for clip wear or a routing error.
Do booster seats have a chest clip?
No, booster seats do not use a harness or chest clip. They position the child for the vehicle seat belt instead. Follow the booster manual for lap and shoulder belt placement.
Should I add aftermarket chest clip pads or covers?
Use only parts approved for that exact car seat model. Unapproved pads can thicken the straps, hide slack, or shift the clip. When in doubt, leave the part off and ask the seat maker or a certified technician.
As of 2026, the simplest habit still works best. Buckle snugly, check the pinch test, and set the clip at armpit level before every drive. For broader child seat guidance, see Consumer Reports, HealthyChildren, and Safe Kids.

Daniel Brooks is an automotive writer and product researcher focused on car accessories, car tech, maintenance, and practical driving guides. At Plug-in Car World, he helps drivers make smarter automotive decisions through honest reviews and research-driven content.