How to Inspect a Used Car Seat Before Using It: Complete Safety Checklist
Quick Answer
To inspect a used car seat before using it, verify its crash history, expiration date, recall status, structural condition, and completeness. Follow the NHTSA used car seat safety checklist and confirm that the seat meets its manufacturer’s requirements.
Six essential safety checks
- Crash history: Confirm that the seat has no disqualifying crash history and meets its manufacturer’s replacement policy.
- Expiration date: Find the manufacture date and verify the model’s permitted service life.
- Recall status: Search the exact brand and model for unresolved safety recalls.
- Structural condition: Check the plastic shell, energy-absorbing foam, and attachment points for damage.
- Harness and hardware: Inspect straps, buckles, adjusters, connectors, and required components.
- Correct fit: Verify that the seat fits your child and can be installed according to both manuals.
Important safety rule
- When history is uncertain: Don’t use the seat simply because it looks clean and undamaged.
A secondhand child car seat can save money, especially when it’s passed down by someone you trust. But learning how to inspect a used car seat before using it involves more than checking the fabric for stains.
I approach this inspection the same way I approach any safety-critical automotive component: verify its history first, then examine its condition. This guide walks through the checks that matter, including problems you cannot identify by sight alone.
In This Guide
Is a Used Car Seat Safe to Use?
A used car seat may be safe if its history is known, its condition is acceptable, and it meets manufacturer requirements. A visual inspection alone cannot establish all these facts.
A used car seat is a child restraint previously owned or used by someone else. This includes infant carriers, convertible car seats, forward-facing harness seats, and booster seats.
When does buying secondhand make sense?
A seat from a trusted family member is generally easier to evaluate than one from an anonymous online seller. You can ask specific questions and request its original documentation.
Before accepting any secondhand seat, establish these conditions:
- The complete crash history is known.
- The manufacturer permits continued use under that history.
- The seat has not expired or exceeded its recommended service life.
- The model and manufacture date are identifiable.
- Any safety recall has been properly remedied.
- The seat has all required, approved parts.
- The seat has no structural or functional defects.
- The correct instruction manual is available.
Meeting these conditions makes a used seat worth evaluating further. It doesn’t replace correct installation or proper harness use.
When should you reject a secondhand seat immediately?
Some problems should end your inspection before you spend time cleaning or adjusting anything. Unknown crash history is one of the biggest concerns.
- The seller cannot provide a reliable usage or crash history.
- The seat was involved in a moderate or severe crash.
- Its labels cannot identify the model and manufacture date.
- The seat has expired or exceeded its permitted lifespan.
- Its shell has cracks, deformation, or other structural damage.
- An important component is damaged and no approved repair is available.
- A safety recall remains unresolved.
Don’t mistake a fresh cover for proof of safety. Upholstery can hide damage, and a crash does not always leave obvious marks.
Section Takeaway: A used child restraint is acceptable only when its history, condition, and instructions support continued use.
How Do You Check a Used Car Seat’s History?
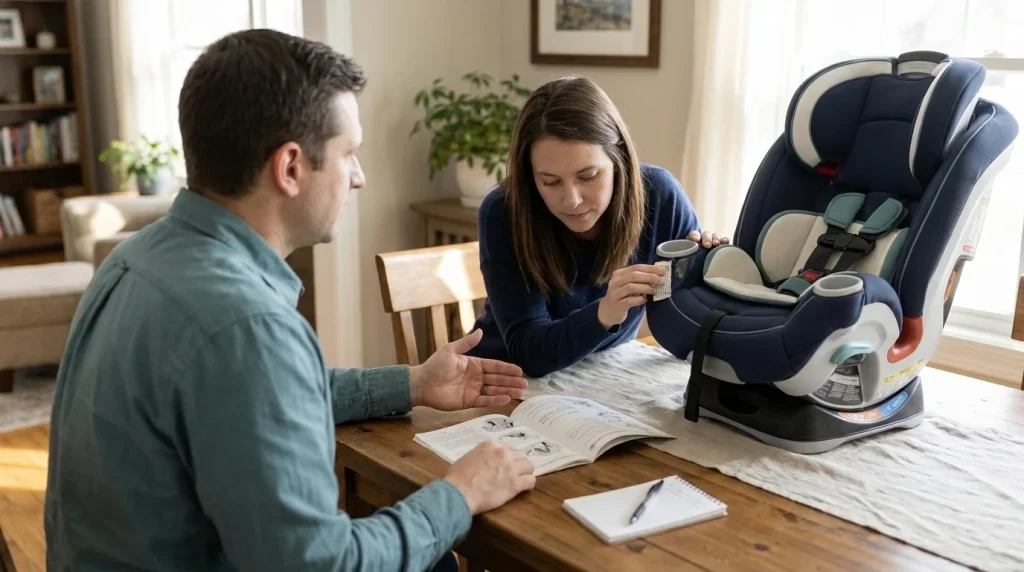
Start by talking to the previous owner. Confirm how the seat was used, stored, cleaned, and whether it was ever inside a vehicle during a collision.
These answers often reveal more than a quick physical inspection.
Ask the previous owner these questions
- Did you purchase this seat new?
- Has anyone else owned or borrowed it?
- Has it ever been in a vehicle during a crash?
- Has the harness, buckle, or shell ever been repaired or replaced?
- Were any cleaning chemicals or disinfectants used?
- Was the seat stored in a dry, protected environment?
- Are any original parts, inserts, or manuals missing?
- Has the seat ever been recalled?
If the person cannot establish the seat’s complete history, don’t rely on their assessment that it looks fine. You need reliable information, not a reassuring description.
What if the seat was involved in a minor accident?
Not every minor collision automatically requires replacement under NHTSA guidance. However, the manufacturer’s instructions may require replacement after any crash.
According to NHTSA’s car seat guidance after a crash, an accident qualifies as minor only when all five conditions are met:
- The vehicle could be driven away from the crash.
- The door nearest the car seat was undamaged.
- No vehicle occupant suffered an injury.
- No vehicle airbags deployed.
- The car seat shows no visible damage.
All five conditions matter. Even then, the manufacturer’s replacement policy takes priority when it is stricter.
For an unfamiliar secondhand seat, independently verifying every crash detail can be difficult. When you cannot establish those details, choose another seat.
Does storage history matter?
Yes. Poor storage can expose a child restraint to moisture, contamination, damaged components, or missing parts.
Ask whether the seat spent extended periods in an outdoor shed, damp basement, or other unsuitable environment. Then inspect for:
- Persistent dampness or visible mold.
- Corrosion around metal hardware.
- Animal damage or contamination.
- Signs of overheating, melting, or deformation.
- Chemical spills or unknown cleaning substances.
Don’t assume that scrubbing will reverse material damage. Ask the manufacturer about questionable exposure, and reject a seat whose integrity cannot be verified.
Pro tip: Keep photographs of the seat’s labels and any manufacturer correspondence. They make future safety checks easier.
How Do You Check Expiration Dates and Recalls?
Find the exact model number and date of manufacture before continuing your inspection. These details help determine the expiration date, appropriate replacement parts, and recall status.
Where is the expiration date on a car seat?
Most manufacturers place identification information on a label or molded section of the restraint. The location varies by model.
Check the following areas:
- The underside of the seat shell.
- The back of the child restraint.
- The side near the belt-routing area.
- Under or beside removable padding, where the manual permits access.
- The underside of a detachable infant seat base.
Look for the manufacture date, model number, serial number, and any stated expiration date. Record the details before labels become harder to read.
Some seats show an expiration date directly. Others state a usable lifespan measured from manufacture.
How long does a car seat last?
There isn’t one universal expiration period for every car seat. Many models specify service lives in the approximate range of six to ten years, but the manufacturer’s instructions control.
For example, consider a hypothetical seat manufactured in March 2021 with a documented seven-year lifespan.
- Manufacture date: March 2021.
- Manufacturer lifespan: Seven years.
- Expected expiration: March 2028, subject to the maker’s exact date rules.
This is an illustration, not a rule for every brand. Never calculate an expiration date using an assumed lifespan.
If the original manufacturer provides no expiration information, contact them for guidance. The American Academy of Pediatrics also advises against using a seat beyond six years from manufacture when no expiration date is provided.
How do you check whether a used car seat was recalled?
A recall means the manufacturer or safety regulator identified a potential safety-related defect or compliance problem. Some recalls have remedies that allow a seat to remain in service.
For seats sold in the United States, use the official NHTSA recall search and the manufacturer’s recall information.
- Locate the brand, exact model number, and manufacture date.
- Search the car seat or equipment recall category.
- Read the affected model and production-date details.
- Contact the manufacturer if your seat may be affected.
- Complete the approved remedy before using the seat.
Do not assume that an absence of recalls proves the seat is crash-free or undamaged. Recall status is only one part of the safety assessment.
For seats manufactured for markets outside the United States, check the relevant national safety authority and manufacturer. Standards and recall systems differ between countries.
Section Takeaway: Confirm the exact seat identity, manufacturer lifespan, and recall remedy status before inspecting its physical condition.
What Parts Should You Inspect for Damage?
Inspect the seat in good lighting with its manual beside you. Work from the structural shell outward, checking every component the manual identifies.
My preferred approach is to keep appearance separate from function. A faded cover may be cosmetic, while a damaged harness or shell can make a seat unusable.
1. Inspect the plastic shell and frame
The outer shell supports the restraint’s structure. Check every accessible surface, especially areas around belt paths, harness openings, and attachment points.
Look for:
- Visible cracks or splits.
- White stress marks in plastic.
- Warped or distorted sections.
- Broken mounting points.
- Loose or unexpected movement between structural components.
- Missing hardware or unexplained modifications.
Don’t try to repair structural plastic with adhesive, tape, or improvised brackets. Contact the manufacturer about damage and whether the seat must be retired.
2. Examine the energy-absorbing foam
Many car seats use rigid energy-absorbing foam inside the shell. Common materials include expanded polystyrene and expanded polypropylene.
This foam is different from the soft comfort padding in the cover. Its purpose is to help manage crash forces as designed by the manufacturer.
Inspect accessible foam for:
- Cracks or fractured sections.
- Missing pieces.
- Unusual compression or deformation.
- Foam that no longer fits its original location.
Some foam pieces are removable or replaceable under manufacturer instructions. Don’t glue, substitute, or remove them without approval.
3. Inspect the harness straps and stitching
The harness webbing helps restrain the child during a crash. Its condition deserves careful attention.
Run your eyes along the straps without aggressively pulling or twisting them. Check for:
- Frayed edges or broken fibers.
- Cuts, holes, or unusual thinning.
- Damaged or loose stitching.
- Hardened, brittle, or unusually stiff sections.
- Melt marks or chemical staining.
- Permanent twists that cannot be corrected according to the manual.
Do not use a seat with damaged harness webbing. Ask the manufacturer whether an exact approved replacement harness is available for that model.
4. Test the buckle, chest clip, and adjuster
Move each operating part according to the seat manual. A harness can appear intact while its buckle or adjuster fails to function properly.
Check that:
- The buckle tongues insert and latch correctly.
- The release button operates normally.
- The chest clip closes and opens as designed, if equipped.
- The harness adjustment mechanism tightens and loosens correctly.
- The adjuster holds the straps as intended.
- No components appear bent, cracked, or modified.
A sticky buckle may contain debris, but cleaning methods differ by manufacturer. Never lubricate or dismantle the buckle unless the instructions specifically allow it.
5. Check the base and installation hardware
Inspect the parts that secure the seat to the vehicle. These may include lower-anchor connectors, a tether strap, locking mechanisms, and a detachable base.
Check for damaged webbing, broken connectors, bent hardware, and missing components. Make sure adjustable mechanisms operate as the manual describes.
For an infant carrier, verify that it attaches securely to its compatible base. Also inspect the carrier handle and any approved load leg or anti-rebound component.
Some infant carriers permit baseless installation with a vehicle seat belt. Others require a specific base or arrangement, so follow the exact model instructions.
6. Inspect the cover, padding, and inserts
The fabric cover is more than decoration. Its shape, thickness, and attachment method can affect how the child fits the restraint.
Check for:
- Torn seams and loose fabric.
- Missing or damaged original padding.
- Unapproved replacement covers.
- Improvised cushioning beneath the child.
- Missing infant inserts required for certain sizes.
- Mold, contamination, or persistent odors.
Don’t assume an attractive aftermarket cover is compatible. Use manufacturer-approved fabric components and inserts intended for the exact seat.
Section Takeaway: Inspect structural parts, restraint components, and fabric separately. Cosmetic condition alone cannot establish whether a used seat is safe.
Can You Clean or Replace Worn Car Seat Parts?
Some used car seats need only approved cleaning, while others require manufacturer-authorized replacement components. Structural damage or an unknown history cannot be corrected by cleaning.
Used car seat inspection: Pass, repair, or reject?
This comparison helps distinguish ordinary maintenance from issues that require removing the seat from consideration.
| Inspection finding | Recommended action | Use decision |
|---|---|---|
| Minor fabric staining | Clean using approved instructions. | Potentially acceptable. |
| Missing approved padding | Obtain the correct part and confirm its required use. | Do not use until resolved. |
| Damaged harness webbing | Ask the manufacturer about approved replacement. | Do not use until resolved. |
| Cracked structural shell | Retire the seat unless the manufacturer explicitly provides another remedy. | Reject. |
| Unresolved safety recall | Obtain and complete the official recall remedy. | Do not use until resolved. |
| Unknown crash history | Choose a seat with verified history. | Reject. |
| Expired seat | Retire and replace the restraint. | Reject. |
How should you clean a secondhand car seat?
Always consult the specific manufacturer’s cleaning instructions. The American Academy of Pediatrics advises that cleaning, rather than disinfecting, is usually preferable because disinfectants may affect protective materials.
Its car seat safety information for families explains why manufacturer guidance matters for both cleaning and continued use.
For a typical removable-cover seat, the process may include these steps:
- Photograph the cover and strap routing before removing approved fabric pieces.
- Check which covers and pads the manufacturer allows you to remove.
- Follow the specified washing method, detergent, and water temperature.
- Clean plastic surfaces only with approved products.
- Clean harness webbing and buckles exactly as instructed.
- Allow cleaned components to dry as directed.
- Reassemble everything using the manufacturer’s instructions.
Avoid bleach, harsh solvents, steam cleaning, and soaking harness straps unless the manufacturer explicitly permits a particular method. Strong cleaning methods may damage restraint materials.
Can you replace a damaged car seat cover?
Sometimes, yes. Many manufacturers offer replacement covers, cushions, buckles, or other components for specific models.
However, a visually similar part isn’t necessarily compatible. Check the exact model number and production date before ordering replacements.
Don’t install homemade padding, universal inserts, or unrelated harness components. Such changes may alter the restraint’s tested configuration.
What about mold, smoke, and unpleasant odors?
A mild, removable surface odor isn’t necessarily structural damage. Persistent mold, chemical contamination, or unknown exposure creates a more serious concern.
Contact the manufacturer before attempting extensive cleaning. If the source of contamination is uncertain or approved cleaning cannot resolve it, choose another seat.
How Do You Install and Test a Used Car Seat?
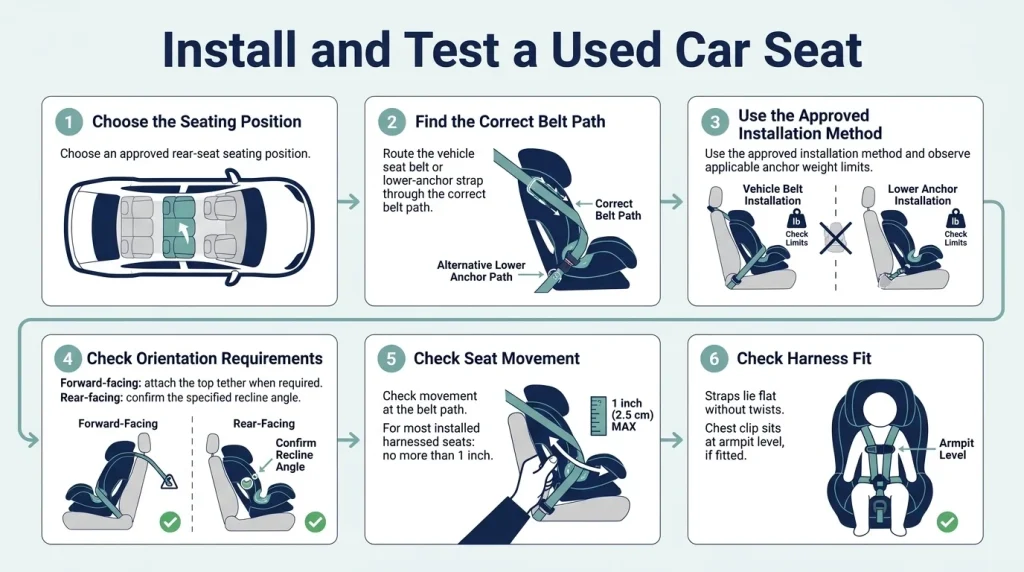
A used seat that passes inspection still needs to fit the child and vehicle correctly. Installation is the final safety check, not a substitute for the earlier steps.
Confirm the seat fits your child
Start with the model’s weight, height, and developmental requirements. The correct seat type depends on the child and the restraint’s approved limits.
- Rear-facing: Keep the child rear-facing until reaching the manufacturer’s applicable height or weight limit.
- Forward-facing: Use the harness and tether as directed, within the seat’s approved limits.
- Booster seat: Verify that the vehicle lap-and-shoulder belt fits and follows the designated guides.
Don’t move a child into the next restraint stage simply because a secondhand seat is available. Correct fit matters more than convenience.
Follow the installation instructions step by step
Read both the car seat manual and your vehicle owner’s manual. These documents explain belt routing, lower anchors, tether locations, and installation limitations.
Use these general checks alongside the official NHTSA car seat installation tips:
- Choose an approved rear-seat seating position.
- Route the vehicle seat belt or lower-anchor strap through the correct belt path.
- Use the approved installation method and observe applicable anchor weight limits.
- Secure the restraint according to both manuals.
- For forward-facing installations, attach the top tether when required.
- For rear-facing seats, confirm the manufacturer-specified recline angle.
- Check the seat’s movement at the belt path.
For most installed harnessed car seats, movement should not exceed one inch side-to-side or front-to-back when checked at the belt path. Don’t judge installation tightness by pulling at the top of the seat.
Do not combine the vehicle seat belt and lower anchors unless both manufacturers explicitly permit that installation method.
Test the harness fit
After the seat passes inspection and installation checks, secure your child according to the manual. Confirm that the harness lies flat and that any chest clip sits in the correct position.
For common five-point harness seats, check:
- Rear-facing harness straps are at or below shoulder level.
- Forward-facing harness straps are at or above shoulder level.
- The harness lies flat without twists.
- The straps pass the manufacturer’s snugness check.
- The chest clip, if fitted, sits at armpit level.
- The child remains within the seat’s applicable size limits.
These harness checks do not apply in the same way to a belt-positioning booster. Follow that booster’s instructions for the vehicle belt instead.
Should a technician inspect your used car seat?
Yes, a certified child passenger safety technician can help confirm proper selection, installation, and harness use. In the United States, many inspection stations offer this assistance without charge.
A technician cannot necessarily determine hidden crash damage or prove an unknown history. You must establish the seat’s eligibility before relying on an installation check.
Pro tip: Bring the restraint manual and vehicle owner’s manual to your appointment. For any unresolved fit or component question, contact the manufacturer directly.
Final used car seat safety checklist
Before the first ride, make sure every applicable statement below is true.
- ☐ I know the seat’s complete ownership and crash history.
- ☐ Its history meets the manufacturer’s continued-use policy.
- ☐ The model number and manufacture date are readable.
- ☐ The seat is within its permitted lifespan.
- ☐ No safety recall remains unresolved.
- ☐ The plastic shell and structural foam are undamaged.
- ☐ Harness webbing and hardware function correctly.
- ☐ All required parts are present and approved.
- ☐ The cover and padding match the manufacturer’s requirements.
- ☐ No unapproved modifications have been made.
- ☐ Cleaning and reassembly followed the manual.
- ☐ The restraint fits my child’s size and needs.
- ☐ The installation follows both manuals.
- ☐ The final harness or vehicle-belt fit is correct.
If you cannot confidently check every applicable item, resolve the issue before using the seat. When a safety concern cannot be resolved, replace the restraint.
Section Takeaway: A successful inspection isn’t complete until the seat fits your child and installs correctly in your vehicle.
Frequently Asked Questions
1. Can I use a secondhand car seat from a family member?
Yes, if you know its complete history and it satisfies the manufacturer’s safety requirements. Verify its expiration date, recall status, physical condition, and required parts before use. A family relationship makes history easier to establish, but it doesn’t automatically make the seat safe.
2. Can a car seat look perfect but still be unsafe?
Yes. A car seat may have hidden damage, an expired service life, an unresolved recall, or an unknown crash history. A clean cover and shiny plastic cannot establish whether the restraint remains suitable for use.
3. Is it safe to buy a used car seat from Facebook Marketplace?
Only consider it when you can reliably verify its complete history and every safety requirement. Anonymous marketplace listings often make those checks difficult. If the seller cannot provide essential information, choose another seat with documented history.
4. Can I use a car seat with a missing instruction manual?
Potentially, if you obtain the correct manual from the manufacturer before use. The instructions are essential for checking the parts, child-size limits, installation requirements, and cleaning procedures. Don’t rely on instructions for a merely similar model.
5. Is a used car seat safe after replacing its cover?
A manufacturer-approved replacement cover may be acceptable when installed according to the instructions. Replacing fabric does not fix an expired seat, structural damage, or disqualifying crash history. Verify the replacement’s compatibility with the exact seat model.
6. What should I do with a used car seat that fails inspection?
Stop using it and contact the manufacturer if the issue might have an approved remedy. If the seat must be retired, follow local disposal or recycling guidance. Prevent an unsafe seat from being reused or mistaken for a usable restraint.
7. How often should I inspect a used car seat?
Complete a thorough inspection before its first use and after any event that could affect safety. Check the harness, buckle, and installation regularly, and inspect after cleaning or reassembly. Also monitor new recalls and the manufacturer’s expiration requirements.
Final Thoughts: Inspect First, Use Second
Learning how to inspect a used car seat before using it can help you recognize problems that ordinary cleaning or a quick visual check would miss. The most important checks involve verified history, expiration, recalls, structural condition, and proper fit.
As of 2026, the safest decision remains model-specific: follow the manufacturer’s instructions and current child passenger safety guidance. Don’t assume an older seat is acceptable just because it still looks new.
A secondhand seat can be a practical choice when you can establish its safety. When you cannot, choose a verified replacement rather than taking an unnecessary risk.
Before your child’s next ride, complete the checklist above and arrange a professional installation check if you need help.

Daniel Brooks is an automotive writer and product researcher focused on car accessories, car tech, maintenance, and practical driving guides. At Plug-in Car World, he helps drivers make smarter automotive decisions through honest reviews and research-driven content.