How to Fix Twisted Car Seat Harness Straps (Step-by-Step Guide)
Quick Answer
To fix twisted car seat harness straps, take the child out, loosen the harness, and work the twist toward the nearest free end until the webbing lies flat again. Check your seat manual first for the exact routing, and confirm the fix with the pinch test and chest-clip check before the next ride, following safety guidance from NHTSA.
Fix it in this order
- Remove the child: Never try to untwist a harness while a child is buckled in it.
- Loosen first: Slack in the strap makes a twist much easier to work out without forcing it.
- Slide the clip down: Move the chest clip away from the twisted section so it does not lock the fold in place.
- Trace the strap: Follow it from the buckle to the shoulder slot, and note where the flat side turns over.
- Work it flat: Rotate the buckle tongue or strap end until both sides of the webbing lie flat.
- Recheck the fit: Tighten the harness, place the chest clip at armpit level, and do the pinch test.
Stop and get help if
- The strap is frayed, cut, faded through, or stays folded after you untwist it.
- You cannot restore the manual’s exact routing, or a buckle or adjuster feels broken.
If you spot a fold in your child’s harness, you do not need to panic. I’ll walk you through how to tell a simple twist from a deeper problem, how to fix it step by step, and how to stop it from coming back.
This guide goes deeper than a quick tip. It covers causes, hidden twists behind the seat shell, damage checks, and the final fit checks that matter after any fix.
In This Guide
- What Is a Twisted Car Seat Harness Strap?
- Why Do Harness Straps Twist?
- How Do You Fix a Twisted Car Seat Harness Strap?
- What If the Strap Keeps Twisting or You Cannot Reach the Twist?
- Twisted Strap or Another Harness Problem?
- How Can You Prevent Twisted Harness Straps?
- Frequently Asked Questions
- Final Check Before Your Next Ride
What Is a Twisted Car Seat Harness Strap?
A twisted car seat harness strap is a strap that has folded over on itself instead of lying flat against the child. The webbing may look like a rope, a narrow ribbon, or a strap with one edge curled under the other.
Flat webbing spreads crash force over a wider area. A twist narrows that area, creates a hard edge, and can hide slack that makes the harness feel tighter than it is.
- Half twist: One side of the strap has flipped once, often near the buckle tongue or chest clip.
- Full twist: The strap has turned over completely, so the smooth side faces the wrong way.
- Fold at the clip: The chest clip sits over a fold and will not slide smoothly along the strap.
- Hidden twist: The twist sits behind the seat shell or under the cover, so only part of the strap looks wrong.
- Buckle twist: The buckle tongue itself has turned, which pulls the strap into a fold each time you buckle up.
This guide is about the child seat harness itself, not a general cover for an adult seat. That distinction matters, because a product such as the one in this Astonish car seat cover review is a different kind of accessory from a child restraint harness.
Pro tip: Check your child seat manual before you remove a cover, a strap, or a buckle part. Routing, harness height, and removal steps differ by seat, and the manual controls the job.
Section takeaway: A twist is not just a cosmetic fold. Flat webbing, correct routing, and a snug fit work together, so fix the twist and recheck the whole harness.
Why Do Harness Straps Twist?
Harness straps twist because a child, a buckle, a cover, or a wash-and-refit job turns one section of webbing while the rest stays fixed. Small turns add up fast, and one careless buckle can leave a fold in place for days.
The cause points to the fix. A twist at the buckle needs a different move from a twist behind the shell, so find the source before you pull hard on the strap.
- Buckling in a hurry: A twisted buckle tongue can flip the strap as soon as it clicks into place.
- Child movement: A child who twists, pulls, or climbs out can roll a loose strap over on itself.
- Chest clip sliding: A clip that slides up or down over bunched webbing can trap a fold underneath it.
- Cover removal: A cover taken off for washing can catch a strap edge and turn it during refitting.
- Splitter plate turn: A strap that turns where it joins the metal splitter plate behind the seat can twist along its full length.
- Strap pads bunching: A pad that slides or bunches can fold the webbing beneath it, especially after a child pulls at it.
Never twist a strap on purpose to make it shorter. Use the harness adjuster and the correct harness-height slots instead, and follow the manual for your child’s size and seat direction.
A short strap is a fit problem, not a reason to fold webbing. If the adjuster cannot take up the slack, check the harness height, the routing, and whether the seat still fits your child.
Section takeaway: Most twists come from buckling, movement, or refitting. Find the turned section first, and you will fix the right spot instead of fighting the whole strap.
How Do You Fix a Twisted Car Seat Harness Strap?
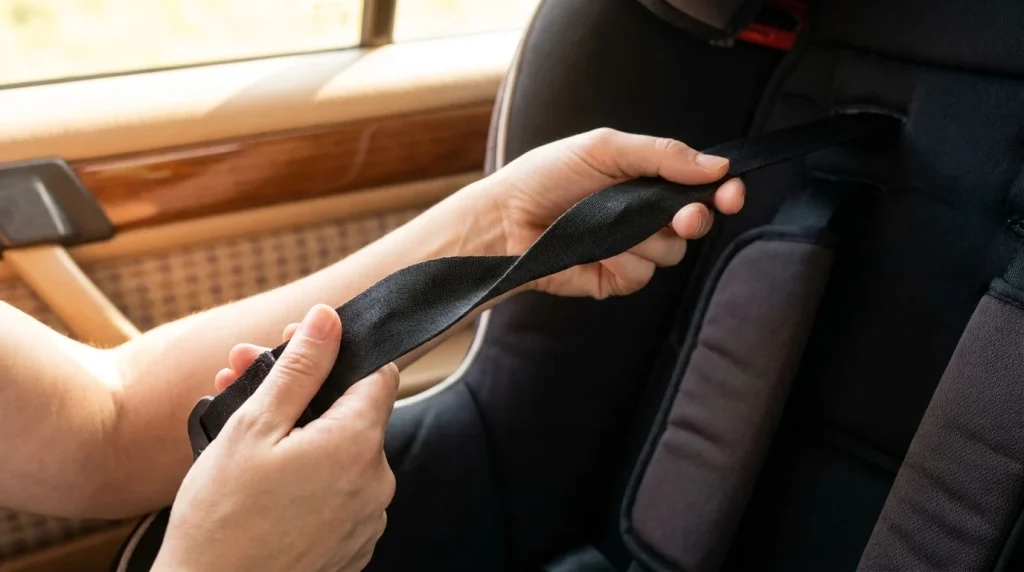
A simple twist near the buckle or chest clip often takes 5 to 15 minutes. A twist that needs cover removal and rethreading takes longer, so set the seat work aside from driving time and do it with care.
Work in daylight, keep the manual nearby, and stop if a part resists force. Forcing a buckle or adjuster can damage the harness or hide a routing error.
- Park and remove the child: Take the child out of the seat and place them somewhere safe before you touch the harness.
- Loosen the harness: Press the harness release and pull the straps forward until you have enough slack to work with.
- Slide the chest clip down: Move the chest clip well below the twisted section so it does not hold the fold in place.
- Trace both straps: Run a finger along each strap from the buckle to the shoulder slot, and mark where the flat side turns over.
- Work the twist toward the end: Hold the strap flat on one side of the twist, then rotate the buckle tongue or strap end until the webbing lies flat.
- Check the buckle tongue: Turn the tongue back to its normal position if it sits sideways, then confirm the strap feeds straight through it.
- Rethread only if needed: If the twist sits behind the shell, follow the manual to remove the cover, detach the strap from the splitter plate, untwist it, and refit it in the exact same path.
- Reset height and tension: Return the harness to the correct height slots, tighten it with the adjuster, and place the chest clip at armpit level.
Now do the pinch test at the collarbone. Try to pinch the strap webbing between your thumb and finger, and if you cannot pinch excess webbing, the harness is snug enough.
Check both straps, not just the twisted one. A second strap can hide a smaller fold, and a child can shift during tightening and change the fit on one side.
Pro tip: Take a photo of the splitter plate and strap routing before you detach anything, if your manual allows removal. That photo helps you restore the exact path, but it never replaces the manual.
Section takeaway: Loosen, trace, untwist, and recheck. A flat strap, a correct route, and a passed pinch test are the three signs that the fix is complete.
What If the Strap Keeps Twisting or You Cannot Reach the Twist?
A twist that returns right after you fix it usually has a cause you have not removed yet. Look for a flipped buckle tongue, a caught strap edge, a bunched cover, or a turn at the splitter plate.
Do not keep driving with the twist while you wait for a better day to fix it. A repeated twist is a signal to inspect the full strap path, not a habit to live with.
What if the twist is behind the seat shell?
Remove the cover only in the way your manual describes, then follow the strap to the splitter plate behind the seat. Untwist the strap before you refit it, and confirm that no new turn forms as you thread it back through its slot.
Count the strap path as you refit it. The strap should pass through the same slots, in the same direction, with no loop caught behind padding or a harness guide.
What if the strap looks damaged?
Stop using the seat for travel if the webbing is frayed, cut, torn, or thinned in one spot. Contact the seat maker for replacement parts or next steps, and do not repair webbing with tape, stitching, or a home fix.
Damage can hide under a twist or a pad. Feel along the full strap after you flatten it, and look for rough edges, loose threads, or a section that feels stiff or uneven.
What if an aftermarket cover or pad is causing the problem?
Remove any cover or pad that was not approved by your child seat maker, then recheck the harness. An unapproved layer can bunch under a strap, change how the buckle sits, or add bulk that alters the fit.
That rule applies to child seats even when a general cover looks useful for another seat. If you are shopping for an adult seat, a cooling car seat cover review can help you compare features, but do not transfer that cover to a child seat unless the child seat maker approves it.
Section takeaway: A repeat twist has a cause. Remove the cause, restore the manual’s exact route, and replace any damaged strap through the maker instead of patching it.
Twisted Strap or Another Harness Problem?
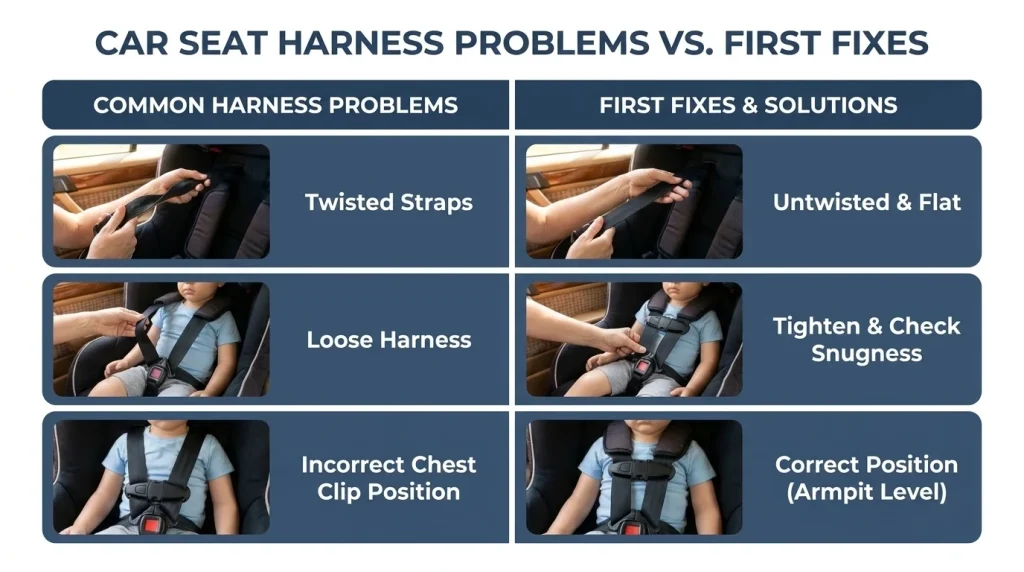
A twist can look like a loose harness, a low chest clip, or a wrong harness height. Use the table below to separate the symptoms before you change the wrong part of the fit.
| Problem | What you will notice | First fix |
|---|---|---|
| Simple twist | Webbing folds over and feels rope-like | Loosen, trace, and work it flat |
| Loose harness | Pinch test picks up excess webbing | Tighten with the adjuster and retest |
| Chest clip too low | Clip sits on the belly instead of the chest | Slide it up to armpit level |
| Wrong harness height | Straps pull from well above or below the shoulders | Move to the slots your manual gives for your child’s direction |
| Hidden twist | One side feels short or pulls unevenly | Check behind the shell and at the splitter plate |
| Damaged strap | Fraying, cuts, or a stiff, thinned section | Stop use and contact the maker |
For independent child-seat ratings and buying background, Consumer Reports covers child seats alongside other car safety topics. Ratings help you choose a seat, but they never replace the manual for your exact model.
Section takeaway: Name the problem before you fix it. A twist needs flattening, a loose harness needs tightening, and a damaged strap needs maker guidance.
How Can You Prevent Twisted Harness Straps?
Prevention works best as a short routine, not a long inspection. A flat strap check at buckle time catches most twists before they harden into a fold.
Build the routine into the same moment each ride. Consistency matters more than speed, and a calm buckle routine helps a child stay still while you check the fit.
- Buckle in order: Buckle each side, then set the chest clip, then tighten, so no step pulls a strap sideways.
- Keep straps flat: Smooth each strap with your hand before you tighten, and fix a small turn while it is still easy.
- Hold the clip steady: Keep the chest clip at armpit level while you tighten, so it does not slide over bunched webbing.
- Unbuckle with care: Lift the child out without dragging a strap across padding or a buckle edge.
- Recheck after washing: Inspect the full strap path after any cover wash, and confirm each strap lies flat before the next ride.
- Watch older children: Show an older child how to sit still for buckling, and check the straps if they play with the harness.
- Recheck after reinstalling: Inspect routing, harness height, and strap flatness any time the seat moves to another car.
Fit rules for general seat covers differ from child seat rules. A Sprints car seat cover review can show how fabric and fit differ for an adult seat, yet the child seat rule stays strict: only a maker-approved cover belongs on a child restraint.
If a seat has a damaged strap, a broken buckle, or a twist you cannot resolve, replacing the seat may be safer than living with the fault. For general buying background, Edmunds covers cars and accessories, but the child seat maker still controls fit, limits, and replacement parts.
Section takeaway: Flat straps, a steady clip, and a quick check after washing or reinstalling prevent most twists. Small checks now save a longer fix later.
Frequently Asked Questions
Can I drive with a twisted harness strap for a short trip?
No. Fix the twist before you drive, even for a short trip. A crash can happen close to home, and a twisted strap may not spread force the way flat webbing should.
Does a twisted strap make a car seat unsafe?
Yes, it can reduce protection. A twist narrows the strap, creates a hard edge, and can hide slack. Flat, snug webbing gives the harness a better chance to hold a child in place.
Can I untwist a strap without removing the seat from the car?
Often, yes. Many twists near the buckle or chest clip can be worked out with the seat still installed. A twist behind the shell may need cover removal and rethreading, so follow your manual.
Why does one strap keep twisting?
One strap may twist more because of how it feeds through its buckle, slot, or splitter plate. Check that side for a flip, a caught edge, or a cover bunching under it. Replace a strap that stays folded or damaged.
Should I use harness strap covers to stop twisting?
Use them only if your child seat maker approves that exact pad for your exact seat. An unapproved pad can change harness fit, hide a twist, or add bulk behind the child. When in doubt, leave it off and ask the maker.
How do I know the harness is tight enough after fixing a twist?
Do the pinch test at the collarbone after you buckle and tighten the harness. Try to pinch the strap webbing between your fingers. If you cannot pinch excess webbing, the harness is snug enough.
Final Check Before Your Next Ride
Run this short check after any twist fix, and do it again after washing, refitting, or moving the seat. It takes less than a minute, and it catches the errors that matter most.
- Flat straps: Both straps lie flat, with no fold, rope-like section, or sideways buckle tongue.
- Correct route: Each strap follows the manual’s path, with no loop caught behind padding.
- Right height: Harness slots match your manual for your child’s seat direction and size.
- Clip level: The chest clip sits at armpit level, not on the belly or near the neck.
- Pinch test passed: No excess webbing pinches up at the collarbone after tightening.
- No damage: No fraying, cuts, or stiff sections hide under a pad or cover.
If any check fails, fix that item before you drive. A child seat works as a system, and one weak link can undo the rest of a careful fit.
As of 2026, the safest habit stays simple: check the manual, keep the webbing flat, and recheck the fit every ride. That habit turns a worrying twist into a quick, confident fix.

Daniel Brooks is an automotive writer and product researcher focused on car accessories, car tech, maintenance, and practical driving guides. At Plug-in Car World, he helps drivers make smarter automotive decisions through honest reviews and research-driven content.