How to Fit Three Car Seats in One Vehicle: A Complete Safety and Installation Guide
Quick Answer
You can fit three car seats in one vehicle if your rear seating row supports three appropriate child restraints and each seat can be installed or used correctly without interfering with the others. The safest approach is to check vehicle compatibility, test different seat arrangements, use approved installation methods, and follow the NHTSA car seat installation guidelines.
Six Steps for a Safe Three-Across Setup
- Check seating positions: Confirm your vehicle permits child restraints in all three intended rear seating positions.
- Measure available space: Compare rear-bench dimensions with each car seat’s base and shell width.
- Choose suitable seats: Consider narrow models without compromising the restraint stage each child needs.
- Plan the arrangement: Test the center and outer positions before securing all three seats.
- Install independently: Ensure every harnessed car seat stays securely installed without support from its neighbors.
- Verify daily usability: Check harness access, seat belt buckles, tether routing, and door clearance.
Essential Safety Check
- One-inch rule: Each installed harnessed seat should move no more than one inch side-to-side or front-to-back when tested at its belt path.
- No forced fit: Never rely on pressure between neighboring seats to keep an installation tight.
Trying to fit three car seats across one back seat can feel like solving a puzzle with expensive pieces. I’ve found that the most useful starting point is understanding how the vehicle’s seat belts, seat contours, and child restraints work together.
A three-across arrangement isn’t simply about finding three narrow seats. This guide explains how to evaluate your vehicle, plan a workable layout, install each restraint, and recognize when a different setup is necessary.
In This Guide
Can Three Car Seats Fit in One Back Seat?
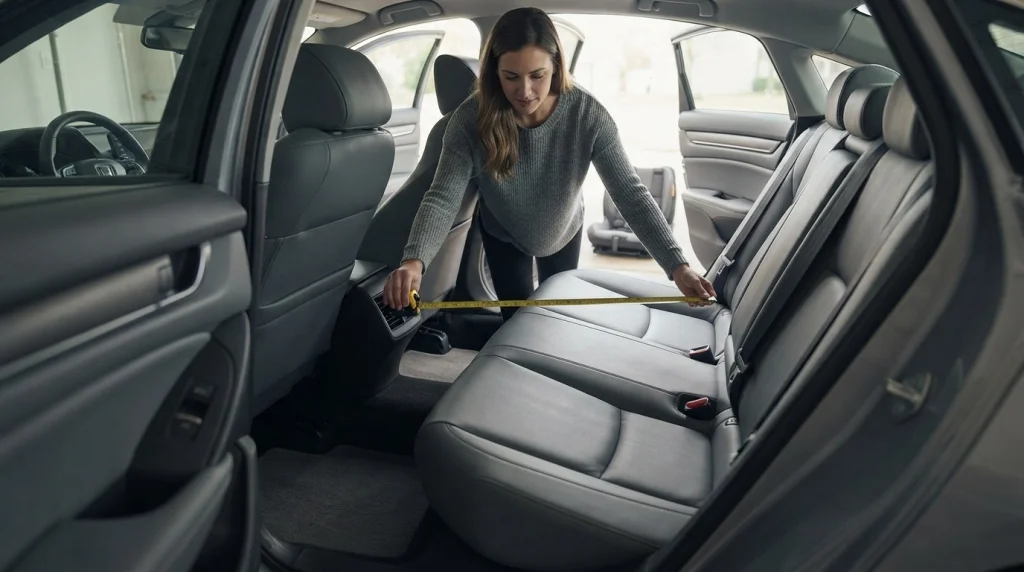
Yes, three car seats can fit across some sedans, SUVs, minivans, and other vehicles. Success depends on the exact vehicle, child restraint models, seating positions, and installation methods.
A wide rear bench helps, but width alone doesn’t guarantee a safe arrangement. Buckle locations and seat shapes often create problems that measurements cannot predict.
Definition: A three-across car seat installation places three child restraints next to one another in a single vehicle seating row. Each restraint must suit its child and function correctly in its designated seating position.
What Determines Whether Three Car Seats Will Fit?
Before shopping for replacement seats, I recommend examining the vehicle itself. Small details in the rear bench can change the outcome.
- Usable bench width: The space available between door panels, armrests, and seat contours.
- Center seat shape: Raised cushions, narrow sections, and uneven padding may complicate installation.
- Seat belt geometry: Buckles and belt anchor locations must support each restraint correctly.
- Lower anchor locations: The LATCH system may not support all three positions.
- Top tether anchors: Forward-facing harnessed seats need approved tether arrangements.
- Car seat dimensions: Base width, shell shape, armrests, and cup holders influence compatibility.
- Front-seat clearance: Rear-facing seats must fit at the required recline angle without prohibited contact.
How Much Width Do Three Car Seats Need?
There is no universal minimum rear-seat width that guarantees three-across compatibility. However, published car seat widths can help you estimate whether a test fit is realistic.
For example, three seats measuring 17 inches wide each have a combined nominal width of 51 inches. That calculation is only a screening tool, not proof they will fit.
- Measure the usable rear cushion width at the car seats’ base level.
- Measure the space between interior door panels at the widest part of the seats.
- Check the width of each restraint at its base and widest shell points.
- Locate all three seat belt buckles before placing the seats.
- Check whether the center seat overlaps the outer seating areas.
Remember that neighboring seats may have different shapes at different heights. Two car seats can sometimes fit beside each other despite their widest points being higher than their bases.
Does Vehicle Type Make a Difference?
Vehicle category gives you a starting point, but individual model design matters more. A compact sedan with a well-designed rear bench may accommodate a combination that fails in a larger SUV.
- Sedans: Rear-bench width and center buckle placement deserve close attention.
- Compact SUVs: Door trim and raised center cushions may restrict usable space.
- Three-row SUVs: Separate rows offer flexibility, although third-row tether and belt availability must be checked.
- Minivans: Different seating configurations may allow children to ride in separate approved positions.
- Pickup trucks: Seat depth, rear-facing clearance, and the owner’s manual can limit suitable installations.
Section Takeaway: Vehicle compatibility depends on more than seat width. Start with the owner’s manual and verify the complete arrangement before making a purchase.
Which Car Seats and Arrangements Work Best for Three Across?
Compact car seats with suitable base shapes often make three-across installations easier. The best combination still depends on each child’s age, size, and required restraint type.
Rear-facing, forward-facing, and booster seats occupy space differently. You should never change a child’s restraint stage merely to make three seats fit.
Are Narrow Car Seats Better for Three Across?
Narrow designs can increase your available layout options. However, advertised seat width doesn’t always reflect how the seat interacts with neighboring restraints.
Some seats are narrow at the base but wide around the shoulders. Others have removable accessories or elevated shells that may help with positioning when the manufacturer permits those configurations.
When comparing narrow car seats, evaluate these features:
- Overall width: Use the manufacturer’s measurement for the exact model.
- Base footprint: A compact base may fit more easily on a narrow center cushion.
- Shell contours: Raised side structures can interact with neighboring restraints.
- Approved installation methods: Check whether seat belt installation works in your intended position.
- Height and weight limits: Make sure the seat suits your child now and for an appropriate period.
- Harness accessibility: You must be able to tighten and check the harness after installation.
A seat marketed as three-across-friendly is not guaranteed to fit every vehicle. For vehicle-specific examples, consult the Consumer Reports guide to fitting car seats three across.
Should Rear-Facing or Forward-Facing Seats Go in the Middle?
There isn’t one arrangement that works for every family. The center position must allow a correct installation, and each child must remain in an age- and size-appropriate restraint.
In some combinations, a forward-facing seat fits between two rear-facing seats because their shells occupy different spaces. Other vehicles work better with a rear-facing restraint in the center.
Consider the following possibilities before making your final decision.
| Seat Combination | Potential Advantage | Important Check |
|---|---|---|
| Three rear-facing seats | May work with compact bases and compatible shells | Correct recline angles and front-seat clearance |
| Two rear-facing, one forward-facing | Different shell heights may create usable space | Forward-facing tether anchor and independent tightness |
| One rear-facing, two forward-facing | May offer practical loading options | Approved tether arrangements for both forward-facing seats |
| Two harnessed seats, one booster | Can suit families with an older child | Booster buckle access and lap-and-shoulder belt fit |
| Three boosters | Some narrow boosters occupy less space | Three usable lap-and-shoulder belts and accessible buckles |
Are Booster Seats Easier to Fit?
A booster seat may be narrower than a convertible car seat, but it introduces another challenge. Children must access the correct buckle and use the vehicle’s lap-and-shoulder belt on every trip.
A booster that fits physically but blocks the buckle is not a workable solution. Also, the shoulder belt must follow the correct path without interference from neighboring car seats.
Check these details during a booster test fit:
- The child can reach the proper buckle without shifting the booster.
- The lap belt rests low across the upper thighs.
- The shoulder belt crosses the chest and shoulder correctly.
- The vehicle belt retracts and moves freely.
- The child cannot accidentally release a neighboring car seat’s installation belt.
- The booster receives the head support required by its design and instructions.
Section Takeaway: Choose seats for your children first, then work out the arrangement. A narrow seat is useful only when it also installs or functions correctly.
How Should You Prepare Before Installing Three Car Seats?
Preparation can prevent repeated installations and unnecessary purchases. Begin by identifying which seating positions and restraint methods your vehicle actually supports.
I like to map out the rear bench before tightening any straps. It makes buckle interference, tether locations, and potential clearance problems easier to identify.
Check Your Vehicle and Car Seat Manuals
The vehicle owner’s manual is the main reference for approved seating positions. Each child restraint manual supplies the installation rules for that particular seat.
Before starting, confirm the following:
- Whether all three intended rear seating positions permit child restraints.
- Which positions have lower anchors.
- Where the approved top tether anchors are located.
- Whether center lower-anchor use is specifically authorized.
- How each vehicle seat belt locks for child restraint installation.
- Whether the vehicle restricts car seat placement or contact with front seats.
- Whether adjustable or removable head restraints require special treatment.
- Whether each child restraint allows the planned contact with neighboring seats.
The NHTSA guide to vehicle and car seat parts explains lower anchors, tether anchors, and their functions.
What Tools and Supplies Do You Need?
Most car seats don’t require specialized tools for ordinary installation. A few basic items can help you assess the space and follow the instructions.
- Vehicle owner’s manual: For seating-position and attachment rules.
- Three car seat manuals: For approved orientations, limits, and installation procedures.
- Measuring tape: For comparing usable bench space and seat dimensions.
- Flashlight: For locating lower anchors, buckles, and tether points.
- Paper and pen: For recording successful test arrangements.
- Another adult: For assistance when positioning or checking seats, if helpful.
Avoid adding unapproved accessories to solve fitment problems. Aftermarket pads, covers, belt extenders, and improvised positioning materials can interfere with a restraint’s intended operation.
Only use installation accessories that the applicable car seat and vehicle manufacturers specifically permit.
Should You Use LATCH or the Vehicle Seat Belt?
Both approved installation methods can provide proper protection when used correctly. For three-across setups, seat belt installation may offer more positioning flexibility.
LATCH stands for Lower Anchors and Tethers for Children. Its lower anchors are fixed in specific vehicle locations, so they may restrict how far a car seat can sit within its designated seating position.
- Seat belt installation: May offer more lateral positioning flexibility within the approved seating area.
- Lower anchor installation: May be convenient where the designated anchors align well with the restraint.
- Center position: Often requires a seat belt because many vehicles lack dedicated center lower anchors.
- Top tether: Use the approved tether anchor with forward-facing harnessed car seats as instructed.
Never assume you can borrow the two inner anchors from neighboring positions for a center installation. This is permissible only when both manufacturers explicitly approve the arrangement.
Do not attach multiple lower-anchor connectors to one anchor unless the vehicle manufacturer expressly permits that configuration. Also, do not combine seat belt and lower-anchor installation unless both manufacturers specifically allow it.
Always check the applicable lower-anchor weight limits. A seat belt installation may become necessary as a child grows.
Pro tip: Confirm the exact seating-position and anchor rules in your vehicle owner’s manual before beginning installation.
How Do You Install Three Car Seats Side by Side?
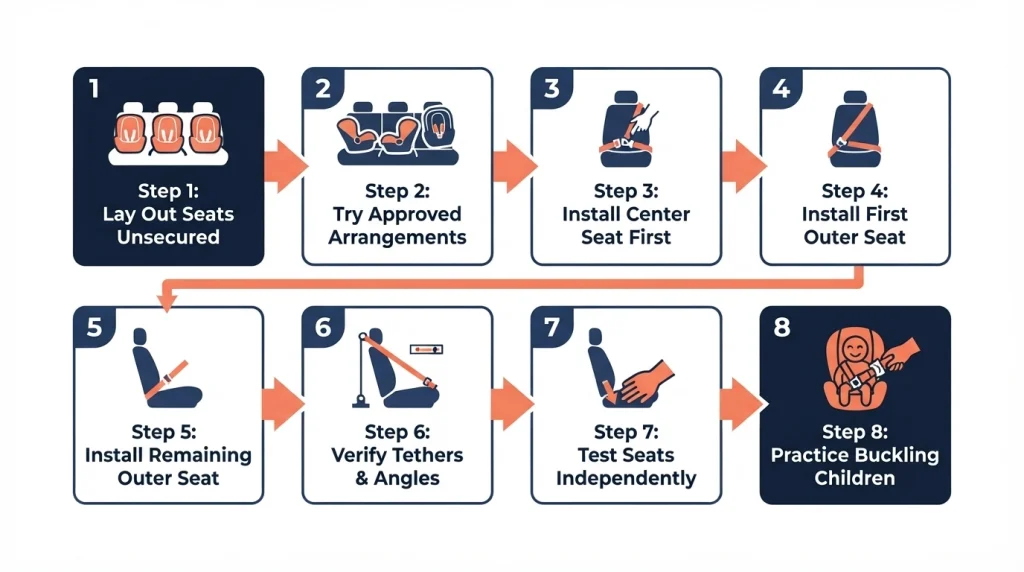
Install three car seats by confirming a workable layout, securing each harnessed restraint independently, and checking the entire arrangement afterward. Starting with the center seat is often helpful, but your final installation order should support a correct setup.
Plan enough uninterrupted time to test several combinations. A rushed installation can hide problems that become obvious when you try to buckle the children.
Step 1: Lay Out All Three Seats Without Securing Them
Place the restraints in their intended rear seating positions. Verify that each position is approved for its restraint type.
Check how the bases and shells interact before tightening anything.
- Look for interference between neighboring shells.
- Check that buckles remain accessible.
- Confirm the doors can close without pressing against a car seat.
- Check appropriate rear-facing recline clearance.
- Verify tether anchor availability for forward-facing seats.
Step 2: Try Different Approved Arrangements
If the first layout doesn’t work, switch the seating positions of restraints where appropriate. Keep each child in the required orientation and restraint stage.
For example, two rear-facing seats might fit better around a forward-facing seat than beside each other. This is a layout possibility, not a universal recommendation.
Record which combinations provide proper belt access and acceptable seat positioning.
Step 3: Install the Center Seat First
Starting with the center restraint often makes it easier to evaluate its installation. That position can become difficult to reach after the outer seats are secured.
- Position the restraint according to both manuals.
- Route the vehicle seat belt or approved lower-anchor attachments correctly.
- Secure the selected attachment system using the required procedure.
- Tighten the installation following the car seat instructions.
- Check movement at the designated belt path.
- Verify the required recline angle or top tether setup, as applicable.
For a seat belt installation, use the locking method specified in the manuals. Don’t assume every vehicle uses the same retractor or buckle system.
Step 4: Install the First Outer Seat
Position the next restraint within its designated seating position. Make sure its installation does not shift the center seat.
Contact between car seats may be acceptable when the manufacturers permit it. However, their shells must not bend, become displaced, or interfere with one another’s installation.
Complete the installation and test the outer seat at its belt path. Recheck the center seat before continuing.
Step 5: Install the Remaining Outer Seat
Repeat the approved installation process on the opposite side. Pay special attention to the space near the vehicle door and its interior trim.
The last restraint should not force another seat out of position. If substantial pressure changes a neighboring installation, stop and revise the layout.
Step 6: Verify Top Tethers and Rear-Facing Angles
Forward-facing harnessed car seats should use the appropriate top tether as directed by their manufacturers. A tether limits forward head movement during a crash.
Rear-facing restraints must remain at their specified recline angles. Check the built-in angle indicator rather than estimating by appearance.
For more installation support, review the guidance from Safe Kids Worldwide.
Step 7: Test Each Installed Seat Independently
A car seat that feels tight only because its neighbors press against it isn’t correctly installed. Every harnessed seat must meet its own installation requirements.
Check each restraint’s movement at its belt path. If necessary, temporarily remove a neighboring seat to confirm that the installed restraint remains secure on its own.
Restore the complete arrangement afterward and repeat the relevant checks.
Step 8: Practice Loading and Buckling All Three Children
A technically compatible layout must also work during everyday use. Practice buckling, tightening harnesses, and releasing restraints with the vehicle parked.
Pay special attention to a booster rider seated beside a car seat installed with the vehicle belt. The child must not accidentally release the buckle securing that neighboring car seat.
Check the final installation again after your practice run.
Section Takeaway: Three-across installation is a sequence of individual installations, not one combined structure. Every harnessed seat must stay secure independently, and every child must be buckled correctly.
How Do You Check That All Three Car Seats Are Safe?
After installation, check each restraint’s security, positioning, and daily usability. Three seats fitting across the rear bench does not automatically mean the arrangement is safe.
Use the following checks before accepting the configuration.
The One-Inch Installation Test
For a harnessed car seat, hold the restraint near the approved seat belt or lower-anchor belt path. Gently pull it side-to-side and front-to-back to check for excess movement.
The restraint should move no more than one inch in either direction at that location. Movement at the top of a rear-facing shell does not replace the belt-path test.
Repeat this check for each installed harnessed car seat.
The Independent Installation Test
Neighboring restraints must not supply the force that keeps another seat installed. A tightly packed arrangement can disguise a loose seat belt or lower-anchor installation.
- Verify each seat is properly secured before surrounding it with other seats.
- Check that the neighboring seats do not shift its position.
- Remove or reposition a neighboring restraint when necessary to verify independent security.
- Recheck every seat after returning the full arrangement.
The Child Restraint and Harness Check
Each child must fit the appropriate restraint and stay within its manufacturer-specified limits. Make sure the harness or vehicle belt can be used correctly in the crowded layout.
- Rear-facing harness: Straps should enter at or below shoulder level, as directed.
- Forward-facing harness: Straps should enter at or above shoulder level, as directed.
- Harness tightness: Remove slack so excess webbing cannot be pinched at the shoulder.
- Chest clip: Position at armpit level where the harness design uses one.
- Booster lap belt: Keep it low across the upper thighs.
- Booster shoulder belt: Route it across the chest and shoulder.
Keep children rear-facing until they reach the manufacturer’s rear-facing height or weight limit. Move them to the next restraint stage based on applicable guidance and their individual fit, not because a different orientation might save space.
The Seat Contact and Door Clearance Check
Some approved three-across combinations allow adjacent seats to touch. Contact becomes a problem if it distorts a shell, changes a recline angle, or compromises an installation.
Inspect the arrangement from the front, rear, and both side doors.
- No car seat shell is bent or visibly compressed.
- No seat belt or lower-anchor strap is trapped between neighboring seats.
- No car seat rests improperly on another restraint’s components.
- No vehicle door presses a car seat out of position when closed.
- Each child restraint maintains its required angle and alignment.
- All harness adjusters and release controls remain accessible.
The Booster Seat Belt Check
A booster seat differs from an installed harnessed restraint. Its main job is to position the child’s body for proper use of the vehicle’s lap-and-shoulder belt.
Therefore, the standard one-inch installation test does not apply to an ordinary belt-positioning booster used as designed. Check manufacturer instructions for securing an unoccupied booster and any lower-anchor features.
Have the child sit in the booster and buckle the vehicle belt. Confirm that neighboring seats do not pull the belt away from the correct route or prevent it from retracting.
Should All Children Under 13 Ride in the Back Seat?
Yes, U.S. child passenger safety guidance recommends that children younger than 13 ride properly restrained in the rear seat. The middle position may be advantageous, but only when the child restraint fits and functions correctly there.
The American Academy of Pediatrics car seat guidance emphasizes proper restraint selection and correct installation.
Never place a rear-facing child restraint in front of an active frontal airbag. If the rear seating arrangement cannot safely accommodate the children, use another approved seating arrangement or vehicle rather than improvising.
Pro tip: A certified Child Passenger Safety Technician can check difficult three-across installations and identify interference you may have overlooked.
Section Takeaway: A successful installation passes both safety and usability checks. Reinspect the arrangement whenever you remove a seat, change its orientation, or adjust the vehicle seating configuration.
What If Three Car Seats Will Not Fit in Your Vehicle?
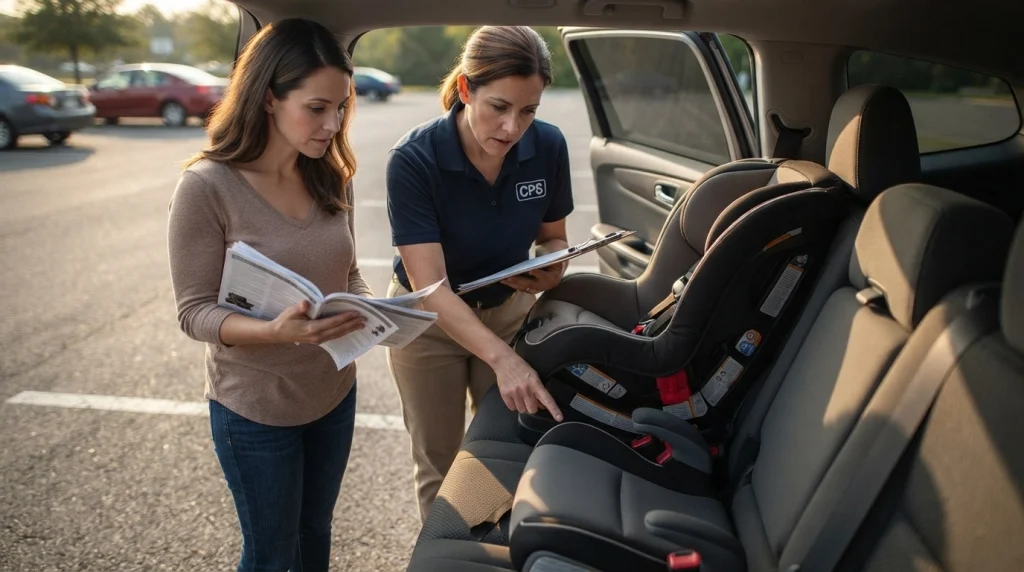
If three seats cannot fit safely, don’t force the arrangement. The next step is identifying whether the problem comes from seat width, buckle access, installation geometry, or vehicle restrictions.
Many problems have practical solutions, but not every vehicle can safely accommodate three child restraints in one row.
Common Three-Across Problems and Possible Solutions
| Problem | Possible Cause | What to Try |
|---|---|---|
| Seats are too wide | Wide shells or bases interfere | Test narrower, approved child restraints |
| Center seat will not tighten | Unsuitable belt geometry or cushion shape | Review the manuals and try another permitted restraint or position |
| Booster buckle is blocked | Neighboring restraint obstructs access | Change the arrangement or select a compatible booster |
| Rear-facing seat hits front seat | Insufficient front-to-back clearance | Check permitted front-seat adjustments and try a more compact restraint |
| Forward-facing tether unavailable | No approved tether anchor for that position | Use another approved position or seek manufacturer-approved guidance |
| Seat becomes loose when another is removed | Installation relies on neighboring pressure | Reinstall independently or change the combination |
Should You Buy Different Car Seats?
Replacing one bulky restraint may solve a fitment problem without requiring three new seats. However, buying narrow models based only on their advertised widths can create another expensive mismatch.
Before purchasing, confirm the exact car seat dimensions, installation requirements, and compatibility with your child. Ask whether the retailer allows a supervised vehicle test fit and what its return conditions are.
Also, check the restraint’s recall status and instructions. If considering a used seat, verify its complete history and manufacturer requirements before relying on it.
Would a Three-Row Vehicle Be Better?
A vehicle with a usable third row may offer more placement choices. However, additional seats do not automatically mean additional approved child restraint positions.
Inspect third-row seat belts, tether anchors, head restraints, and access routes. Consider whether the children can be secured without disturbing restraints in the second row.
Children should remain in suitable rear seating positions, and the vehicle must support each installation.
When Should You Get Professional Installation Help?
Seek a certified Child Passenger Safety Technician when you cannot achieve independent tightness or aren’t certain about anchor compatibility. Professional guidance is especially useful when a booster buckle or center belt arrangement creates problems.
A technician can help evaluate the specific vehicle, restraint models, and children involved. Bring all relevant manuals and the actual seats to the appointment.
You can also contact the vehicle or car seat manufacturer for clarification about approved installation methods.
Section Takeaway: Never sacrifice proper installation to make a three-across layout possible. If the combination fails safety checks, change the combination or use another suitable seating arrangement.
Frequently Asked Questions About Fitting Three Car Seats
1. Can you fit three car seats in a small car?
Yes, some small cars can accommodate three compatible child restraints in the rear row. The result depends on usable seat width, buckle placement, restraint design, and the vehicle’s approved seating positions.
Test the complete arrangement before assuming it will fit safely.
2. Do you need three sets of LATCH anchors for three car seats?
No, you do not need three sets of lower LATCH anchors. Approved seat belt installations can secure harnessed car seats, and many vehicles have lower anchors in only two rear seating positions.
Use each seat’s approved installation method and the correct tether arrangements.
3. Is it safe for three car seats to touch each other?
Contact may be acceptable if the car seat and vehicle manufacturers permit it. The neighboring seats must not distort one another, affect positioning, trap belts, or create a false sense of tightness.
Every installed harnessed seat must remain secure independently.
4. Can you put a rear-facing car seat in the middle?
Yes, a rear-facing car seat can occupy the center rear position when the vehicle and child restraint manufacturers allow that installation. It must achieve the correct recline angle and remain securely installed.
A center seat belt installation may be necessary when dedicated lower anchors aren’t available.
5. Is it better to install car seats with seat belts or LATCH?
Both methods are acceptable when used according to the applicable instructions. Seat belt installation may provide additional flexibility in crowded three-across configurations because lower anchors occupy fixed positions.
Use the approved method that allows each restraint to be installed correctly.
6. Can a booster seat fit between two car seats?
Sometimes, but buckle access is often the biggest obstacle. The child must be able to buckle the correct lap-and-shoulder belt without shifting the booster or accidentally releasing a neighboring seat’s installation belt.
Correct belt positioning matters more than the booster fitting physically.
7. What should you do if three car seats cannot fit safely?
Try other approved seating arrangements or compatible narrow restraints, and consider getting help from a certified Child Passenger Safety Technician. If the vehicle cannot support a safe installation, use another suitable vehicle or seating configuration.
Never force the seats together or use unapproved modifications.
Final Takeaway
Learning how to fit three car seats in one vehicle requires more than choosing slim models. The safest result comes from checking vehicle compatibility, arranging the seats carefully, and making sure each child restraint works independently.
Before your next journey, inspect every installation and practice buckling all three children. If something doesn’t fit or function properly, revise the arrangement and seek qualified help rather than making a compromise.
Your next step: Gather your vehicle manual, measure the rear bench, and test your planned configuration with all three restraints. A correct three-across setup is one that protects every child on every trip.

Daniel Brooks is an automotive writer and product researcher focused on car accessories, car tech, maintenance, and practical driving guides. At Plug-in Car World, he helps drivers make smarter automotive decisions through honest reviews and research-driven content.