What Is the Car Seat Pinch Test? How to Check Harness Fit
Quick Answer
The car seat pinch test is a quick check that tells you whether a child car seat harness is snug enough. After you buckle the harness and place the chest clip at armpit level, try to pinch the strap webbing at your child’s collarbone. If you can pinch a fold of webbing between your thumb and forefinger, the harness is too loose. If the webbing slips from your fingers, the harness passes, and safety guidance from NHTSA supports this simple check.
What a pass or fail means
- Pass result: No fold of webbing lifts at the collarbone.
- Fail result: You can pinch slack, so the harness needs tightening.
- Test spot: Always test at the collarbone, not the belly.
- Chest clip: Set it at armpit level before you test.
- Clothing check: Remove bulky coats before you buckle.
What to do next
- Tighten in small steps, then retest at the collarbone.
- Flatten any twisted straps before you test again.
- Recheck on every ride, not just after install.
Welcome to a guide that answers one small question with big safety stakes. I’ll walk you through the car seat pinch test, step by step, so you can check it with confidence before every drive.
This guide covers what the test is, how to do it, and what to fix when it fails. It also covers the mistakes that make the result misleading, and when to ask a certified technician for help.
In This Guide
What Is the Car Seat Pinch Test?
A car seat pinch test is a harness-tightness check for a child car seat. It tests whether the harness straps are snug against your child’s body, with no slack to pinch at the collarbone.
People also call it the harness pinch test, the strap pinch test, or the pinch check. All three names describe the same check, done at the same spot on the shoulder strap.
A snug harness helps keep a child in place during a sudden stop or a crash. Loose straps can let a child move too far forward, which raises injury risk.
- Snug fit: The straps stay close to the body, with no loose fold.
- Even tension: Both shoulder straps feel equally tight.
- Flat straps: The webbing lies flat, without twists or bunching.
The pinch test does not check the seat installation itself. It also does not replace the chest clip check, the belt-path check, or your seat manual.
Section takeaway: The pinch test is a fast harness check at the collarbone, and a pass means no slack lifts under your fingers.
How Do You Do the Car Seat Pinch Test Correctly?
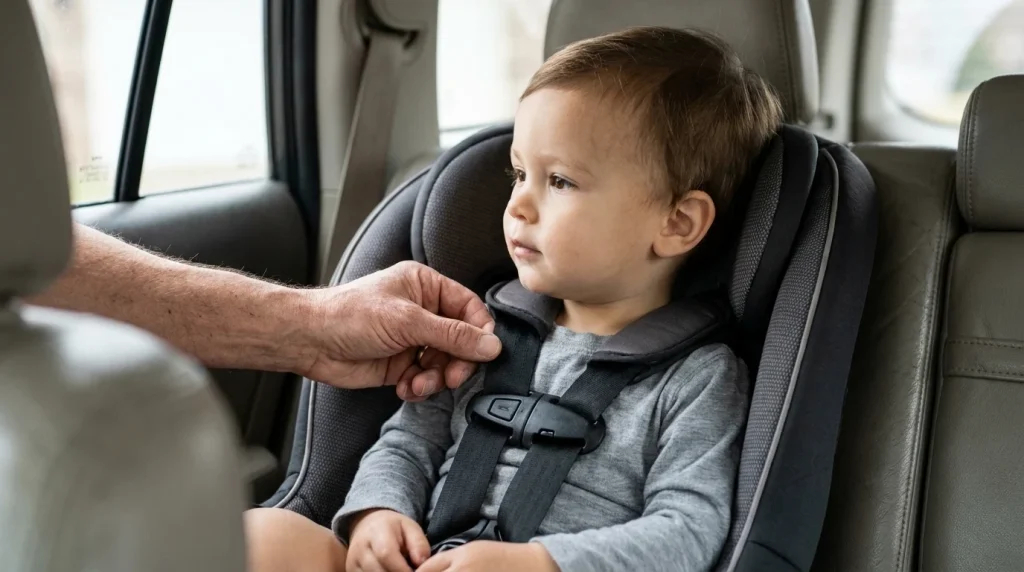
Do the pinch test after you buckle the harness and set the chest clip at armpit level. Then pinch the strap at the collarbone, not at the belly or chest.
- Buckle first: Buckle the harness and remove any bulky coat.
- Set the clip: Slide the chest clip to armpit level.
- Remove slack: Pull the harness adjuster strap until the straps feel snug.
- Find the spot: Place your fingers on the shoulder strap at the collarbone.
- Pinch across: Try to pinch the webbing across the strap, not along it.
- Repeat: Test the other shoulder strap in the same way.
Pinch across the strap, not along it, so you test for slack in the webbing. Use your thumb and forefinger, and try to lift a fold as you would pinch a piece of cloth.
As an illustrative example only, a child in a thin fleece might pass, while the same child in a puffy coat might fail. That difference shows why clothing matters, even when the harness setting has not changed.
Section takeaway: Buckle, set the chest clip, tighten, then pinch across the strap at the collarbone on both sides.
What Should You Do If You Can Pinch the Strap?
A failed pinch test means the harness has slack, and you should tighten it before you drive. Do not start with a loose harness and hope the ride will settle it.
- Tighten slowly: Pull the adjuster strap in small steps.
- Retest often: Pinch again after each small adjustment.
- Fix the clip: Return the chest clip to armpit level if it moved.
- Remove bulk: Take off a bulky layer, then buckle and retest.
| Result | What it means | What to do |
|---|---|---|
| You cannot pinch slack | The harness is snug at the collarbone | Check the chest clip, then drive |
| You can pinch a fold | The harness has slack to remove | Tighten in steps and retest |
| One side passes, one fails | Tension is uneven or a strap is twisted | Flatten straps, tighten, and retest both sides |
Tighten in small steps, and retest after each step. The harness should feel snug, but your child should still breathe and sit comfortably.
Section takeaway: A fail is a fix, not a failure of the seat, so tighten, flatten, and retest before you drive.
When Should You Check the Harness Again?
Check the harness on every ride, because fit can change from day to day. Clothing, growth, and a new install can all change the result.
- Every ride: Test after you buckle, even on short trips.
- Clothing change: Retest after a coat, sweater, or outfit change.
- Growth: Retest after a growth spurt or a harness-height change.
- Reinstall: Retest after you move or reinstall the seat.
- Washing: Retest after you wash and refit the harness pads.
A change to the vehicle seat itself can also matter, so recheck the child seat after you swap the cover underneath it. For context on vehicle seat covers, see this Astonish car seat cover review, but remember it covers a vehicle seat cover, not a child seat insert.
Section takeaway: Treat the pinch test as part of buckling up, and retest whenever clothing, growth, or the install changes.
What Mistakes Can Make the Test Misleading?
Most failed or false results come from where, or how, you pinch. A small change in spot or clothing can change the answer.
- Bulky coat: A puffy coat can hide slack under the straps.
- Wrong spot: Testing at the belly can miss slack at the shoulder.
- Twisted straps: A twist can feel tight while slack sits nearby.
- Low clip: A chest clip below the armpits can let straps slide.
- Extra padding: An unapproved insert can change harness fit.
Aftermarket pads and thick covers can also hide slack, so do not add them behind your child unless the seat maker allows them. Vehicle seat covers are a different product, as shown in this cooling car seat cover review, and they do not make an unapproved insert safe.
The same caution applies to other vehicle covers, including the one in this Sprints car seat cover review. Use that kind of review for your own seats, and use your child seat manual for anything that sits under the harness.
Pro tip: check your child seat manual first, and use NHTSA guidance or a certified technician when the manual is unclear.
Section takeaway: Test at the collarbone, in thin layers, with flat straps and the chest clip at armpit level.
When Should You Ask a Certified Technician for Help?
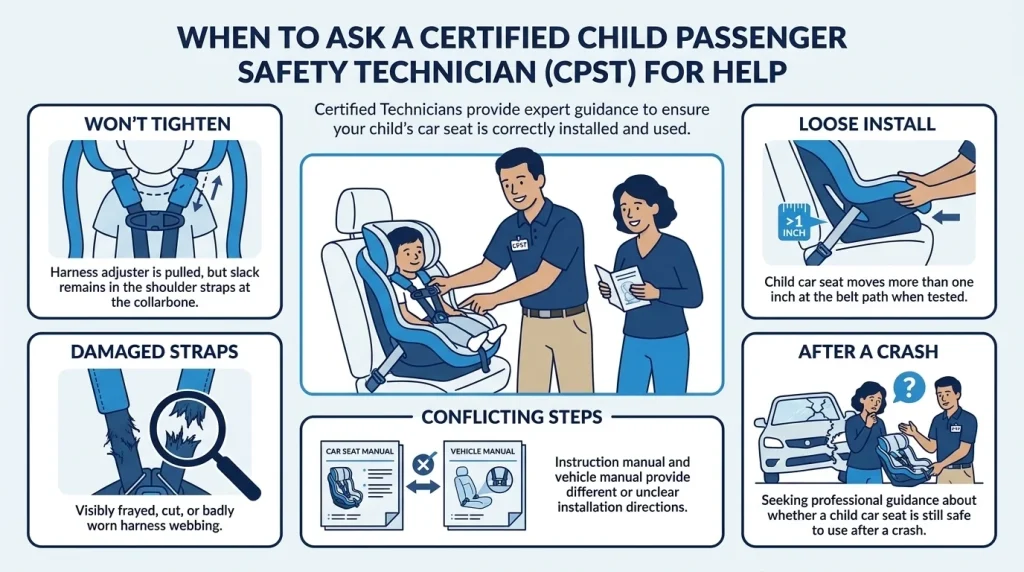
Ask for help when the harness will not tighten, the straps look damaged, or you are unsure about the install. A quick check by an expert can catch a problem that a home check might miss.
Independent ratings from Consumer Reports can help you compare seats before you buy. Your seat manual still comes first for fit, limits, and install steps.
A certified child passenger safety technician, often called a CPST, can check fit in person. The American Academy of Pediatrics also publishes child passenger safety guidance for parents.
- Won’t tighten: The adjuster pulls, but slack stays at the collarbone.
- Damaged straps: Webbing looks frayed, cut, or badly worn.
- Loose install: The seat moves more than one inch at the belt path.
- After a crash: You are unsure whether the seat is still safe to use.
- Conflicting steps: The manual and the vehicle manual seem to disagree.
Section takeaway: As of 2026, the pinch test is a daily check, but a technician check is the right next step when fit, damage, or install is in doubt.
Frequently Asked Questions
How tight should a car seat harness be?
The harness should be snug enough that you cannot pinch any slack at the collarbone. The chest clip should sit at armpit level, and the straps should lie flat without twists.
Where exactly do you pinch for the pinch test?
Pinch the shoulder strap at the collarbone, just above the chest clip on the harness. Pinch across the webbing with your thumb and forefinger, and try to lift a small fold.
Does the pinch test work for a booster seat?
No, the pinch test is for a harnessed child car seat, not a booster seat. A booster uses the vehicle seat belt, so check belt fit across the lap and shoulder instead.
Can my child wear a coat in a car seat?
No, remove a bulky coat before you buckle the harness, because it can hide slack. Use a thin layer instead, and place a blanket over the secured harness if your child needs warmth.
How often should I do the pinch test?
Do the pinch test on every single ride, after you buckle the harness and set the chest clip. Recheck after clothing changes, growth, washing the pads, or reinstalling the seat.
What should I do if the harness straps are twisted?
Untwist the straps, lay them flat, and retest the harness at the collarbone. If a strap is frayed, damaged, or will not lie flat, stop and follow your seat manual for replacement guidance.
Before your next drive: buckle, set the chest clip, and do the pinch test. If you cannot pinch slack, you are ready to go.

Daniel Brooks is an automotive writer and product researcher focused on car accessories, car tech, maintenance, and practical driving guides. At Plug-in Car World, he helps drivers make smarter automotive decisions through honest reviews and research-driven content.