How to Install a Car Seat Cover Correctly (Without Slipping or Tearing)
Quick Answer
To install a car seat cover correctly, drape the backrest from the top down, push the center chucks completely through the seat bight, and clip the bottom hooks firmly under the seat frame. Always verify side-airbag clearance along the outer seam before driving, or check our comprehensive guides at Plug In Car World for specialized interior setups.
Installation Steps at a Glance
- Remove the headrest: Press the base release tab and lift the posts out completely.
- Slip on backrest: Pull the top cover down evenly over the seat shoulders.
- Anchor center chucks: Push plastic discs flat through the central seat crease.
- Fasten lower hooks: Pull bottom straps taut and connect hooks to metal frame brackets.
- Reinstall and lock: Slide headrests back through precut slots and snap them into place.
Critical Safety Rule
- Never block side-impact airbag seams with non-compatible, uncertified slipcovers.
Most driver seat covers end up bunched into a wrinkled pile within two weeks. That happens when the anchors slip loose during daily entry and exit.
I have spent years testing automotive interior gear across electric vehicles and trucks. Getting a smooth, factory-upholstered fit comes down to anchoring technique rather than elbow grease.
What Is a Car Seat Cover and How Does It Fasten?
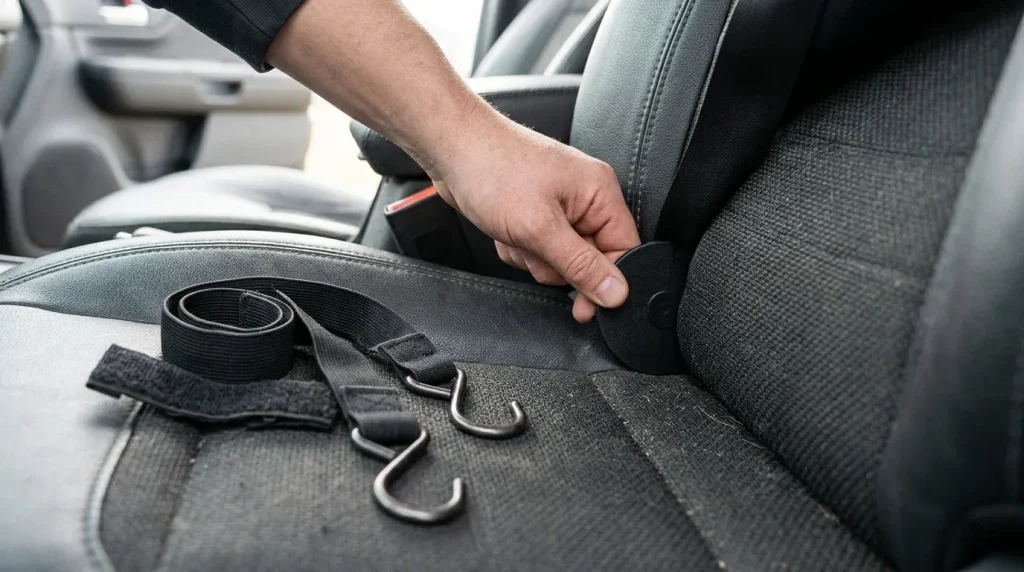
A car seat cover is a protective fabric or faux-leather shield tailored to protect original automotive upholstery from wear, spills, and UV damage.
Modern covers rely on three main hardware components to stay rigid against contoured factory foam:
- Plastic chucks (round disc anchors): Inserted edge-first through the seat bight to lock behind the frame.
- Steel S-hooks: Fastened to elastic webbing under the seat pan springs.
- Hook-and-loop flaps: Secured around headrest guide stems and side bolstering.
The seat bight is the tight horizontal crease where your backrest meets the seat cushion. Mastering that gap determines whether your cover stays flat or slips constantly.
Cheap universal protectors often skip heavy-duty tension hardware. Premium sets provide vehicle-specific straps that replicate original upholstery lines.
Tools and Workspace Preparation Checklist
You do not need specialized mechanical trade tools for this job. Having a few basic household items nearby saves bruised knuckles.
Park on level ground with all doors wide open for maximum elbow clearance. Slide the front seats entirely forward to create room in the rear footwells.
- Microfiber detailing towel
- Interior upholstery brush
- Cordless shop vacuum
- Plastic trim removal tool or dull putty knife
- Flashlight or bright LED work light
Thoroughly vacuum every seam before sliding new covers over old fabric. Trapped sand under a tight cover acts like 80-grit sandpaper against your leather.
Wipe down vinyl surfaces with a gentle cleaner so friction straps grip properly. Clean surfaces prevent unpleasant musty odors from getting locked beneath non-breathable backing.
Step-by-Step Front Seat Cover Installation Guide
Front bucket seats require patience because electronic motors and wiring harnesses occupy the underside. Take your time feeling for mounting points instead of yanking blindly.
Follow these sequence-critical steps to secure driver and front passenger covers without snagging internal seat wiring.
Step 1: Detach the Headrests
Raise the headrest to its highest notch by pressing the primary release lever. Locate the tiny pinhole on the opposite post collar.
Depress that secondary collar catch with a key or paperclip. Pull the headrest straight upward until both metal posts pull free.
Step 2: Align and Slide the Backrest
Identify driver versus passenger covers by locating the side airbag deployment tags. The tagged seam must always face the vehicle door window.
Slide the backrest cover over the top shoulders like a tailored jacket. Work the fabric down slowly in alternating two-inch increments to prevent seam tear.
Step 3: Feed and Lock the Chucks
Locate the round plastic discs stitched to the middle seam of your cover. Turn each disc vertical so the slim edge fits into the seat crease.
Push each disc firmly through the bight toward the rear footwell. Reach behind the seat, pull the disc flat, and lock it flush against the seatback.
Step 4: Secure the Seat Base Cushion
Drape the bottom cover over the seating cushion, matching side bolsters evenly. Align front skirt drops so they do not obstruct seat adjustment handles.
Feed the rear elastic straps through the center seat crease toward the rear floor. Pull the front skirt straps straight underneath the metal chair framing.
Step 5: Anchor Under-Seat Hooks Safely
Kneel on the floorboard with a flashlight aimed under the seat cushion. Locate the thick stamped-steel framing rails or heavy suspension coil springs.
Snap your metal S-hooks into static steel mounting holes. Avoid clipping hooks onto bright yellow airbag conduits, heating wires, or power seat drive cables.
Give the lower front edge three hard tugs. A properly secured cushion will not budge or bunch forward under tension.
How Do You Install Rear Bench Seat Covers Correctly?
Rear bench covers require a different strategy because rear seats do not have open access underneath. You must release the lower cushion to anchor straps correctly.
Solid benches, 60/40 split configurations, and integrated center cup holders each demand specific strap routing.
Here is how the main seat configurations compare when mounting covers:
| Bench Style | Difficulty | Typical Removal Method | Key Installation Trick |
|---|---|---|---|
| Solid Bottom Bench | Moderate | Front center push clips or 10mm rear bolts | Pull bench entirely into driveway for tensioning |
| 60/40 Split Folding | Low to Moderate | Fold seatback flat using shoulder release latch | Zip center cover sections together before strapping |
| Fold-Down Armrest Bench | Moderate to High | Seatback folded forward, armrest deployed | Tuck hook-and-loop flap deeply into armrest hinge gap |
Most modern car rear bench bottoms pop loose with quick-release tabs. Place your hands beneath the front edge of the cushion directly aligned with the footwells.
Yank sharply upward to release the spring clips from the floor pan. Guide the seatbelt buckles through their precut holes before carrying the cushion out.
Lacing rear straps across the removed bench outside the car guarantees a drum-tight fit. Click the cushion back into floor latches once straps are secured.
Critical Airbag Safety Checks You Cannot Skip
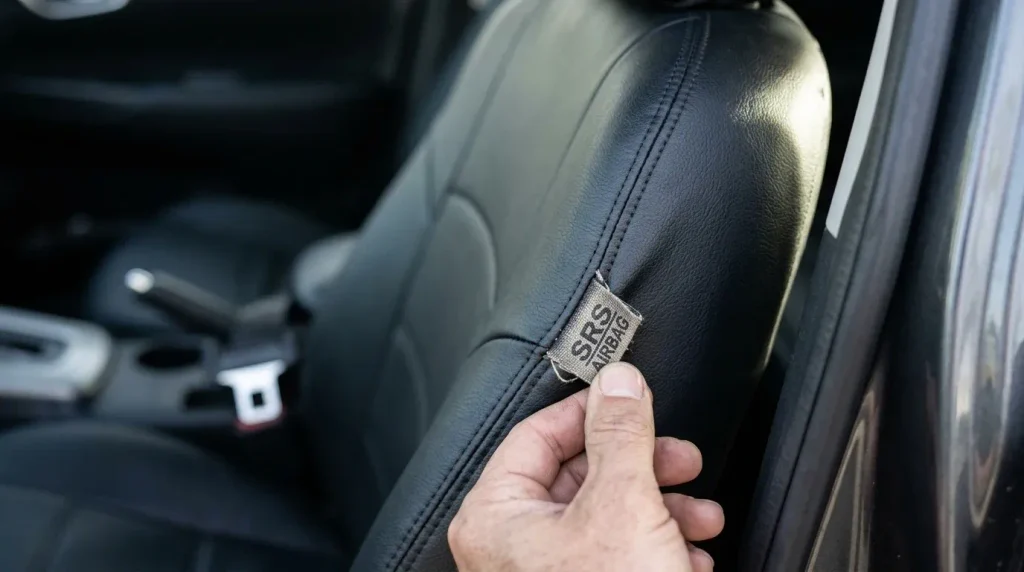
Modern vehicles contain side-impact torso airbags packed inside the outer backrest bolsters. An incorrect seat cover can prevent an airbag from opening during a collision.
The National Highway Traffic Safety Administration emphasizes that auxiliary seat covers must never impede emergency restraint deployment.
Verify that your seat covers carry documented airbag compatibility certification before driving. These covers feature specialized burst-thread stitching or dedicated open side cutouts.
Look for fabric labels marked “AIRBAG” along the outer edge. If you switch the driver and passenger sides accidentally, explosive airbag deployment will be blocked.
Inspect child safety seat clearance along rear rows according to Centers for Disease Control and Prevention restraint standards. Never run seat cover straps across lower LATCH anchor bars.
Check that seat belt female receivers sit completely outside the slipcover skirts. Never bury safety hardware inside protective covers.
How Do You Eliminate Wrinkles and Prevent Shifting?
Wrinkling happens when there is dead air between original seat curves and thick aftermarket material. Faux leather and neoprene require warmth and tension to shape correctly.
Park the car outside in direct sunlight with the windows rolled up for two hours. The solar heat softens dense vinyl and relaxes tight packaging creases.
Work creases out from the center outwards toward the bolsters using clean palms. Re-tighten under-seat straps once the material has expanded from the cabin heat.
Use a plastic trim removal tool to push extra material beneath headrest post plastic bezels. This single finishing trick gives universal sets a custom-tailored factory appearance.
If you’re ready to pick one, here’s what I’d actually recommend for durability, grip, and straightforward installation:
🏆 Best Overall
Oasis Auto Faux Leather Covers
★★★★★
High-density multi-layer synthetic leather with reinforced chuck anchors and side-airbag certified stitching. I found the tailored bolster panels fit curved modern seats better than generic universal options.
💰 Best Budget
FH Group Universal Cloth Covers
★★★★☆
Breathable polyester cloth fabric backed with 3mm foam padding and flexible hook loop fasteners. It takes less than twenty minutes to mount on daily drivers without popping any rear seat clips.
🚛 Best Heavy-Duty Protection
Covercraft Carhartt Duck Weave
★★★★★
Heavy-duty ring-spun cotton duck canvas treated with water repellency and sewn with double overlapped seams. These covers survive muddy tools, dogs, and farm chores without shifting out of position.
Frequently Asked Questions About Car Seat Cover Installation
Do you have to take seats out to install car seat covers?
No, you do not need to remove front seats to mount covers. Most front buckets install inside the cabin using push-through chucks and lower spring clips. Only solid rear bench cushions occasionally require popping forward release tabs.
Can you put seat covers on heated and cooled seats?
Yes, but material choice matters. Breathable perforated cloth covers allow heat and climate ventilation to pass through normally. Thick non-perforated neoprene or foam-backed vinyl significantly dulls temperature transfer and slows seat warming cycles.
Why do my car seat covers keep slipping around?
Covers slide when center chuck anchors are not flipped flat behind the seat crease. If the disc pulls forward through the gap, bottom cushion tension collapses. Check that under-seat hooks attach to rigid steel rather than flexible wire harnesses.
How do I know if my seat cover is airbag safe?
Check the outer side bolster seam for an official stitched tag labeled Airbag or SRS. Safe covers feature loose burst stitching that blows open instantly or leave outer seat shoulders completely unobstructed for unhindered side deployment.
Final Checks Before Hitting the Road
Cycle your front seats fully forward, backward, up, and reclined to verify the harness straps do not bind against electric slide rails.
Buckle every seat belt once into its matching buckle receiver to confirm clear access. Re-tighten underneath strap hooks after two weeks of normal commuting to lock in your custom fit.

Daniel Brooks is an automotive writer and product researcher focused on car accessories, car tech, maintenance, and practical driving guides. At Plug-in Car World, he helps drivers make smarter automotive decisions through honest reviews and research-driven content.